Firestone 2hp 10A130 restoration project

Plankwalker

Petty Officer 3rd Class
Joined
Sep 28, 2020
Messages
79
The flywheel is off. It took most of the day, but I am super happy about the condition of the ignition coil. It looks brand new.
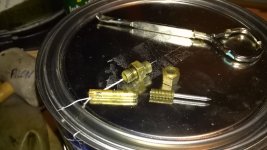
The carb is all cleaned up. I just need a small parallel slotted screwdriver to get the main jet out before I put it all back together.
I posted a youtube video with the Flywheel removal.
I hope to do weekly additions during the restoration.

IMG_20201025_085803.jpgIMG_20201025_085751.jpgIMG_20201025_144722.jpg
 

Attachments

  • IMG_20201025_085741.jpg
    IMG_20201025_085741.jpg
    1.5 MB · Views: 12
Last edited:

Plankwalker

Petty Officer 3rd Class
Joined
Sep 28, 2020
Messages
79
Making progress. Piston and crank shaft are removed and I am cleaning parts. Almost ready to start masking parts and packing them up for delivery to a guy I know for blasting and priming.
IMG_20201028_214937.jpgIMG_20201028_214954.jpg
 

Plankwalker

Petty Officer 3rd Class
Joined
Sep 28, 2020
Messages
79
I am going to add a vent to my garage this weekend. The fumes are making me light-headed. Sorry for the crappy audio on the first youtube video. Here is episode 2:
Episode 2
 

Plankwalker

Petty Officer 3rd Class
Joined
Sep 28, 2020
Messages
79
Installed two exhaust vents and little heater to keep me warm this winter while I work on the engines and the boat. Episode 3 is ready.
IMG_20201031_104842.jpg
 

Plankwalker

Petty Officer 3rd Class
Joined
Sep 28, 2020
Messages
79
Built a rack to hold my outboards, fixed a major dent in the hood, and started cleaning some parts of the motor. Here is Episode 4.
IMG_20201108_145202.jpg
 

Plankwalker

Petty Officer 3rd Class
Joined
Sep 28, 2020
Messages
79
I opted to strip and prime the engine parts myself. I started with a 6" brass wire wheel and I will follow up with some buffing to smooth out the surface. Not to a mirror finish, but just to a create a smooth paint finish.
I have order high heat primer and paint and some additional sanding tips for the Dremel to get into some of the tiny corners.
I will likely use bono to fill some of the divots in the propeller.
I have been researching some ways to take the dents out of the gas tank. I will try a technique called paintless dent removal or PDR. I hope it works.
 

Plankwalker

Petty Officer 3rd Class
Joined
Sep 28, 2020
Messages
79
Pulling the dents out of the gas tank did NOT work. That just means I will be filling them with a combination of epoxy and bondo. Check out my failed attempts here.
IMG_20201115_140513.jpg
 

Plankwalker

Petty Officer 3rd Class
Joined
Sep 28, 2020
Messages
79
Sorry for not posting any updates for awhile. My time is split between work and family, and sometimes I decide to take a pee with the extra minute I have of free time. I have been slowly working on the dents in the gas tank. It is a slow process of applying epoxy and sanding it smooth. I am almost done.

IMG_20201229_172709.jpg
 

Plankwalker

Petty Officer 3rd Class
Joined
Sep 28, 2020
Messages
79
First coat of primer on the gas tank. I need to wait at least 48 hours before I apply a sandable/filler primer. In the mean time, I start cleaning the engine block to get it ready for new high-temp primer and paint.
20210314_103913.jpg
 

brim_buster

Lieutenant Junior Grade
Joined
Jul 9, 2013
Messages
1,203
I feel your pain. But after all this work you will have a vintage, running boat motor that will not only look good and run but you did it yourself.
 

Plankwalker

Petty Officer 3rd Class
Joined
Sep 28, 2020
Messages
79
Engine block, lower unit and intake manifold get High Heat primer. Next, I rebuild the carburetor and prepare any outward facing bolts for paint.20210320_210446.jpg20210320_212216.jpg
 

Plankwalker

Petty Officer 3rd Class
Joined
Sep 28, 2020
Messages
79
Testing finishes before painting. I was concerned about mixing types of paints and whether or not to use a 'clear coat' or lacquer to fix the decals and then cover the top portion of the gas tank. I created a test strip. The enamel high heat engine paint covered really well over both the high heat primer and the regular filler primer. The clear coat ate through the paint I was going to use for the tank. Not sure why. The test strip was allowed to dry at room temperature for more than 48 hours. The lacquer worked much better. However, the lacquer I tested with was white. I have a clear lacquer in the mail.

You can check out the final sanding of the tank and the priming of the parts here:
Firestone 2hp outboard: Episode 6 - YouTube
Firestone 2hp outboard: Episode 7 - YouTube
20210322_095238.jpg20210322_095240.jpg20210322_095242.jpg
 

Plankwalker

Petty Officer 3rd Class
Joined
Sep 28, 2020
Messages
79
I decided to test the clear coat a second time. No wrinkling this time. Three light coats, exactly 15 minutes apart. The finish is better than the lacquer and I think the clear coat has better UV protection.
Now I am testing the effect of spraying clear coat on the decals for fixing the pigment.
 

Plankwalker

Petty Officer 3rd Class
Joined
Sep 28, 2020
Messages
79
Time to work on the Carburetor. I managed to find an identical carb on ebay. Between the two of them, and a carb kit, I hope to be able to create one fully functioning carb. The lower half of the carb that came with the engine had some pitting where the gas bowl is supposed to seal against the carb, but the same piece from the second carb needs some thread repair where the brass cap covers the jet and needle.
I opted to repair the threads. I applied some JB Weld to the damaged threads and tomorrow I will re-tap the threads before preparing the housing for paint.
c1.jpg
The cap does not need any major torque, and the JB Weld, once cured, works well for repairing gas leaks.
I will video the reassembly. Also, before dismantling the carb completely, I made certain to take lots and lots of pictures.
c2.jpg
 

Plankwalker

Petty Officer 3rd Class
Joined
Sep 28, 2020
Messages
79
Its really coming together now. The scariest part of the build is the finish on the gas tank. I painted the prop the same antique white as the tank and every time I spray a clear coat on the prop, the paint bubbles up, just like with the test strip I did. Now I need to strip the prop down again and start over.
Both the paint and clear coat are rustoleum. Ironically, I have had no problem with the clear coat over the dupli-color high heat paint on the mid-section an mounting bracket. I ordered another clear coat; a dupli-color brand. I will test it first on the prop before doing the clear coat on the tank.
The tank has gotten its final spray and after it fully cures, it will get a 1000 grit wet sanding before the decals are applied.
Check out the gearcase, mounting bracket, and recoil starter assembly. Dealing with that coil spring was less scary than I had imagined.
Firestone 2hp outboard: Episode 12. Mounting bracket, gearcase, & recoil. - YouTube
mid section.jpg
 
Top