DP-SM, Transom Seal Leak & Engine Mount Help

cyauch

Petty Officer 3rd Class
Joined
Jul 10, 2020
Messages
91
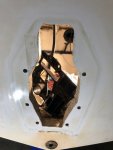
Two weeks ago hit something underwater harder than i;ve ever hit before. Noticed no vibration or steering issues. And after a quick check of the props and skeg figured all was good and i was lucky....so i thought. Later in the day noticed auto bilge kick on, and 10 minutes later kick on again. turned engine off, lifted access, and saw that water rose slowly until pump kicked on. then i hear what sounds like water dripping / slow streaming in. Hard to describe the sound, but imagine your sink stopped up and a little trickle of water comes out of faucet and lands in the stopped up water.

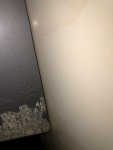
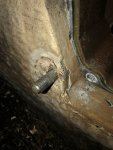
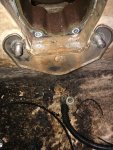
Next day, filled bilge are with water and noticed water leaking past transom shield on right / stbd bottom. Close look showed a 1/16 " gap between the shield and the hull but was hull flush everywhere else. I haven't confirmed yet, but i think the inside plate at the bottom of the transom may have deformed a little. Saw a couple video's and posts where most say hammer it flat and run with it. I may try that if that's the true problem and not something else. Still, i've run into several other 'problems' i need advice on please.


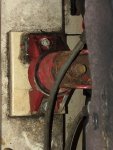
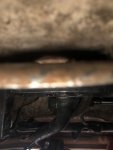
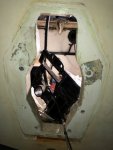
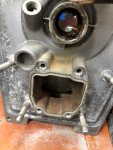
So, pulled the out drive and noticed it appears previous owner wasn't doing yearly maintenance or checks on the gimbal bearing. that bearing makes noise when i turn it by hand and some water did come out the bellows. I do plan on replacing the bellows and bearing. In fact, I'm gonna pull the entire gimbal housing off and clean it up also so i can make sure i get a good seal on the bellows.


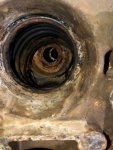
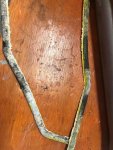
The u-joints are kinda rusted up, but look good otherwise. Should i replace? From what's seeing, the u-joints are not sold individually but i have to get the entire shaft? Read a few others posts on here saying different but I'm a noob to VP's

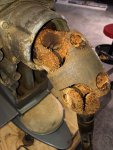
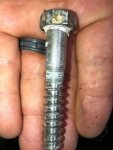
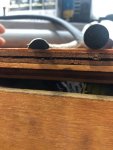
So i have the OD off, and engine is ready to pull. However, i could not get the top nuts to the mounts off. In fact, one was pretty corroded and seemed to start rounding so i stopped and pulled the two hull mount lag bolts. they came out clean and easy


My thought it to replace the mounts with engine out (understood engine alignment required) rather than fight with it for hours only to have to pull the lag bolts after rounding the nuts anyway :)

I guess after all this

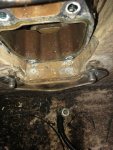
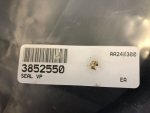
1. Any special alignment procedures i need to perform after -reattaching the transom shield to the hull? What specifically do i enter for the model / ID of the transom shield and gimbal housing? my OD is a DP-SM per the label plate, but only the transom shield and gimbal housing show up when i look at SX-M, -MHP etc. Based on on what i read, SX is same for all OD's?

2. Working on older Mercs, there was also a new gasket that mated between the outdrive and the gimbal housing. I don't see this in the VP service manual for the OD. I assume a liquid gasket type material is used, but i don't see it specified in either the gimbal / transom sealant and gasket diagram or the upper gear housing to gimbal housing sealant and gasket diagram?

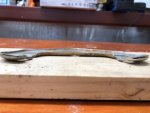
3. Best way to re-bed engine mounts back to hull? My thinking was clean up the holes of prior sealant, wipe and clean the area, and put 4200 on the shoulder area of the lag bolts as well as on the bottom the engine mounts then bolt them down. Didn't see any evidence of sealant inside the holes or on the lag threads so kinda leary about adding any. And i can't find anything anywhere about torque. would sure hate to strip them out. Any suggestions? Snug should be ok right?

Again, thanks to anyone who can offer up info and / or suggestions. I've tried to search and compile info from here and other sources, and i love to rebuild / build things, when it comes to a boat, what may work in a non-boat environment may not work in the wet world
 

Attachments

  • TransomeShield.jpg
    TransomeShield.jpg
    23.4 KB · Views: 5
  • enginemount.jpg
    enginemount.jpg
    60.2 KB · Views: 4
  • Gimbal.jpg
    Gimbal.jpg
    58.4 KB · Views: 6
  • ujoint.jpg
    ujoint.jpg
    64.5 KB · Views: 5
  • lagbolt.jpg
    lagbolt.jpg
    53.9 KB · Views: 5

dypcdiver

Lieutenant Junior Grade
Joined
Nov 1, 2005
Messages
1,018
1....Workshop Manual AC
2(2)
Sterndrive
SX-M, SX-MTD
DP-SM, DP-SMTD, DP-SMTD1
Transom Shield
SX-M, SX-MLT, SX-MACLT,
SX-MHP, SX-MDA, SX-MDB
Sterndrive
Transom Shield

7743008 English 07 - 2003

Try Google, that's what I did, it is a 6Mb PDF.

2....Not the same as Merc's all in the manual above

3....As you suggest, nice and snug,

The 'U' joints look a bit too crusty to me, they can be rebuilt without removing the input shaft, just need to make a tool to allow you to press the caps out. There is a section in the 'Adults only' at the top of the page that explains, new ones available from motor parts suppliers.
 

cyauch

Petty Officer 3rd Class
Joined
Jul 10, 2020
Messages
91
Thanks! For the manual, i've been using the one via a link in the Adults Only section. ( http://boatinfo.no/lib/volvo/manuals/sx_dp-s_drive.html#/0 ) I'll crawl the web for the info you provided


For the housing gasket, i ran across a post on here for an SX and there was a small note about it. Post said no gasket and that only 3M gasket is needed on the 'o-ring' around the water pipe and that when the OD is re-installed, the u-joint bellows forms the top seal with the OD. Your post confirms that for me so i feel better now :)

Again, thanks! got the engine out last night now its time to continue with disassembly of the transom parts and see what, if anything, else is damaged then start ordering....
 

dypcdiver

Lieutenant Junior Grade
Joined
Nov 1, 2005
Messages
1,018
Here is a photo of my tool for pushing out the UJ's it needed to have a bit removed to clear the input shaft housing.
Have fun

fetch
 

Scott Danforth

Grumpy Vintage Moderator still playing with boats
Staff member
Joined
Jul 23, 2011
Messages
47,573
holy lack of annual drive maintenance batman

with the u-joints that rusted, your input seal will soon be going as rust is migrating to the seal surface, so you need to pull the upper transmission apart to replace the U-joints and more-importantly, the input shaft seal

you will need to set rolling torque

in the stickies are cross-references for just the U-joints. however you will need to address the rust on the rest of the double cardan joint parts.
 

cyauch

Petty Officer 3rd Class
Joined
Jul 10, 2020
Messages
91
DypC - Thanks! based on what i've read from links in the Adult Only section and other posts here, those are inside snap-rings so i should be able to walk into Napa or any parts house and match them up and walk out?

Scott - I know right?

Full disclaimer, i bought this boat this Spring. We had a pontoon we sold that we didn't expect to be sold in a week so we went out looking for a center console or a cuddy. Read allot of good things about Regal's, hull is sound, and overall, is a solid boat for being 15 years old. So far havent found any wood, even in the two seats i re-upholstered (1" plastic / abs in place of wood) The price was right and i knew I would be pulling the OD this winter anyway to do a good cleanup as well as polishing up the gel coat all around plus a few minor fixes here and there on the deck hardware. When i saw that GB i just about fell out. there's no way in heck that can't be the orig GB and UJ's.

Good news on the UJ's is that i did wire brush a few spots and they started to look new again :) Ibut I'm probably gonna just replace them this winter. Still have another couple months we can go out to the islands so....

Got everything order to put exhaust and drive back together. Engine is out. I expect to be able to determine tomorrow night if the bearing plate at bottom of inside transom is bent (i hope that's why water is leaking), but i also think that knock on the underwater object may have also jarred some rust loose in the GB and water may have been coming in there. I see light 'rust' on top the exhaust Y like water was dripping there.

I also noticed an alignment quirk of the gimbal housing and transom shield; almost like its cocked counter clockwise 1/8". Never noticed it this year so maybe its been that way since i bought it and i'm just noticing because i'm now super sensitive to anything that looks broke or wrong. who knows. I'll take a pic tomorrow and post that to see what ya'll think.
 

cyauch

Petty Officer 3rd Class
Joined
Jul 10, 2020
Messages
91
So an update. Got the exhaiust Y out and low and behold, i now know why there was a leak from the transom shield. Pretty sure the bottom bearing plate is a little bent AND it appears the fiberglass where its mounted to has 'sunk' or compressed in. Good news there's no visible fiberglass or hull damage (i.e. cracks, softness, seperaration, etc). Tap with a small mallet all over the place and the sound never changed. I think that 'wear' spot is from the exhaust Y too.

But with the pics i took, pretty sure that bearing plate is supposed to be flush both at the top two holes and at the bottom when placed against the transom. Even if i use a mallet to get rid of the slight bend at the ears (see photo), that's not gonna be enough to make up the gap.

So questions are (pics attached. file names are descrip)

1. is the plate supposed to in fact be flush against transom at the ears (stud holes) and bottom?

2. Best way to close that gap to make it more flush? I'm thinking 3 - 4 inch x 3 inch strips of fiber glass cloth layered to make a 'block'. then come from outside existing hole and drill to complete the hole thru these layers. I'm thinking a block and won't be able to wrap in that hole since its a very tight fight for the exhaust Y to mount

3. The plate appears to be stout so i think i can get a little of the bend out. I looked on line for replacement using the part number from Marine Parts Europe and the image in the diagram matches, but when Googling that part number, the images are completely different. Does / should that matter? As an example, the PN is 21446681. Images returned show something similar, but different. And i see no PN stamped on this one.

Thoughts / suggestions?

To me, it looks like whoever owned this before me hit allot of stuff :) and my stump hit a few weeks ago was the final straw. That might be a silver lining as i was gonna pull the OD off this winter to go through it since it's new to me anyway. I guess this i only have to pull it off once, but allot of other stuff will be addressed so i don't have to the OD or engine out potentially more than once.
 

Attachments

  • bearing_plate.jpg
    bearing_plate.jpg
    22.2 KB · Views: 6
  • plate_flush_top_gap_bottom.jpg
    plate_flush_top_gap_bottom.jpg
    26.8 KB · Views: 6
  • plate_flush_bottom.jpg
    plate_flush_bottom.jpg
    69.9 KB · Views: 6
  • transom_stud_thru_hull.jpg
    transom_stud_thru_hull.jpg
    54.1 KB · Views: 6
  • plate_flush_top.jpg
    plate_flush_top.jpg
    84.9 KB · Views: 6

cyauch

Petty Officer 3rd Class
Joined
Jul 10, 2020
Messages
91
Kinda hammered the plate straight and re-installed. bolted back up the exhaust Y then put 30 gals water in the bilge. while not near as bad as before, there is still some water seeping from the transom shield on the back of the boat. Seeps out from the bottom on the outboard corners. dry as a bone around the exhaust port on the bottom. I don't have a pine tree near me but found a couple pine needles behind the inside transom plate...what what looks like maybe 4200 here and there. So now I'm wondering if its been removed in the past 15 years, and if it was, was the transom seal replaced or just re-used. ugh. So much for hoping things would fall into place for use this weekend.

So tomorrow starts the journey of removing the entire transom assemblies. Might as well do a rebuild of it all while its out.

Still looking for any input on what to do about the area around the two studs for the bearing plate. Also, the VP manual says not to use any sealant (I assume 4200 or similar) when mounting to hull. Just the seal. Never owned an inboard / outboard. Is this standard practice to not do this? Seems like I'd want an extra barrier just incase that seal does fail.
 

cyauch

Petty Officer 3rd Class
Joined
Jul 10, 2020
Messages
91
Good news and an update....have a couple questions about transom gasket and sealer or no sealer...

Everything off the boat and cleaned up. No cracks, breaks, or any apparent structural issues. Based on the amount of 4200/5200/rtv-like stuff between the gimbal housing and hull, pretty sure the stump hit jared the GH a little and the crud underneath prevent it from sitting flush again. whew.

I cleaned up the hull and the GH. lots of corrosion on the GH. While i'd love to break it down to parade rest and send it out for re-paint. i honestly don't have the funds for that right now so plan is to save the next year and have it done next winter. In the mean time

1 Best way to slow additional corrosion?

2 When mounting back to boat, is the gasket that goes around the entire GH sufficient? I can't find anything in the VP manual that says to use a sealant / caulk / rtv, but does say don't put anything on the new seal.

3. If i do use sealer, i don't want to plaster it in there like before (unless i need to?) My though was like small engine, circle around each thru-hole with a thin line from one hole to the next (like connect the dots) for each side. then do another line around the exhaust port on the GH itself.

4. Of all the bolts, screws, etc that failed, it was only one of the small bolts that holds the trim sensor in the right GH bolt hole. Thinking here is i'm gonna dremmel it flat, try and drill it out and re-tap. worst case, grind it flush and drill a new hole and tap.

I was gonna first try the seal only and fill the bilge to see if it leaks. If not, then run the sealer plan. what kind recommended? 4200, 5200, ??

All in all i am relieved no damage to the hull, transom, or OD / GH. It is very apparent owner did no maintenance to the OD. the rear pivot pin was a PITA also. LOTS of heat and a chemical concoction of WD40, PB Lubricant, PBlaster, Lithium Grease, 3-in-1 penetrating oil, two vice grips, a 10" pipe wrench, and two ball-joint splitters, it finally came out. had to grind the ends to remove the massive mushrooms i created, but i won.
 

Attachments

  • clean_transom.jpg
    clean_transom.jpg
    33.1 KB · Views: 6
  • before_clean_transom.jpg
    before_clean_transom.jpg
    41.7 KB · Views: 6
  • gimbal_housing_clean.jpg
    gimbal_housing_clean.jpg
    67.1 KB · Views: 6

muc

"Retired" Association of Marine Technicians...
Joined
Jul 7, 2004
Messages
2,064
Red flag that there was sealer between gimbal housing and transom. It means there was a problem before and someone who doesn’t know what they are doing smeared sealant all over to try and fix it. Sealant can only hurt. It can’t help because there is too much push and pull going on

Another red flag, the “sunk” area around the 2 bolts. This only happens when the wood is soft or someone really over torqued the nuts. Either way it should be replaced/repaired. I’m a mechanic so I can’t help on how to fix it. But I would be probing the inside of those holes and thinking about having a quality “glass guy” take a look.

Because someone has been doing funky things. I would give a close look at the transom. Is it within spec for flatness, parallel and thickness? Also check flatness of the gimbal housing.

A light coat of weatherstrip adhesive on the gimbal housing to hold the new seal in place.

Clean, prime and paint the bad areas. Check that all bonding / continuity wires are working.
 

cyauch

Petty Officer 3rd Class
Joined
Jul 10, 2020
Messages
91
Thanks muc. I agree i was a little shocked to see the sealer there. The gasket around the GH is completely toast so my hope is the previous owner maybe had a leak and his mechanic simply put some sealer in there. Seems like allot of work just for that unless there was something else done (that hasn't hit me yet).

Last night i spent an hour with a small spade-type tool (like a dentist's but bigger) and went through each hole and all around the key hole. no sponginess, softness, and it never stuck in anywhere so at this point i feel confident all is sound there. I do have a friend coming over who does glass work to take a look (does RV's so....) but again, everything is hard in the transom. won't even flex when pushed on with or without the motor.

Didn't think about running a straight edge over the back to see if there's any deflection not detectable by the eye alone. Thanks for that tip.

And yes, given the hardness of those two sunken stud holes, i'm fully convinced they were over-torqued. Will wait to see what the glass guys says, but if all good there, i have the resin and fiber cloth to build those two areas up again and see how that goes.

First batch of parts come in tomorrow hopefully and includes the new transom seal. The plan is to put that on the back of the GH and re-mount to the hull then fill the bilge and see what happens. If there's still leaking, and glass guy says transom is solid, i might sparingly use some sealer to assist. Dunno yet.
 

cyauch

Petty Officer 3rd Class
Joined
Jul 10, 2020
Messages
91
First batch of parts came in! But i have some questions about the types of sealers and adhesives listed in the manual. Using the included screen shot of the manual as reference

First, 3M 1300 (A) is called for for the exhaust Y gasket and the transom shield seal (gasket to hull). No where local sells that except for Fastenal and they want me to buy a case (36 count) for darn near $900! NOT! It looks like that's to basically hold the gasket in place until its mounted anyway (i.e. vertical surface). Is there an alternative? Will Merc bellows adhesive work in its place?

Can I / Is It ok to use Permatex in place of the plain labeled 3M Adhesive (D) or something else? For the two items identified, I assume to you place a bead on top of the rubber o-ring? (i've never done that and seems counter intuitive so....)

For the Greases (F) and (B), my plan is to use either 'normal' marine wheel bearing grease or prop shaft grease. I thought i had some Royal Purple but i'm out at the moment.

And for thread locking (E) i have Locktite Red and Blue, plan was to use Red. I need to the check the numbers though to see if its a good alternative
 

Attachments

  • grease_and_sealants.PNG
    grease_and_sealants.PNG
    143 KB · Views: 6

muc

"Retired" Association of Marine Technicians...
Joined
Jul 7, 2004
Messages
2,064
I use 3M weatherstrip adhesive for A, you could use bellows adhesive. Small bead in the groove, just enough to hold it in place.

I use mercury perfect seal for C+D, you could use permatex #3. Paint light coat on gaskets, o-rings and all threads that might get exposed to water.

I use red locktite for E, I also put it on both the hinge pin bolt threads, seen too many of those come loose.

I use mercury 2-4-C for B

I use mercury extreme grease for F

Any grease will work ---- but ----- you rarely get quality you didn't pay for.
 

cyauch

Petty Officer 3rd Class
Joined
Jul 10, 2020
Messages
91
Thanks Muc!

Forgot to also mention the friend of mine how does glass work did come by. Spent a while looking it over, tapping, and finally drilled a few holes from inside and looked the shavings over. All come out dry (thank gawd) but he also told me the transom doesn't have wood. I honestly don't remember what he said exactly as its been a few days and other things have occupied my time waiting on parts.

He was able to determine, however, there was a slight deflection inwards between the two stud holes at the bottom of the keyhole. I think it was a .001 feeler gauge he was able to slide in, but everywhere else nothing would go through. Told me not to worry about it? Looking at the new seal that came in today it's massive compared to the one I pulled off so I don't think I'm gonna sweat this.

R/
 

cyauch

Petty Officer 3rd Class
Joined
Jul 10, 2020
Messages
91
Just wanted to make sure i got this before i roll with it.....Installing shield back to transom.....

Rope gasket in groove held in place with 3M weather adhesive. I read some used a small bead of 4200 but opted for route Muc suggested.

I read, re-read, re-re-read, and re-re-re-read the service manual. No where can i find where it says to use 4200 / 5200 or similar around thru hull holes, anywhere on the shield, etc. In other words, the rope gasket is the only thing that will be stopping water from coming in....right?

The new rope gasket is massive compared to the old one (assuming the old one is original). Hope that sucker will compress with the torque the manual specs out :)

I thought old gasket had some 4200 / 5200 it was bedded into, but closer inspection revealed there where some black sections and the white was corrosion that stuck to the gasket when it was pulled off. Yea, i sanded, primed, and painted the channel, then used the 3M Weather Strip adhesive Muc mentioned and bedded the new gasket and ends.

so in the key hole pic, should i put some 4200 / 5200 around the stud holes or leave as is? Again, manual doesnt call for it but....
 

Attachments

  • clean_transom.jpg
    clean_transom.jpg
    33.1 KB · Views: 3
  • old_and_new_transom_seal.jpg
    old_and_new_transom_seal.jpg
    42.9 KB · Views: 3
  • top_old_transom_seal.jpg
    top_old_transom_seal.jpg
    68.6 KB · Views: 3

muc

"Retired" Association of Marine Technicians...
Joined
Jul 7, 2004
Messages
2,064
Agree the seal looks big. But it’s been awhile since I did this job. Did you get it from Volvo for your TSK serial number?

sealant won’t help around those holes.
 

cyauch

Petty Officer 3rd Class
Joined
Jul 10, 2020
Messages
91
Thanks Muc. I'll omit putting any sealant around holes or on the shield itself.

As for the gasket, yea, i ordered that without knowing about serial numbers so i may screwed myself on that. I hope not. Here;s what i did. I could only find a stamped ID tag on the OD itself (told me it as a DP-SM Ratio: 1.95) Once i pulled the engine the only other tag i could find was the photo below. I couldn't find any other stamped tags on the GH or shield itself.

Based on that tag Type value, i went to VP shop and determined #7 is / was the part i needed. If i get blasted for posting a link i'm sorry. If the link doesn't work I went to VP Shop>Marine Drives & Transmissions>TSK SX-M; TSK SX-MACLT; TSK SX-MBAC; TSK SX-MHP>Transom Shield then selected the TSK SX-M one.

It appears that part is also the same for the other TSK SM-xxxx ones, but .....
And, from Marine Drive & Transmissions, i selected the item below TSK SX-M; TSK SX-MACLT; TSK SX-MBAC; TSK SX-MHP link and looked that the different transom shields there also (appear to have different water inlet pipe sizes), and the gasket there is also the same part number

If i messed up or missed something, please let me know. If i got it right, great! I don't mind eating the cost and getting another if i screwed up Since this is the part i'm pretty nervous about getting right, i'd rather know now if i got the right stuff or need to rewind and get the right stuff :) As always, thanks! I certainly appreciate your continued input and info to this.

Even though i develop software for a living, and tune diesel trucks as a hobby, I'm out of my element with VP so somewhat gun-shy. I love to turn a wrench and enjoying learning how to work on this baby.
 

Attachments

  • shield_part_number.jpg
    shield_part_number.jpg
    17.4 KB · Views: 1
  • inner_plate_id.jpg
    inner_plate_id.jpg
    19.8 KB · Views: 1

muc

"Retired" Association of Marine Technicians...
Joined
Jul 7, 2004
Messages
2,064
That is the right part number.
 

cyauch

Petty Officer 3rd Class
Joined
Jul 10, 2020
Messages
91
Thanks. gonna be on hold for a day or two. Hurricane / Storm preps
 
Top