DIY Upholstery & Canvas Repair Advice

Old Ironmaker

Captain
Joined
Dec 28, 2015
Messages
3,050
A common theme with these machines are that the seller's say they are moving and can't take the machine with them ( yea right :rolleyes: )

:

Friends of ours are downsizing and that is exactly why they want to sell us their machine. Can't remember exactly which it is but I do know it's a walking foot whatever that is. I can't sew a button on a shirt. I think I am going to hold out long enough to get the family price.
 

tpenfield

Moderator
Staff member
Joined
Jul 18, 2011
Messages
18,092
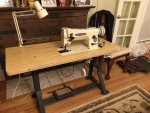
I came across this machine today. . . it is a Consew 206RB-4 . . . the one that I was hoping to find.

IMG_3456.JPG

:)

I'll spend the next few days getting it all adjusted, etc. and trying out a few test pieces.
 

tpenfield

Moderator
Staff member
Joined
Jul 18, 2011
Messages
18,092
To summarize, I thought that I would share my findings, having done a search for machines that would be capable of (and good for ) vinyl upholstery & canvas work.

I got the Consew 206RB-4 for $500 :D which is a really good price (IMO). the machine I got was purchased originally in 2003, so it is 15+ years old. Still seems to be in good shape . . . needed some oiling, which I took care of.

For anyone looking at a machine for this kind of work, I'd highly recommend a machine that has 'walking foot' & 'needle feed' (aka 'compound feed'). they will cost a bit more in the used market, but I think the resulting stitch quality will be sooo much better.

In terms of brands & models with walking foot/compound feed that seem to be on the used market, I found these:

Consew
225
226
206RB

Juki
1508
1541

Singer
111
211

Highlead
GC0618-1-SC

Chandler/Adler
67
167

Sailrite
111
'Fabricator' (which is a newer version of the 111)

I did find some machines that had a walking foot, BUT were not needle feed. Therefore you are relying on the top & bottom 'feet' of the machine to move the material through the machine. While this is much better than a regular feed machine, which only pulls the material from the bottom, it is not as good as having the needle itself be part of the feeding mechanism.

Also, I would stay away from the 'portable' machines, since they do not have needle/compound feed. The portable machines tend to have a mechanism that moves the presser feet to provide a top feed in addition to the regular bottom feed. They'd be good for some canvas repair work or very simple upholstery work, but still not up to the capabilities of an industrial machine with walking foot & compound feed.

I also found many 'knock-off' models in the portable machines, similar to the Sailrite LS1 series, but with (supposedly) cheaper parts. The reviews I found on these types of machines were fairly mixed.

Finally, the sewing world is being taken over by 'servo motors' . . . the prior standard was to have a 'clutch' motor. The difference being that the clutch motor is always spinning at its top RPM while you have the machine 'on' and you engage the 'clutch' with a foot pedal, similar to the clutch in a car (manual transmission that is . . .). While the clutch initially engages slowly, it tends to 'grab' after a second or 2 and before you know it, your sewing machine is running at full speed, which is about 15-20+ stitches per second :eek: In most cases this is too fast for detail work, like small pieces, corners, etc.

Servo motors use modern electronics and position/speed sensing to regulate the speed of the motor, giving you much more control over the machine speed. When doing vinyl upholstery & canvas work, I think most people will want a slow machine speed and one that they can significantly control. Servo motors will do this vs. a clutch motor.

I have a servo motor on order for my Consew 206RB-4. Many models of servo motors will be interchangeable with a clutch motor from a mounting perspective. So, the swap-out should be fairly easy.

Anyway, I am really psyched about my 'new' sewing machine. I'm not a sewer by any means, but the machine seems to produce excellent work, even with a rookie like me at the controls :) :thumb:
 

Scott Danforth

Grumpy Vintage Moderator still playing with boats
Staff member
Joined
Jul 23, 2011
Messages
49,899
Is it too early to ask..... what would you charge for a swim platform and new interior.......:lol:
 

tpenfield

Moderator
Staff member
Joined
Jul 18, 2011
Messages
18,092
Is it too early to ask..... what would you charge for a swim platform and new interior.......:lol:

Yes, it may be a bit early for both. But based on my prior experience and all the 'fun' I had, I'd say $1 million for a swim platform :D
 

Scott Danforth

Grumpy Vintage Moderator still playing with boats
Staff member
Joined
Jul 23, 2011
Messages
49,899
1 million pecos is like $37.50 usd...... Lol
 

tpenfield

Moderator
Staff member
Joined
Jul 18, 2011
Messages
18,092
Ooopps . . .!!!

Forgot a couple of Juki machines on my list.

Consew
225
226
206RB

Juki
562
563
1508
1541

Singer
111
211

Highlead
GC0618-1-SC

Chandler/Adler
67
167

Sailrite
111
'Fabricator' (which is a newer version of the 111)

:)
 

tpenfield

Moderator
Staff member
Joined
Jul 18, 2011
Messages
18,092
I received the servo motor and top stitch walking foot (feet) yesterday. The motor is an 'Enduro SM-550' . . . seems to be OK. Still takes a bit of getting used to with the pedal pressure, but I can keep the machine running at about 120 RPM, which will be great for corners and curves.

The pulley that came with the machine was a 3" (75mm) x 3/8". I had swapped out the pulleys on the original machine/motor, going with a 6" on the machine and a 2" on the (clutch) motor for a 3:1 reduction. I didn't have a good way of taking the pulley off the new (servo) motor, and my belt supply was limited. So, I had to change up my gear reduction pulleys and go with the 3" on the motor : 5" on the machine machine, giving a 1.67 reduction instead of the 3:1 that I had with the clutch motor. So, the machine currently has a 5" pulley and the motor has the 3" pulley, running on a 43" x 3/8" belt. My other belt assortments were all 1/2" width, which the motor pulley would not handle.

I'm hoping I can swap out the motor pulley and get back to a 6"x1/2" pulley on the machine and 2"x1/2" on the motor, giving me 3:1 motor:machine ratio, running on a 46"x1/2" belt. I might need to stop by Tractor Supply to pick up a few more pulley/belt variations. :rolleyes:

Anyway, here is some top stitching using the new motor & walking foot w/ top stitch guide (3/16" offset). It really holds the stitching at a consistent distance from the seam. :thumb:
.
Click image for larger version  Name:	IMG_3474.JPG Views:	1 Size:	182.9 KB ID:	10811662
 

tpenfield

Moderator
Staff member
Joined
Jul 18, 2011
Messages
18,092
Update . . . gear ratio.

I went to tractor supply and got a new drive pulley with 5/8" bore (2" OD). Wouldn't you know it the drive pulley that came with the servo motor is 15mm bore (75mm OD ~3") :rolleyes:

The shaft on the motor is about 0.590" (i.e. 15mm) and the bore on the new pulley is 0.625" (5/8) . . . Sooo, I needed to come up with about 0.035" of 'sleeve' to put in the 5/8" bore to tighten up the difference.

I sacrificed a beer can (empty of course) to the cause, but neglected to tell the Admiral she will not be getting the 5 cent deposit back on the can :). I cut a length of aluminum from the can and made an 'insert' for the 5/8" bore and it came out to 0.590" on the micrometer :thumb:

I put the new pulley on the motor, fastened everything up, went with a 1/2" belt, a few adjustments . . . done.

I tested a few pieces, sewing up to 8 layers of vinyl to make sure the drive pulley with makeshift sleeve is up to the task. :thumb:

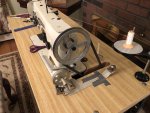
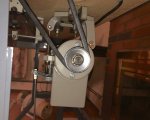
I'm back to a 3:1 (Motor:Machine) ratio; it slows the machine down nicely, which you really need for thick material and for curves and tight spaces. I can maintain about 1-2 stitches per second with the gear reduction and servo motor. Here are a couple pictures of the new pulley & belt setup.
.
Click image for larger version  Name:	IMG_3524.JPG Views:	1 Size:	196.3 KB ID:	10814177
.
Click image for larger version  Name:	IMG_3525.JPG Views:	1 Size:	128.2 KB ID:	10814178
 

Scott Danforth

Grumpy Vintage Moderator still playing with boats
Staff member
Joined
Jul 23, 2011
Messages
49,899
Ted, if you run into belt slip, I can point you toward a toothed belt setup.
 

tpenfield

Moderator
Staff member
Joined
Jul 18, 2011
Messages
18,092
Ted, if you run into belt slip, I can point you toward a toothed belt setup.

Yes, I was thinking of that, particularly for the 2" diameter pully, but it seems to be working fine. I can also engage the bobbin winder, which tightens the belt a bit and gives it a bit more contact circumference on the pulleys.
 

tpenfield

Moderator
Staff member
Joined
Jul 18, 2011
Messages
18,092
Here is a video that I took of the Sewing Machine going through 8-12 layers of marine vinyl. Most of the swatch that you see is 8 layers, but there is a section towards the end that has some of the layers doubled over, making it 12 layers.

The Servo motor and speed reduction are working out well.

Consew 206RB-4
.
 

Scott Danforth

Grumpy Vintage Moderator still playing with boats
Staff member
Joined
Jul 23, 2011
Messages
49,899
how is the admiral with you sewing in front of the fireplace?
 

Reserector_

Chief Petty Officer" & 2021 Splash of the Year Win
Joined
Oct 15, 2019
Messages
611
Impressive!
When you described the speed with the reduction you are using it sounded slow to me, but after seeing it, it seems ideal.
 

tpenfield

Moderator
Staff member
Joined
Jul 18, 2011
Messages
18,092
Impressive!
When you described the speed with the reduction you are using it sounded slow to me, but after seeing it, it seems ideal.

It is easier to hold the machine at a constant low speed, as you saw in the video, with the gear reduction. I can make it go a whole lot faster with a bit more pedal pressure.
 
Top