Diningroom table - with epoxy?

redneck joe

Supreme Mariner
Joined
Mar 18, 2009
Messages
10,262
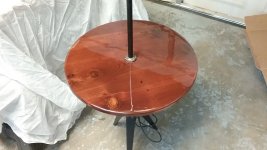
thinking about doing an epoxy run in my latest project. More on that in a bit.

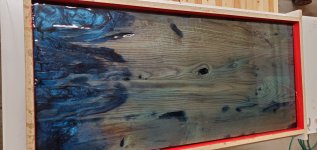
I've done live edge things before as well as old oak and walnut barn wood but this is the first time I've had to deal with anything warped this much. I've realized the harder the wood the more likely for inconsistencies and warping>.

5SzfV7f.jpg
 

redneck joe

Supreme Mariner
Joined
Mar 18, 2009
Messages
10,262
thought I could just run thru my planer but after a bit i realized that wasn't going to work. I had only spent time with two boards (I split these three to fit into planer). I have a hand joiner that I thought about using but the time involved with that would have ben quite a bit more that I wanted to invest in this.

So - the internets of things taught me about a router sled. I've had a new router, in the box, for about five years. Thought I'd give it a shot. Had to get some bar clamps anyway as the ones I have are not large enough for this project. It mostly worked, and what didn't was due to my ignorance so next time will be easier / better results. Important thing is I now have one side good so I can finish other side in the planer - which is much more time efficient.

2krjHId.jpg
 
Last edited:

redneck joe

Supreme Mariner
Joined
Mar 18, 2009
Messages
10,262
do not think this will be the final placement and of course the live edge (left) will be facing out.. Need to see how the grain looks when all planed out.

Overall will be just under 7' long, width TBD depending on epoxy usage but thinking about 42" or so.


QVd5Eph.jpg
 

redneck joe

Supreme Mariner
Joined
Mar 18, 2009
Messages
10,262
The markings on the wood from the router is (I think) due to one of my lessons learned - the sled was high enough that I had to extend the bit out so the shaft was bending into the rotation when in the wood. I'm sure there is a technical term for that, i call it bending.


This is the wood I'm using. I'll get some close ups as well so you can see all the little holes from the beetles.

Ambrosia Maple is a general term attached to a variety of Acer (true maple) species whose boards included colorful bug “trails” — caused by a fungus carried by the Ambrosia Beetle which penetrates the tree sap as the beetle eats into the tree, and it spreads both through the worm hole and up and down in the tree (carried along by the sap) and causes discoloring of the wood in streaks. The two primary species which draw the beetle’s attention are Acer Rubrum (Red Maple) and Acer Saccharum (Sugar Maple), although — with there reputedly being more than sixty different Acer species indigienous to North America — this unusual phenomenon is certainly not confined to just the two. Weight and density can vary greatly — depending upon the actual species — the typical varieties of maple figuring can also be present, often creating some very unique, visually spectacular specimens.
 
Last edited:

redneck joe

Supreme Mariner
Joined
Mar 18, 2009
Messages
10,262
Now, to the epoxy part. If anyone has input/experience/lessons learned that would be great.


Couple questions/thoughts:

I will be splining the pieces together (not biscuits) on all but the epoxy ones of course. I plan on using melamine with mold release and latex caulk. Also for the ends, may use window putty to create a dam rather than complete a box? I don't want to build a complete or partial box for the whole thing, just the area I want to pour. I know that has potential for disaster but I think I can redneck my way thru that.

I know the epoxy is supposed to become just part of the surface but can I also run a routed channel on the edges (yes even the live edge) to ass an epoxy spline of sorts? I'm not going to be using clear. I've not see thins on the interwebs so asking for input. On paper it makes complete sense.


Thinking about the color. Everyone does the river blue but A) that is not her style (doing for a friend) and B) I would want to practice more than I will on that style before committing to a full project like this. So I'm thinkin black or white. The black will compliment the beetle holes which I will also fill up and five the few softwood spots the same negative space look. I think also will work well with the finished wood (natural stain/hard wax/whatever I decide). The white would give a contrast and would use in the softwood sections but still tint the beetle holes black. Would that be odd? And if I go white, I'll probably do a glow in the dark.

Single or double pour? For sure double if going glow in the dark white but maybe either way since my lack of experience maybe can cover up some mistakes and see my thought above on the potential disaster - the loss would be mitigated. Also any tips on weather related concerns on the curing will be great.

So, these are my morning thoughts. Getting up at 2am gives one lots of time to ponder.
 

southkogs

Moderator
Staff member
Joined
Jul 7, 2010
Messages
14,792
I can't quite picture in my head exactly what you're doing with the epoxy, but here's what I learned by not doing the full flood: level ain't as level as you think it is.

I didn't plane my surface down, but I had purchased a factory finished table top. Apparently, either from the profile cutting I did on the interior or just due to the quality of the make, the top was just slightly warped. I had leveled out the table top and my base, but didn't catch the slight warp of the wood itself ... so when I flooded the epoxy, I couldn't get a smooth coverage because I didn't have a full form to make it deep enough across the entire top. Left me about a 1/8" 'bump' on one end of my profile cut.

Also, I tried brushing on the final coat because I had rounded edges to the table top. That actually mostly worked, but I had a booger of a time controlling "drips" on the underside of the curved top.

You're better at this stuff than I am, so the router channel and dams may do the trick, But anywhere you're going to have the surface go from wood to epoxy and back to wood with no ridges, find a way to make sure those two wood edges are exactly the same depth. You're working with gravity on the pours more than you are level ground.
 

aspeck

Moderator
Staff member
Joined
May 29, 2003
Messages
18,599
My only experience was a clear flood on a hand carved top ... it looked beautiful except for the face that the flood of clear left the carving basically unseen! Ugghh! I should have poured black into the carvings before doing the flood. I learned the hard way.
 

aspeck

Moderator
Staff member
Joined
May 29, 2003
Messages
18,599
Also, when it dried I had small depressions where the carving was. On hindsight I would fill the depressions, let dry, then flood. But that is me based on 1 experience and I am certainly not an expert. Actually, on hindsight I would have given it to someone who knew what they were doing! LOL!
 

dingbat

Supreme Mariner
Joined
Nov 20, 2001
Messages
15,484
Unless your casting objects in the epoxy I would go with poly. Easy to tint and easy to work with.
 

cptbill

Senior Chief Petty Officer
Joined
Oct 6, 2012
Messages
741
Table top epoxy is the way to go on that project, makes for a great glossy finish and will even out the surface over the imperfections. Make sure your project is level and the temp is warm enough to let it flow and keep a heat gun handy. Here's the last one I did with epoxy not very big but the finish is great
 

Attachments

  • 20201103_101527 (2).jpg
    20201103_101527 (2).jpg
    743.5 KB · Views: 4

nurseman

Lieutenant Junior Grade
Joined
Jun 2, 2013
Messages
1,045
Blacktail studios on YouTube has some great tutorials on big pours, I've found him very helpful. Here are some things that I learned on my first few attempts at epoxy tables.
How thick you can pour depends on your epoxy, with the danger being too much heat build up. It never hurts to do two pours just to be safe. If you want some interest in your tint, try tinting with mica powder, as it will have some "shimmer" to it.
The epoxy will shrink slightly as it cures. so your surface won't be level when done.
Be sure to get epoxy that is intended for deep pours, and make sure you give yourself plenty of time to baby sit it after the pour, as you may need to torch bubbles for several hours.
 

redneck joe

Supreme Mariner
Joined
Mar 18, 2009
Messages
10,262
Blacktail studios on YouTube has some great tutorials on big pours, I've found him very helpful. Here are some things that I learned on my first few attempts at epoxy tables.
How thick you can pour depends on your epoxy, with the danger being too much heat build up. It never hurts to do two pours just to be safe. If you want some interest in your tint, try tinting with mica powder, as it will have some "shimmer" to it.
The epoxy will shrink slightly as it cures. so your surface won't be level when done.
Be sure to get epoxy that is intended for deep pours, and make sure you give yourself plenty of time to baby sit it after the pour, as you may need to torch bubbles for several hours.
yeah, watched him a bunch after I posted all this - and learned about 'deep pours'. I love his black with the walnut - I think thats the direction I'm going.


Also, got all planed out today and it is thinner than expected, only 1 1/8' before sanding so for sure as I mentioned two pours. First to learn/look for level second to finish hopefully appropriately.
 

redneck joe

Supreme Mariner
Joined
Mar 18, 2009
Messages
10,262
Good news bad news. she decided she wanted just square not live edge and just plain black epoxy so no mixing. Bad news is I finally got around to calculating the qty and its almost four gallons. She's paying for it, just hate to be that wrong. More good news is since I had to plane all the way down to just one inch, the legs I already have will work instead of buying more expensive heavy duty. They still support 800lbs, I just usually overkill in these situations.

Southkogs- planning on a latex caulk dam all the way around the pour area so can slightly overpour and just sand down. If I then choose a complete top flood it will mitigate. But also got to thinking, should the top be the underside of the pour or the top working surface? if I use the bottom and flip over after cured I shouldn't have to worry about leveling out as much on pre-pour? Maybe that would make me choose a flooded finish.


Nurseman, how much not level after pour? Also on the mica will black mica in black tinted show up?
 

nurseman

Lieutenant Junior Grade
Joined
Jun 2, 2013
Messages
1,045
Good news bad news. she decided she wanted just square not live edge and just plain black epoxy so no mixing. Bad news is I finally got around to calculating the qty and its almost four gallons. She's paying for it, just hate to be that wrong. More good news is since I had to plane all the way down to just one inch, the legs I already have will work instead of buying more expensive heavy duty. They still support 800lbs, I just usually overkill in these situations.

Southkogs- planning on a latex caulk dam all the way around the pour area so can slightly overpour and just sand down. If I then choose a complete top flood it will mitigate. But also got to thinking, should the top be the underside of the pour or the top working surface? if I use the bottom and flip over after cured I shouldn't have to worry about leveling out as much on pre-pour? Maybe that would make me choose a flooded finish.


Nurseman, how much not level after pour? Also on the mica will black mica in black tinted show up?
I would not do an upside down pour, as there will be bubbles on the underside that will not pop [at least in my experience]. On my tables, the top of the epoxy was a around a 1/16th below the wood. You can kind of see it in the first picture.
I used a blue dye and then added blue, green and silver mica powders which give a nice pearlescent shimmer. The second pic is a good pic of the look.
These are a coffee table and end tables that I made from a reclaimed oak post out of an old farmhouse basement. The bottom of the post was dry rotted, so I just wire wheeled the rot away after I had re-sawn the post and used the epoxy to accentuate the ragged edge. The iron bands on the end tables are to cover up a screw up.
Still working on the bases...
 

Attachments

  • 20200423_112443.jpg
    20200423_112443.jpg
    1.1 MB · Views: 12
  • 20200512_211625.jpg
    20200512_211625.jpg
    1.1 MB · Views: 11
  • 20200505_172659.jpg
    20200505_172659.jpg
    2.2 MB · Views: 11
  • 20200512_210226.jpg
    20200512_210226.jpg
    1.2 MB · Views: 11

redneck joe

Supreme Mariner
Joined
Mar 18, 2009
Messages
10,262
very nice, that is a very dark blue. I don't see the green mica, but then thats why i failed the painting part of art class in high school.

forgot about bubbles being one of the few things that are successful against gravity.

Was that a single pour and when did you add the mica?
 

nurseman

Lieutenant Junior Grade
Joined
Jun 2, 2013
Messages
1,045
I added a bit of black dye to darken the blue, and the green is verrrrry subtle, more of a hint really. The light has to hit it just right. I did that in two pours because I miscalculated my volume and had to order more epoxy. 🤬 
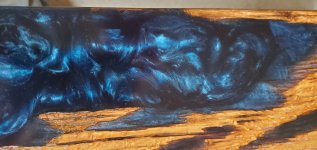
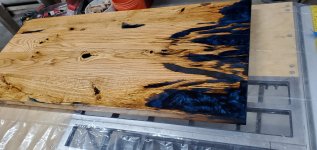
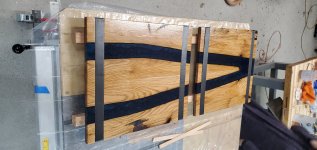
I added the mica when mixing. The first pour had more black in it, but I dialed that back for the second pour, giving it that deep, dark look. [more accidental than anything, but I'm claiming it as a win]
I think It is totally worth the time and effort to mix up a few small batches and experiment with your colors and stuff like that.
 

southkogs

Moderator
Staff member
Joined
Jul 7, 2010
Messages
14,792
I agree. I liked doing the smaller floods better. I could see what was happening ... and felt like I could control the bubbles a little bit more with the smaller pour.

I avoided sanding because I didn't want the risk of what I was making that I couldn't buff everything out. I really wanted a smooth epoxy. If you're planning on sanding/buffing you may want to do a small piece with it first and see how that works.
 
Top