Concerns when Setting Input Drive Rolling Torque after U-Joint Replacement

FatSacMikey

Cadet
Joined
Aug 30, 2020
Messages
7
Hello all,

This is my first post here, but let me first say that we (my wife and I) have been consulting these forums for the 4 years we've owned this boat and you guys have been a huge help for all of our undertakings. Many thanks and lots of respect for everything you guys do.

I'm in some undocumented territory right now, so I wanted to get some professional opinions on how to proceed.

The technical specs...

2000 Chapparal Sunesta 223 Sterndrive

Engine:
  • Serial Number: 4012010656
  • Manufacturer: Volvo Penta
  • Model Number: 50Gi PEFS
Sterndrive:
  • Serial Number: 4202001946
  • Manufacturer: Volvo Penta
  • Model: TSK SX-MLT
We were out one day and I noticed a new vibration while running/turning, so we pulled the drive the next weekend to find water in the bellows and the rusty remains of a disintegrated gimbal bearing. The inner ring of the gimbal bearing had fused to the driveshaft, plus the driveshaft had been exposed to the water intrusion, so after much deliberation we decided to replace the driveshaft as well. We got the new gimbal bearing in, and I took the input drive bearing carrier to the local shop to get them to replace the pretension sleeve in accordance with the workshop manual as I don't have a hydraulic press handy. They said they wouldn't set the rolling torque preload for me since I hadn't taken a measurement before taking the old driveshaft out, but I'm pretty sure it was out of spec anyway (very little rolling torque). So yesterday we got the carrier back and set the rolling torque ourselves in accordance with the workshop manual (9-14 in-lbs). I believe we succeeded, but now I'm nervous about 2 things:

1. The bearing carrier feels rough when rolling starting at about the 6-7 in-lb point. It gets progressively rougher as we get to the 10 in-lb point, and it's making it difficult to get a reading as the torque gauge dial is jumpy. See video link at bottom. Is this roughness normal, or should we expect smooth rolling all the way up to the specified rolling torque?

2. As we were cleaning up for the day, I found the little spring that goes around the lip of the input shaft seal in my pocket (it must have fallen off when I had the seal in my pocket earlier that day). To get this spring back on the seal, we'll have to again remove the driveshaft from the bearing carrier, put the spring in place, reassemble, and set the rolling torque. I understand we're supposed to replace the pretension sleeve when the driveshaft is removed, but will this be necessary in this case given that the pretension sleeve has not been used at all? If it is, I'm thinking I can just buy myself a hydraulic press for the cost of another hour of labor and do it myself. It would be ideal if we could just reassemble, set the rolling torque again, and be on our way, but I don't want to risk a gear unit meltdown.

Some notable pics I've taken throughout the process:

Gimbal bearing in place, rust can be seen inside engine coupler:
https://photos.app.goo.gl/fAaAHkyTb5fRiz3c7

Destroyed gimbal bearing vs. new gimbal bearing:
https://photos.app.goo.gl/XxvSKZCXcxC2xWWV6

Inner part of gimbal bearing fused to driveshaft:
https://photos.app.goo.gl/w3VdUrrTyDsGyPeG7

Old driveshaft vs. Volvo Penta's new driveshaft:
https://photos.app.goo.gl/rayyMAUPXyfaVTYB6

Bonus pic - strange gash in upper gear housing:
https://photos.app.goo.gl/rTyagzHVhxt8K1u18

And my brief video showing the final rolling torque measurement. It looks like 10 in-lbs to me, but like the post says, the dial is jumpy due to the roughness while rolling:
https://youtu.be/6aMl5WEswlw


Looking forward to any input!
 

alldodge

Moderator
Staff member
Joined
Mar 8, 2009
Messages
40,756
Howdy
No expert with VP but maybe muc might comment

If there is any roughness then a bearing has something that got in it, or it was damaged during install, removal and re-install. I would not install and use until its smooth as silk
 

FatSacMikey

Cadet
Joined
Aug 30, 2020
Messages
7
Thanks for the advice. That seems to be the general recommendation. I'm thinking of bringing it back to the shop that pressed it together while it's still preloaded and asking them if they think the bearings feel right.
 

muc

"Retired" Association of Marine Technicians...
Joined
Jul 7, 2004
Messages
2,064
Don’t think I would go back to the shop you used. There is no reason to check rolling torque on these bearings before disassembly, other than curiosity The only reason I can think of for not wanting to set rolling torque is they are worried that they will do it wrong.

If you followed the manual, your bearings are bad. But what worries me is that, having done this job 100s of times. I have never seen these bearings bad without water or metal contamination. Or low gear lube. This leads me to believe someone did something wrong. I’m guessing something like, not enough lube on the bearings before setting the torque, bearings damaged during disassembly or the bearings weren’t clean.

Yes you you need a new sleeve and bolt. They are used at this point. The first few times I did this job, I made sure to have extras. Learned that one the hard way. It’s pretty easy to tighten it too far and have to press it back apart and start over.

I watched the video, it’s too short to tell much. But what I did see is. You have the wrong torque wrench, never use a torque wrench (or a gauge) in the first or last 10% of their range. They just aren’t accurate enough unless they are the highest quality. Also the RPMs you are turning it are to slow, looking for a speed of 5 seconds per revolution. Take your reading after 5-10 revolutions. I have seen some techs use their drill to give the bearings a good spin to seat them.

I would make sure the bearings are well lubed, spin them up good and recheck the rolling torque with the proper tool.
when done with the job, you shouldn’t be able to feel anything but smooth. I also recommend checking upper and lower gear backlash after reassembly to check for mistakes.
 

muc

"Retired" Association of Marine Technicians...
Joined
Jul 7, 2004
Messages
2,064
Pro tip. When setting rolling torque, stay near the lower end of the spec with used (spun under load at least once) bearings and near the upper end of the spec with new bearings.
 

muc

"Retired" Association of Marine Technicians...
Joined
Jul 7, 2004
Messages
2,064
What is the part number of that new shaft assembly?
 

FatSacMikey

Cadet
Joined
Aug 30, 2020
Messages
7
Hi muc, thanks for the response!

The part number is 3852384.

I had the thought earlier this week that when the gimbal bearing failed, the ensuing lateral motion of the driveshaft may have transferred force to the bearings, resulting in damage to the races. Our game plan right now is to get the bearing carrier back out and take it to a shop to get new bearings/crush sleeve pressed in AND get the shop to set the rolling torque so that we can get a pro to put hands/eyes on it and get a level of comfort with how it ends up feeling. We're shooting to get it apart this weekend and get it to a shop early next week. I will post updates as we proceed.
 

muc

"Retired" Association of Marine Technicians...
Joined
Jul 7, 2004
Messages
2,064
Them bearings are pretty tough. Never seen a bad gimbal bearing cause problems.

3860842 is the newest part number
But 3852384 will work.
 

billbayliner

Chief Petty Officer
Joined
Jun 30, 2006
Messages
553
It is critical that the drive gear bearings be coated with 75w90 (fully synthetic) oil when performing the bearing pre-load.... The shop better have experience and be PATIENT when assembling the drive gear assembly... The price of the bearing are not expensive so I would use new bearings and ONLY "NON-Counterfit" SKF or TImken bearings (FAG bearings have not failed me either).... Part numbers are

SKF / Timken / FAG 30207:
SKF / Timken / FAG 31307
 

FatSacMikey

Cadet
Joined
Aug 30, 2020
Messages
7
Back with an update...

After several weekends of delay, we finally got a chance to get the drive back off and extract the bearing carrier (again). We ordered new bearings, crush washer, screw, seal, and o-rings, and got in touch with another shop who was willing to get it apart, install the new bearings, and set the rolling torque for us. My wife brought the bearing carrier in and she said as soon as the shop owner turned it, he said "yes this doesn't feel right, the rolling should be smooth." After just 2 days in the shop, he had gotten the thing reassembled, and it was smooth as silk when we got it back. So we reinstalled the bearing carrier (along with the new o-rings) and bolted the drive back on the boat.

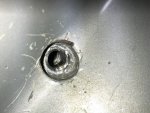
Now, after all of this (8 weeks off the water now), the lower unit drain plug is leaking. We had a heli-coil installed last year because a certain big strong man (me) stripped the threads in the housing while changing the fluid. It looks like part of the mating surface in the housing has chipped off, compromising the seal of the plug's o-ring. We have tried 2 separate new o-rings now, so I'm pretty sure it is not an issue of a worn o-ring. I'm going to try to patch the mating surface with JB weld. I may make a post to document how it goes. Here is a pic of the drain hole - any ideas would be hugely appreciated:

https://photos.app.goo.gl/xskFHSqqzjAHFdA76

Lessons learned:
-Bearings should be smooth
-Don't go cheap on a torque wrench
-Trust your gut - if you have doubts, go to a professional

Thanks for the help everybody!
 

alldodge

Moderator
Staff member
Joined
Mar 8, 2009
Messages
40,756
That will never seal as-is.
If it cleaned real good, then use break cleaner or naphtha to ensure all oil is gone. Apply marine-tex or JB and once it sets up, need a way to sand it down flat. Maybe drimmel tool with sanding disk

seal.jpg
 

FatSacMikey

Cadet
Joined
Aug 30, 2020
Messages
7
That will never seal as-is.
If it cleaned real good, then use break cleaner or naphtha to ensure all oil is gone. Apply marine-tex or JB and once it sets up, need a way to sand it down flat. Maybe drimmel tool with sanding disk


Thank you, I was thinking the exact same thing. We let it drain overnight, and I just applied the JB weld and I'm at Home Depot now to try to find a dremel disk and a few parts for a home-made pressure tester. I'll provide an update on progress soon.
 

FatSacMikey

Cadet
Joined
Aug 30, 2020
Messages
7
So I'm setting up to pressure test, and I see that my adapter (from a West Marine gear oil transfer pump) doesn't mate up 100% with the surface of the vent hole... does anyone know if this would create a leak point? The pic is at the link below.
 

alldodge

Moderator
Staff member
Joined
Mar 8, 2009
Messages
40,756
I use it with an o-ring just like it comes to fill the drive, it seals
 

muc

"Retired" Association of Marine Technicians...
Joined
Jul 7, 2004
Messages
2,064
Doesn't look like that will seal.
But all you have to do is pressurize it and spray the soapy water to find out.
 

FatSacMikey

Cadet
Joined
Aug 30, 2020
Messages
7
Well I added JB Weld, and it slowed down the leak significantly, but it's still leaking. In the pics at the link below, you can clearly see where a piece of the mating surface has chipped off, likely due to undermining by the helicoil. The second picture shows my JB Weld job.

https://photos.app.goo.gl/emUArmRdmYLPwAjv8

Interestingly, this passed the pressure test. I had to test from the drain plug hole, and I expect the difference is that the fill nozzle's o-ring had a larger diameter than the one on the drain plug, so it was in contact with a more intact part of the mating surface.


At this point, I don't think there's much more I can do on my own. If we're going to need to add more JB Weld and sand it down, or drop a bead in and re-tap, I'd definitely rather let a pro take it from here as I'm not prepared to disassemble the lower unit to clear out the shavings and/or dust. If anyone has any other ideas I'm all ears, but I'm calling the shop tomorrow to see if they can fit us in.
 

alldodge

Moderator
Staff member
Joined
Mar 8, 2009
Messages
40,756
I would look for another lower end. Yours can be fixed but it would need to be dissembled, welded up and drilled and retapped
 
Top