Carburetor question on restoration I’m working on 1992 40 hp MSHQ Yamaha

Douglasdzaster

Petty Officer 1st Class
Joined
Sep 11, 2020
Messages
315
On 2 stroke 2-3-4 cylinder motors won't find the spark plugs darken exact same as with 4 stroke ones, one or 2 will differ from the rest. The OP has installed new parts inside each carb along adjusting float's height to specs.

View attachment 340526

If opening the fuel pump will surely find both rubber diaphragms excessively ballooned or even dry, if still in good shape and removed for a close inspection the diaphragm's bolt's holes will probably won't fit any more specially if E10 fuels were used for a long time. Time to order 2 new ones at around $ 30.00, body gaskets at each side are not included.

Let's find out when the old style fuel hose, primer bulb and fuel tank are installed if able to prime the bulb till firm...

Happy Boating
When I decarb the engine should I wait until I can take it to the lake and run it right away? I’ve got everything i need and ready with the holes drilled.
 

Sea Rider

Supreme Mariner
Joined
Sep 20, 2008
Messages
12,345
When I decarb the engine should I wait until I can take it to the lake and run it right away? I’ve got everything i need and ready with the holes drilled.
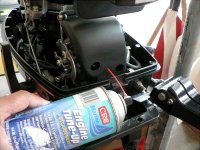
Aha, what a progress, thought that were going to skip that one Lol!! which decarbon product did you finally buy ? Was it CRC marine decarbonizer or any other market available. Good to have the combo on water, after application can go full throtle as if stealing the beast. Tomarrow will post a nce way to shoot the product through the carbs...

Happy Boating
 

Douglasdzaster

Petty Officer 1st Class
Joined
Sep 11, 2020
Messages
315
Aha, what a progress, thought that were going to skip that one Lol!! which decarbon product did you finally buy ? Was it CRC marine decarbonizer or any other market available. Good to have the combo on water, after application can go full throtle as if stealing the beast. Tomarrow will post a nce way to shoot the product through the carbs...

Happy Boating
I had to order it but I got the CRC.
 

Sea Rider

Supreme Mariner
Joined
Sep 20, 2008
Messages
12,345
The procedure is as follows :
-Once combo floats warm it up for min 5 minutes at neutral/idle.
-Connect the red cannula into the can's valve nozzle.
-Maintain the throttle rpm between min 1.5 to 2.0 K revs through the entire long decarbon process, the higher the better.

CRC Decarbon Procedure.JPG

-Insert the cannula inside the upper carb’s throat ( repeat for other remaining carbs as well.)
-Push valve fully down for 1 second.
Motor will run uneven, let fully recover the idle rpm was set to, takes some seconds.
-Apply the same procedure in middle and lower carbs, one at a time.
-Keep spraying the decarbonizer while keeping the 1-2-3 carb sequence. Run at least 1/3 to ½ can through all 3 carbs.
Decarboning.JPG

-After application let the motor burn out the CRC leftovers inside the combustion chambers till the exhaust smoke clears by itself.
-Go for a wot run as if stealing the combo for say 5-10 minutes on flat water if possible, the motor should idle well and run much smoother than before throughout the whole throttle range. Next time wanting to apply have already drilled the required 3 small orifices, avoids disassembling the carb's large silencer each time.

PD: The provided cannula tends to come out of the valve when spraying, add a small droplet of Crazy Glue instant glue or equivalent between the rear cannula and the valve nozzle...

This process can be done at terra firme on muffs while geared forward for the motor to run under load at 2K or bit more while spraying CRC side of motor or inside the boat whichever one it's preferred. No One should be standing side or behind the motor when applying CRC decarbonizer, the spinning prop could chop anyone’s legs, bad music...

Happy Boating
 

Douglasdzaster

Petty Officer 1st Class
Joined
Sep 11, 2020
Messages
315
The procedure is as follows :
-Once combo floats warm it up for min 5 minutes at neutral/idle.
-Connect the red cannula into the can's valve nozzle.
-Maintain the throttle rpm between min 1.5 to 2.0 K revs through the entire long decarbon process, the higher the better.

View attachment 341058

-Insert the cannula inside the upper carb’s throat ( repeat for other remaining carbs as well.)
-Push valve fully down for 1 second.
Motor will run uneven, let fully recover the idle rpm was set to, takes some seconds.
-Apply the same procedure in middle and lower carbs, one at a time.
-Keep spraying the decarbonizer while keeping the 1-2-3 carb sequence. Run at least 1/3 to ½ can through all 3 carbs.
View attachment 341059

-After application let the motor burn out the CRC leftovers inside the combustion chambers till the exhaust smoke clears by itself.
-Go for a wot run as if stealing the combo for say 5-10 minutes on flat water if possible, the motor should idle well and run much smoother than before throughout the whole throttle range. Next time wanting to apply have already drilled the required 3 small orifices, avoids disassembling the carb's large silencer each time.

PD: The provided cannula tends to come out of the valve when spraying, add a small droplet of Crazy Glue instant glue or equivalent between the rear cannula and the valve nozzle...

This process can be done at terra firme on muffs while geared forward for the motor to run under load at 2K or bit more while spraying CRC side of motor or inside the boat whichever one it's preferred. No One should be standing side or behind the motor when applying CRC decarbonizer, the spinning prop could chop anyone’s legs, bad music...

Happy Boating
Thank you again sir. I’ve read a lot about decarbing being good maintenance.
 

Sea Rider

Supreme Mariner
Joined
Sep 20, 2008
Messages
12,345
Thank you again sir. I’ve read a lot about decarbing being good maintenance.
You're welcome, on a motor which has never been decarbonized ever before won't remove heavy carbon build ups on the cylinder head, exhaust covers and lower crankcase exhaust but will clean pistons, pistons rings for a smoother ring free motor operation. Should be applied ideally every 50 run hours on new or overhauled 2 stroke filthy motors. Once applied report if found any real performance difference.

Happy Boating
 

Douglasdzaster

Petty Officer 1st Class
Joined
Sep 11, 2020
Messages
315
You're welcome, on a motor which has never been decarbonized ever before won't remove heavy carbon build ups on the cylinder head, exhaust covers and lower crankcase exhaust but will clean pistons, pistons rings for a smoother ring free motor operation. Should be applied ideally every 50 run hours on new or overhauled 2 stroke filthy motors. Once applied report if found any real performance difference.

Happy Boating
Update with new problem: I haven’t had time for the boat for awhile. Except to start it every so often making sure I’m keeping fresh fuel. Even though I’m running none ethanol.
I now have an older style tank with a vent I can open and close. Primer bulb gets solid. All was good until I finally got the time to take 2 of my grandsons fishing the other day. Boat ran good on the way out. We fished about 4 hours then the heat and sun ran us off. On the way back in the boat ran good at wot for about 10 minutes then started to sputter and lose power. Never died idled fine and at 1/4 throttle. I’d hit wot and the boat planed out for about 2 or 3 minutes then sputter and lose power again. When I pulled away from the ramp I stopped to rig the boat for trailering. I pulled the cowling off and there was about a quarter cup of water in the pan which has never happened before. It was hot on that asphalt and I was trying to keep up with 2 youngsters so I didn’t spend a whole lot of time on it. I checked the tale tail hose it was hooked up good and tight. I put the cowling on and brought it home. I still haven’t had a chance to look at it. Hopefully I will tomorrow. I’m planning on starting by pulling the plugs then check compression. Then run it and see if I can tell where the water came from. I figured the water in the cowling and the heat off the engine may have caused a little steam and was fouling something electrical. That’s just me guessing. Y’all may tell me to start else where. I’m back on my regular schedule again and can get back to the important stuff like hitting the water. Unfortunately this issue has popped up. I’m hoping it’s not the head gasket. A bolt broke off in the block when I changed the thermostat ( had to take it to a machine shop) the thought of removing those head bolts make me nervous. Especially since there’s 13. Lol
 

Douglasdzaster

Petty Officer 1st Class
Joined
Sep 11, 2020
Messages
315
Update with new problem: I haven’t had time for the boat for awhile. Except to start it every so often making sure I’m keeping fresh fuel. Even though I’m running none ethanol.
I now have an older style tank with a vent I can open and close. Primer bulb gets solid. All was good until I finally got the time to take 2 of my grandsons fishing the other day. Boat ran good on the way out. We fished about 4 hours then the heat and sun ran us off. On the way back in the boat ran good at wot for about 10 minutes then started to sputter and lose power. Never died idled fine and at 1/4 throttle. I’d hit wot and the boat planed out for about 2 or 3 minutes then sputter and lose power again. When I pulled away from the ramp I stopped to rig the boat for trailering. I pulled the cowling off and there was about a quarter cup of water in the pan which has never happened before. It was hot on that asphalt and I was trying to keep up with 2 youngsters so I didn’t spend a whole lot of time on it. I checked the tale tail hose it was hooked up good and tight. I put the cowling on and brought it home. I still haven’t had a chance to look at it. Hopefully I will tomorrow. I’m planning on starting by pulling the plugs then check compression. Then run it and see if I can tell where the water came from. I figured the water in the cowling and the heat off the engine may have caused a little steam and was fouling something electrical. That’s just me guessing. Y’all may tell me to start else where. I’m back on my regular schedule again and can get back to the important stuff like hitting the water. Unfortunately this issue has popped up. I’m hoping it’s not the head gasket. A bolt broke off in the block when I changed the thermostat ( had to take it to a machine shop) the thought of removing those head bolts make me nervous. Especially since there’s 13. Lol
Oh the reason for my water vapor (steam theory). I was on the lake a while back and had the cowling off working on the carburetors and a little water got in and I thought nothing about it. As I pulled into my next spot it started to sputter the same way. I wiped out all the water and fished for a while giving everything time to dry out. It ran fine the rest of the day.
 

99yam40

Fleet Admiral
Joined
Sep 7, 2008
Messages
9,097
water in the pan means wet wiring, that tends to short out things or lets spark jump where it should not.
find where the water is coming from and solve that
 

Douglasdzaster

Petty Officer 1st Class
Joined
Sep 11, 2020
Messages
315
water in the pan means wet wiring, that tends to short out things or lets spark jump where it should not.
find where the water is coming from and solve that
Hopefully I can get it to do it here at the house on muffs or in the tank while it’s not under a load. Thanks for the reply.
 

Douglasdzaster

Petty Officer 1st Class
Joined
Sep 11, 2020
Messages
315
Hopefully I can get it to do it here at the house on muffs or in the tank while it’s not under a load. Thanks for the reply.
Forgot I have to go out of town today. So I can’t work on it. I took a peak under the cowling just now though. I noticed some residue under the head. Also the bottom 2 carburetors have a little fuel residue in the top vents. Doesn’t look like they over flowed as there is no fuel anywhere else. Could those floats be tweaked a little from that epa fuel tank pressure. They haven’t been flooding when I’ve ran it.Thanks again for all the help and advice. I’ll try to run it tomorrow and find out where the water in the pan came from so I can fix that first.
 

Sea Rider

Supreme Mariner
Joined
Sep 20, 2008
Messages
12,345
Seen same issue on other motors, the explanation is quite simple : the lower crankcase's gasket is shot, when the motor runs at higher revs, cooling water floods the pan, 100% of the exhaust smoke that should exit right through the exhaust tube, middle leg and prop is leaking around the pan along water and motor missing due to too much contaminated carb air intake and final crappy combustion.

Solution : Torque all lower motor's pan bolts fully tight with a large wrench to achieve a good leverage, go for a water wot test and report if the issue was canceled, if not or was lessened. Remove the entire crankcase and install a New base gasket, check if in need to aply any sealer at both gasket's sides or it's the one that comes with a glued coat at both sides...

Happy Boating
 

Douglasdzaster

Petty Officer 1st Class
Joined
Sep 11, 2020
Messages
315
Seen same issue on other motors, the explanation is quite simple : the lower crankcase's gasket is shot, when the motor runs at higher revs, cooling water floods the pan, 100% of the exhaust smoke that should exit right through the exhaust tube, middle leg and prop is leaking around the pan along water and motor missing due to too much contaminated carb air intake and final crappy combustion.

Solution : Torque all lower motor's pan bolts fully tight with a large wrench to achieve a good leverage, go for a water wot test and report if the issue was canceled, if not or was lessened. Remove the entire crankcase and install a New base gasket, check if in need to aply any sealer at both gasket's sides or it's the one that comes with a glued coat at both sides...

Happy Boating
Wouldn’t I have noticed the exhaust smoke coming out of the cowling or noticed the smell when I removed the cowling? So I could end up pulling the engine to fix this one? What if I run it on muffs? Will the exhaust come out the middle leg and prop or up through the pan? No telling when those bolts where ever checked if ever so I’ll have a torch wrench in my hand tomorrow for sure. Many thanks as usual. I didn’t know of anything to check other than the head gasket. I’ll let you know how it goes. I checked the manual I have. Are you talking about the 8 engine mounting bolts. Also looking up a part. Shows to be a rubber seal under the pan. Does this sound right?
 
Last edited:

Sea Rider

Supreme Mariner
Joined
Sep 20, 2008
Messages
12,345
Wouldn’t I have noticed the exhaust smoke coming out of the cowling or noticed the smell when I removed the cowling? So I could end up pulling the engine to fix this one? What if I run it on muffs? Will the exhaust come out the middle leg and prop or up through the pan? No telling when those bolts where ever checked if ever so I’ll have a torch wrench in my hand tomorrow for sure. Many thanks as usual. I didn’t know of anything to check other than the head gasket. I’ll let you know how it goes.
Have 2 issues going on with a Tohatsu 9.8 & 30 HP motors, pan gasket have 2 deterioration stages (1) Spills water onto the pan (2) motor runs like crap at wot with cowl ON, when removed runs strong as a champ independently of the water leaking onto the pan. Pan gaskets are relatively cheap...

BTW, when the pan gasket begins to deteriorate will leak water onto the pan, how much will depend entirely on its deterioration, once it's shot, kaputt will let water and smoke onto the pan and cowling. Your motor it's on its first stage...

Running on muffs it's not the same as running wot at load while pushing a boat. That's why always recommend to torque the entire powerhead's gaskets from time to time if with time, avoids seizing bolts with salt water and breaking when plan removing them ; as the Brits say, Long Live the Gaskets...Lol!!

Happy Boating
 

Douglasdzaster

Petty Officer 1st Class
Joined
Sep 11, 2020
Messages
315
Have 2 issues going on with a Tohatsu 9.8 & 30 HP motors, pan gasket have 2 deterioration stages (1) Spills water onto the pan (2) motor runs like crap at wot with cowl ON, when removed runs strong as a champ independently of the water leaking onto the pan. Pan gaskets are relatively cheap...

BTW, when the pan gasket begins to deteriorate will leak water onto the pan, how much will depend entirely on its deterioration, once it's shot, kaputt will let water and smoke onto the pan and cowling. Your motor it's on its first stage...

Running on muffs it's not the same as running wot at load while pushing a boat. That's why always recommend to torque the entire powerhead's gaskets from time to time if with time, avoids seizing bolts with salt water and breaking when plan removing them ; as the Brits say, Long Live the Gaskets...Lol!!

Happy Boating
Yea the seal I found is $11. It doesn’t look to difficult to pull the engine. I just need to rig up a way to lift it while installing the seal. The manual shows checking the mounting bolts as regular maintenance. I’m learning more and more about outboards. Different animals from all the other small engines I’ve worked on over the years. Got a short list from the admiral tomorrow then it’s straight to the boat. I’ll report back. Especially if I make it to the water tomorrow.
 

Sea Rider

Supreme Mariner
Joined
Sep 20, 2008
Messages
12,345
Must disconnect whatever holds the powerhead to the pan before unbolting the lower pan bolts to lift it out to change the pan's gasket. Both mating surfaces must be immaculate clean specially the surroundings under the lower powerhead where corrosion and piting usually forms there, saltwater is very aggressive with aluminum and light alloys. Post a pic of the lower powerhead to have a look on what has been going on throughout the long boating years.

Must the new pan gasket be installed with a sealer coat at both sides or it's the one that comes factory coated with a special glue at both sides ? Apply a small coat of marine grease to each of the pan bolts before torquing them tight. Re torque them after some hours use, probably will have cede a bit with heat which it's quite normal. Good to realize that an outboard used in salt water can't be paired to any other motor...

Happy Boating
 

Douglasdzaster

Petty Officer 1st Class
Joined
Sep 11, 2020
Messages
315
Must disconnect whatever holds the powerhead to the pan before unbolting the lower pan bolts to lift it out to change the pan's gasket. Both mating surfaces must be immaculate clean specially the surroundings under the lower powerhead where corrosion and piting usually forms there, saltwater is very aggressive with aluminum and light alloys. Post a pic of the lower powerhead to have a look on what has been going on throughout the long boating years.

Must the new pan gasket be installed with a sealer coat at both sides or it's the one that comes factory coated with a special glue at both sides ? Apply a small coat of marine grease to each of the pan bolts before torquing them tight. Re torque them after some hours use, probably will have cede a bit with heat which it's quite normal. Good to realize that an outboard used in salt water can't be paired to any other motor...

Happy Boating
Had to knock out the yard work yesterday and had a few minutes so I started the engine to check some things out I haven’t done in a while. Operating temperature, compression etc. Was going to check spark at idle but all of my pliers are old enough to have a pin hole in the insulation and I don’t like to get zapped. Goin to get a pair of welding gloves.Of course a few minutes turned into 30.
Anyway it did something new while idling. After about 15 minutes I’m checking temperature all over the engine with my temp gun and notice it starts to idle slower. It slowly went from around 800 rpms to 650 rpm. I didn’t touch it so I could see what it would do next ( I was expecting it to die or start missing or sneezing) . It never missed a beat and a few minutes later it idled it self back up to 800 rpms again. I said that’s lovely a whole other issue. I did notice a little fuel residue at one of the two vents on top of carbs. 2 and 3 but nothing running out. Was wondering if my floats and needles aren’t metering the fuel correctly since I had that EPA tank push fuel through them that time? Next chance I get I’m going to check torch on the pan and engine bolts then run it wot on the water and see if I still shuts down. If so I’ll run it without the cowling so I know for sure about the seal.
All so forgot to mention we had the boat loaded down that day. A teenager and a 10 year old and 2 ice chest my wife packed with enough food and drinks for a week on top of my usual gear. 3600 rpms was all it would do. I’m going to have to get a different prop for when I’m not alone.
 

Sea Rider

Supreme Mariner
Joined
Sep 20, 2008
Messages
12,345
Water leaks usually occurs at high rpm not at idle or muffs, go for a wot run with removed cowl and visually figure out if the leak comes from the cylinder head, exhaust cover or lower pan gaskets...

Happy Boating
 
Top