Captain's Chair Pedestal and Carpet

AirJordan613

Cadet
Joined
Aug 14, 2022
Messages
19
Hi, I'm soon to be starting on a floor replacement project on my boat. The floor is carpeted, and I plan on recarpeting after the new floor is in. The boat currently has back-to-back seating that we'd like to replace with a captain's chair for the driver.

Do I need to cut the carpet around the pedestal so it can be in direct contact with the floor? If so, how can I make the carpet look neat/clean around the pedestal base? Or, should I just mount the pedestal on top of the carpet?

Thanks!
 

Baylinerchuck

Commander
Joined
Jul 29, 2016
Messages
2,726
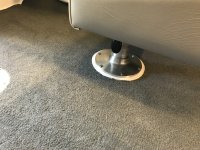
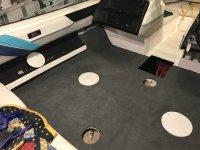
This is how I did mine. Cut 2 disks out of plywood, glued to the deck after the deck was glassed. Used PB as the glue. Carpet is cut around the disk. Water won’t pool up near the pedestal fasteners since the disk is higher than the carpet. If you set the pedestal on the carpet you are inviting rot to the party.

79E2EE22-529B-4EC2-B877-F2CABD1EF9F3.jpeg8C1F976D-ACDF-4147-9584-98CC1AADBB51.jpeg
 

Baylinerchuck

Commander
Joined
Jul 29, 2016
Messages
2,726
What boat? Prepare yourself for the ugly that lies under your deck. Boats rot from the bottom up. Depending on how your boat is built, you may have rotted stringers.
 

AirJordan613

Cadet
Joined
Aug 14, 2022
Messages
19
That looks good! Anything special to keep the carpet from fraying around the disks? Did you use lag bolts for the seats?

Boat is a ‘93 Wellcraft 196 Eclipse with a pre-vortec 5.0 Merc 2BBL. I just drilled a hole in the transom for a transducer wire. Filled that hole with PB then running the wire through a new hole in the PB. Transom was a little damp but wood was still solid. I’ve mentally prepared for some stringer work but am really hoping that I’m pretty solid around the motor and transom. No gelcoat cracking on transom and motor isn’t moving around. Transom and motor mounts / surrounding stringers also passed the tap test although I know that’s not going to tell 100% of the story. Pulling the motor is when the project begins to feel out of my league.
 

jbcurt00

Moderator
Staff member
Joined
Oct 25, 2011
Messages
25,034
Denial ain't just a river in Egypt

Transom wet wood isn't going to stay 'solid' for long, if it's wet up high where a transducer wire should be run, it's significantly more likely to be mush at the bottom
 

JASinIL2006

Vice Admiral
Joined
Feb 10, 2012
Messages
5,674
That looks good! Anything special to keep the carpet from fraying around the disks? Did you use lag bolts for the seats?

Boat is a ‘93 Wellcraft 196 Eclipse with a pre-vortec 5.0 Merc 2BBL. I just drilled a hole in the transom for a transducer wire. Filled that hole with PB then running the wire through a new hole in the PB. Transom was a little damp but wood was still solid. I’ve mentally prepared for some stringer work but am really hoping that I’m pretty solid around the motor and transom. No gelcoat cracking on transom and motor isn’t moving around. Transom and motor mounts / surrounding stringers also passed the tap test although I know that’s not going to tell 100% of the story. Pulling the motor is when the project begins to feel out of my league.

Unfortunately, the tap test really is meaningless unless you're highly experienced, and even then I'm not sure I'd trust it. Drilling test holes is the only way to really know what condition stringers and transom are in.

I had no gelcoat cracking on my transom and the outdrive was solid as a rock, but when I actually got into the transom, about 1/4 of it around the keyhole was so rotten I could remove the wood in bunches with my bare hands.

If you do find you've got more substantial problems, don't despair too much. Pulling the engine, repairing the transom, etc., really isn't that complicated and you don't have to be a mechanic. It is a decent amount of work, but many of us took it on with little or no boat experience.

Good luck!
 

jonny rotten

Petty Officer 1st Class
Joined
Jan 8, 2012
Messages
345
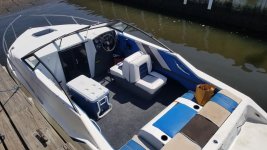
I ripped out my floor last year. Deck was shot but stringers were perfect. I added some 2x4 cca supports where I felt it needed it. Should last another 30 years. Used 3/4 plywood instead of the 1/2 that was there. I was debating swapping my back to back with a pedestal and was going to add a 2x10 cca block under the deck for extra support. Choose to leave one back to back and remove the other one. So much more room and now I just set up a zero gravity chair to relax on. Way better
 

Attachments

  • boat.jpg
    boat.jpg
    55.8 KB · Views: 8

AirJordan613

Cadet
Joined
Aug 14, 2022
Messages
19
I don’t think I’m in denial, we’ll see how it goes when the floor comes up. Sort of a hope for the best, mentally prepare for the worst kind of situation. One step at a time.

Most of the floor is still solid. I have one roughly 6” x 6” soft spot and a patched spot from a prior owner that I'd like to re-do. So figured I’d just do the whole floor and learn along the way. Stringer work doesn't seem too bad. I just don't have a good setup for pulling a motor - garage ceiling is way too low (so low that I have side-mount openers for my garage doors), and I don't own an engine hoist. And winter is a complicating factor as the boat will likely be stored offsite (inside cold) to keep it out of the snow.

I didn’t do the tap test myself, a family friend that owns a boat dealership did for us - their opinion was that stringers and transom were still solid, but given the boat's age, they're likely damp. So far that lines up with the core I got from the top of transom, but I understand the tap test doesn't tell all.

I’ll plan on making a new thread for the floor and/or more extensive rebuild it if comes to that. Taking it one step at a time as this kind of work is new to me.

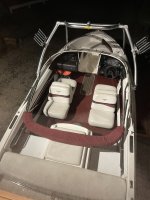
@jonny rotten we're thinking of doing the same. Would like some adjustability from the captain's seat between me and the wife on the driver's side, and more room behind it for a cooler or some gear. We like the passenger-side back-back seat and will probably update it with a replacement unit. I already rebuilt the two rear seats next to the doghouse with 1/2" HDPE and new foam and vinyl. The rest of the interior will probably be a combination of new and old material as it's not all bad.
 

Attachments

  • 20220831_021832327_iOS.jpg
    20220831_021832327_iOS.jpg
    1.9 MB · Views: 7

todhunter

Canoeist
Joined
Sep 15, 2020
Messages
1,311
For your original question, I put my captains chair bases over the carpet and screwed through the carpet. That way there won't be any fraying. Also...I didn't have a good way to get a very clean hole cut in the carpet, and it would have bothered me if I had a jagged hole. I did raised mahogany platforms fiberglassed to my deck to screw my captain's chair bases into (click that link, then scroll down a little to see what it looks like after I got the carpet installed). Marine carpet has a rubberized back, so with a little bit of effort I was able to make it stretch and conform up and over the raised platforms without bad wrinkling.
 

AirJordan613

Cadet
Joined
Aug 14, 2022
Messages
19
For your original question, I put my captains chair bases over the carpet and screwed through the carpet. That way there won't be any fraying. Also...I didn't have a good way to get a very clean hole cut in the carpet, and it would have bothered me if I had a jagged hole. I did raised mahogany platforms fiberglassed to my deck to screw my captain's chair bases into (click that link, then scroll down a little to see what it looks like after I got the carpet installed). Marine carpet has a rubberized back, so with a little bit of effort I was able to make it stretch and conform up and over the raised platforms without bad wrinkling.
That looks great! My steering wheel / console is already pretty low, so my original thought was to build up the bulk strength for it underneath the floor rather than adding a lot of extra height. Though I believe the original floor is 1/2", I'm planning to use 3/4" and thought I'd PB/epoxy and glass a second section of 3/4" underneath the area for the pedestal. Perhaps I could glass in a thin platform on top as well to route the water away.

Is your seat still stable despite going over the carpet? Did you use lag bolts to install?
 

todhunter

Canoeist
Joined
Sep 15, 2020
Messages
1,311
That looks great! My steering wheel / console is already pretty low, so my original thought was to build up the bulk strength for it underneath the floor rather than adding a lot of extra height. Though I believe the original floor is 1/2", I'm planning to use 3/4" and thought I'd PB/epoxy and glass a second section of 3/4" underneath the area for the pedestal. Perhaps I could glass in a thin platform on top as well to route the water away.

Is your seat still stable despite going over the carpet? Did you use lag bolts to install?
Thanks! I cut the post down on my seats so they can sit as low as possible, as the platforms were about 3/4" thick. I used #14 stainless steel sheet metal screws (McMaster-Carr part number 90184A536) sized to the correct length so they would only go into the platform, and not into the deck. The seats are very stable. When tightening the screws down, the seat base easily compressed the carpet.
 

froggy1150

Master Chief Petty Officer
Joined
Nov 3, 2017
Messages
843
So I did similar for my pedestal. 3/4 piece of plywood. Fairly wide. I drilled holes for stainless t nuts. Then small piece of foil tape over base of each t nut to keep resin out. Then I glued wood to deck with PB resin. Then I cut some bolts with some shank to them so there was just enough thread to bottom out In Tnuts. Then I layed glass over the top. Then gel coat. No carpet for me but for you... you could make a decorative frame out of whatever metal and screw down holding carpet. 3/4 Ss angle.
I have picks of my build 1974 reinell cuddy restore
 

froggy1150

Master Chief Petty Officer
Joined
Nov 3, 2017
Messages
843
 

Baylinerchuck

Commander
Joined
Jul 29, 2016
Messages
2,726
That looks good! Anything special to keep the carpet from fraying around the disks? Did you use lag bolts for the seats?

Boat is a ‘93 Wellcraft 196 Eclipse with a pre-vortec 5.0 Merc 2BBL. I just drilled a hole in the transom for a transducer wire. Filled that hole with PB then running the wire through a new hole in the PB. Transom was a little damp but wood was still solid. I’ve mentally prepared for some stringer work but am really hoping that I’m pretty solid around the motor and transom. No gelcoat cracking on transom and motor isn’t moving around. Transom and motor mounts / surrounding stringers also passed the tap test although I know that’s not going to tell 100% of the story. Pulling the motor is when the project begins to feel out of my league.
Good marine carpet should have a rubberized bottom which helps prevent fraying. Just take your time and use a sharp knife. When cutting a circle like this, start with an x over the circle and make small cuts a little at a time to cut out each quarter.
I really thought hard about longevity and preventing water to enter my new encapsulated wood. I didn’t like the idea of screwing bases into the carpet as this creates a low spot any water would naturally wick to. Holes with fasteners through the deck potentially could be a spot for water to enter. I tried hard to ensure as I rebuilt my boat it would be difficult for it to rot again.
 
Last edited:

froggy1150

Master Chief Petty Officer
Joined
Nov 3, 2017
Messages
843
That's why I did it the way I did. I have ZERO holes into my deck. I glued attachment points for everything on top of deck. 2x4's glassed in to screw into
 
Top