Bravo III lower unit

wakina

Seaman
Joined
Mar 20, 2011
Messages
72
1996 Pro Line 230 WA, 5.7L Bravo 3. It is over heating so was wondering if the lower unit has any type of water pick up tube/hose that can fall off, break, or or just plain wear out?
 

r.j.dawg

Ensign
Joined
May 30, 2011
Messages
993
Re: Bravo III lower unit

If you are overheating my first check would be your impeller in the raw water pump. Bottom starboard side of the engine and a pain in the ***** to get to.
 

wakina

Seaman
Joined
Mar 20, 2011
Messages
72
Re: Bravo III lower unit

Well the truth is that my 8 year old grand son started the boat on the trailer and now it over heats, Thought maybe there was something that could be damaged with hot exhaust. Runs fine just over heats now. it ran about 30 seconds before I could get in the boat and shut her down. Ran great last weekend so I think the drystart has something to do with it.
 

r.j.dawg

Ensign
Joined
May 30, 2011
Messages
993
Re: Bravo III lower unit

Yup, your impeller is toasted. Get it changed and check your exhaust tubes going off the risers. They could be done as well. It only takes seconds to fry an exhaust system without water going through it. :facepalm:
 

wakina

Seaman
Joined
Mar 20, 2011
Messages
72
Re: Bravo III lower unit

Was told there was no impeller in the lower unit and that raw water pump was located on the bottom front of the engine. Learn something new every day. So there are actually 2 raw water pumps, is that correct?
 

Pete104

Lieutenant
Joined
Apr 30, 2011
Messages
1,439
Re: Bravo III lower unit

NO, just 1!
Chances are this going to cost gramps alot of money! Perhaps a couple of times.
 

Scott Danforth

Grumpy Vintage Moderator still playing with boats
Staff member
Joined
Jul 23, 2011
Messages
49,538
Re: Bravo III lower unit

without water, the raw water impeller was toasted in a few seconds. the exhaust hoses will also be suspect as they need the water flow to keep them cool.
 

wakina

Seaman
Joined
Mar 20, 2011
Messages
72
Re: Bravo III lower unit

the rubber exhaust tubes/hoses appear to be fine they weren't even hot to the touch, checked them first thing as soon as she was shut down. Running the impeller dry without water frys them as they would over heat from friction, is that correct?
 

Scott Danforth

Grumpy Vintage Moderator still playing with boats
Staff member
Joined
Jul 23, 2011
Messages
49,538
Re: Bravo III lower unit

I would still inspect them on the inside.
 

wakina

Seaman
Joined
Mar 20, 2011
Messages
72
Re: Bravo III lower unit

I will definately do that as I already have enough problems with out creating more!!! Thanking all of those who have answered to my questions.
 

TilliamWe

Banned
Joined
Dec 21, 2004
Messages
6,579
Re: Bravo III lower unit

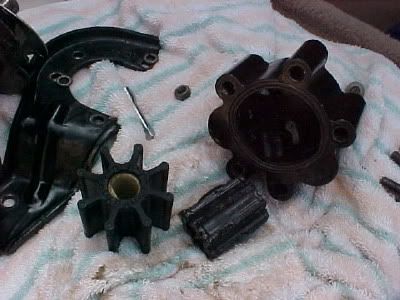
Here's what you'll likely see when you get the pump off the motor. (Some are easier than others to reach.)

New impellar in photo for reference.
Ruined_Impeller.jpg


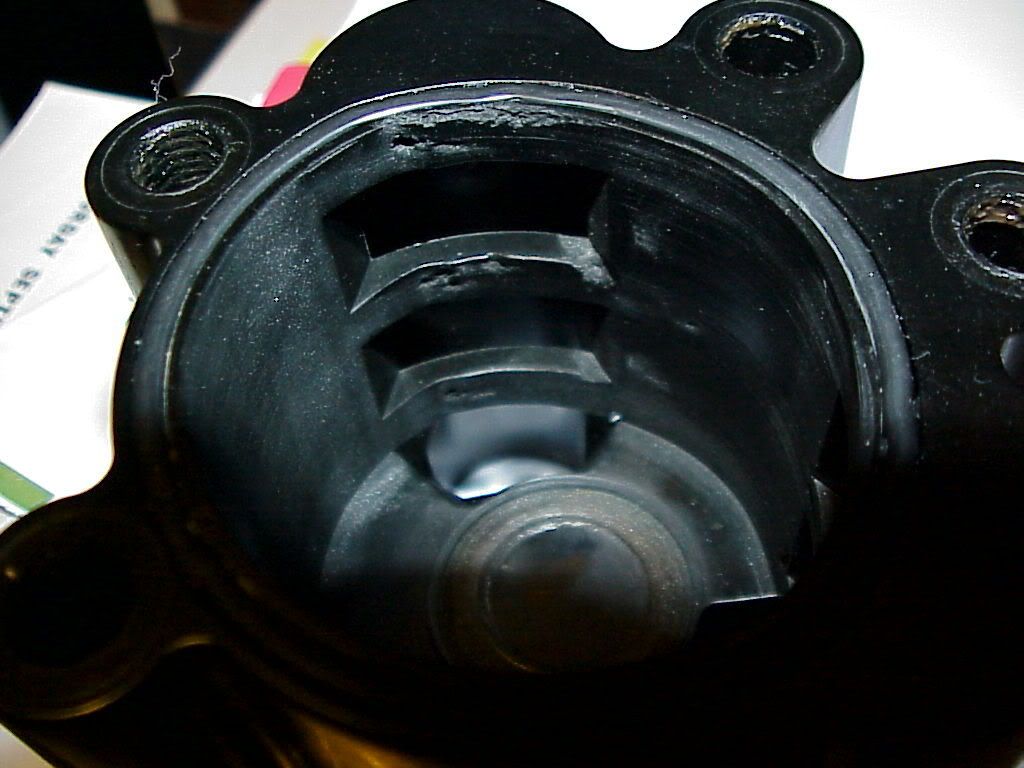
If the inside of the pump housing looks like this, go ahead and replace it. (Although this housing was used like this for two more years after this photo was taken)
MVC-002X.jpg
 

wakina

Seaman
Joined
Mar 20, 2011
Messages
72
Re: Bravo III lower unit

I have already ordered a new pump kit, consisting of a new housing, wear plate, o rings and impellar for the replacement! That photo sure is enlightening and the keys to the boat will be kept in a more secure location. So maybe both my grand son and I have learned something from this episode in a boaters life.
 

Pete104

Lieutenant
Joined
Apr 30, 2011
Messages
1,439
Re: Bravo III lower unit

You will have pieces of the old impeller pushed into the cooling system. That isn't good!
Unfortunately pictures people take, don't show the important stuff!
 

wakina

Seaman
Joined
Mar 20, 2011
Messages
72
Re: Bravo III lower unit

Can't do to much about that which was pushed into the block but I was intending on back flushing the water line from the upper circulator pump back through the power steering cooler and into the bilge before reassembly. just in case there would be ground up impellar parts still in the raw water pump outlet line.
 

Pete104

Lieutenant
Joined
Apr 30, 2011
Messages
1,439
Re: Bravo III lower unit

Great! Now your thinking. But instead of letting the pieces just get pushed into the bilge, take an old sock & put over outlet hose at the pump. You'll see what left the "original impeller" & thru forensics you will know if you got all the crud out!
Don't forget that just because it went one way, don't mean it's gonna go the otherway very easy!
 

TilliamWe

Banned
Joined
Dec 21, 2004
Messages
6,579
Re: Bravo III lower unit

Backflushing is necessary, of course. If you can, though, take off the thermostat housing and look for any pieces there, especially if you don't get ALL the blades when you backflush. One of the blades from that trashed impeller you see above made it all the way to the thermostat housing on my boat. It caused the boat to run about 15 degrees too warm.
 

wakina

Seaman
Joined
Mar 20, 2011
Messages
72
Re: Bravo III lower unit

Took about 1/2 hour to get the pump off, just waiting for new pump to arrive. Was not to bad of a job after all! I see where it could be a bear though with out the kind of room that I have in the engine compartment. Getting it back together will probably be a challenge though.
 

MarkSee

Lieutenant Junior Grade
Joined
Sep 10, 2010
Messages
1,172
Re: Bravo III lower unit

Did you happen to make a 'witness' mark on the old housing and bracket to make the line-up and installation of the new housing on the bracket easier? I have no room to get on the back side of the housing and push the hoses back on so the hoses have to go on the housing first, then get the hosing semi-installed on the bracket, then get the bracket mounted back to the engine block, then final install and tighten all bolts/nuts. Mine only had a single worm clamp and I added a 2nd clamp on both the inlet and outlet sides of the hoses. The nuts mounting the housing to the bracket used lock washers and I replaced those with new stainless steel nylocs that made the installation on the out-of-site studs a little easier.
Mark
 

wakina

Seaman
Joined
Mar 20, 2011
Messages
72
Re: Bravo III lower unit

Actually I was able to take the pump out bracket, brace and all. Took the top bolt out of the bracket first after removing the large hose that goes to the t-stat housing, then the one off of the brace on the port side of the block then removed the last bracket bolt. The pump, bracket and brace was free to move down and forward where I could get at loosen the clamps on the hoses and remove them after putting a red cable tie on one so I knew where it went when reinstalling on the pump. I will reinstall in reverse order.
 

wakina

Seaman
Joined
Mar 20, 2011
Messages
72
Re: Bravo III lower unit

The new pump is installed and functions properly. I ran the boat for about 1/2 hour on the muffs and the temp hovered between 140 and 145 degrees on the instrument panel. I do have a minor leak on the inlet side of the pump but could not fit my nut driver between the motor mount and the hose clamp, I can feel it move when trying to turn it. Didn't have my 1/4 inch drive sockets with me either, I am sure the ratchet and small extention will work to tighten the hose clamp.
 
Top