BF45: removing oil pan?

Cresco750

Petty Officer 2nd Class
Joined
Jul 7, 2012
Messages
192
Hi all
My first time posting on this forum.
I picked up a BLAF / BF45A which I am in the process of swapping power heads. The original motor is getting water into the combustion chamber (previous owner had corrosion on head welded / resurfaced / new head gasket, to no avail), and I just happened to have a brand new power head in my shed for the same.
I have the factory shop manual, and I am at the point of removing the oil pan. I have removed the (11) 6x25mm bolts around the outside / underside periphery of the pan but I have left the exhaust tube and water tube installed, but it doesn’t seem to want to break free? I’ve given it a few good taps with a rubber mallet, but I am hesitant to get too brutal with it for fear of cracking the pan. Is there a step I’m missing here? Or am I just being too gentle with the mallet?

Thanks in advance.
 

ahicks

Captain
Joined
Sep 16, 2013
Messages
3,957
You'll need to remove the exhaust pipe and water intake pipes (2 bolts). Behind those, you'll find 2 more bolts holding the pan on. Very difficult to see them.

I've done a bunch of these now, but remember the first one I did clearly. Missed these same 2 bolts myself, and thankfully didn't break the pan "tapping" on it with a dead blow mallet.

For reference, check out the new pan gasket. That should give you a pretty good idea of where they are located.....
 

Cresco750

Petty Officer 2nd Class
Joined
Jul 7, 2012
Messages
192
You'll need to remove the exhaust pipe and water intake pipes (2 bolts). Behind those, you'll find 2 more bolts holding the pan on. Very difficult to see them.

I've done a bunch of these now, but remember the first one I did clearly. Missed these same 2 bolts myself, and thankfully didn't break the pan "tapping" on it with a dead blow mallet.

For reference, check out the new pan gasket. That should give you a pretty good idea of where they are located.....

Thanks for your response. I did actually end up figuring it out before I saw your message, and I had a real battle with the two bolts holding the exhaust tube on. They wouldn’t budge even with liberal amounts of heat and soaking with PB Blaster. In the end the heads sheared off both, and then I found that the flange on the sump which the exhaust tube bolts to is quite badly corroded and starting to disintegrate, so Ill be looking for a replacement sump now too.
 

ahicks

Captain
Joined
Sep 16, 2013
Messages
3,957
Thanks for your response. I did actually end up figuring it out before I saw your message, and I had a real battle with the two bolts holding the exhaust tube on. They wouldn’t budge even with liberal amounts of heat and soaking with PB Blaster. In the end the heads sheared off both, and then I found that the flange on the sump which the exhaust tube bolts to is quite badly corroded and starting to disintegrate, so Ill be looking for a replacement sump now too.
You're watching ebay for that part?
 

Cresco750

Petty Officer 2nd Class
Joined
Jul 7, 2012
Messages
192
Ok, so I’m ready to start reassembly and now that I am intending to use the later style oil pan I also have to use the later exhaust pipe. This style of pipe has an additional small tube coming out the side which pokes up into the under side of the lower engine case, above the level of the gasket. The new oil pan gasket that I purchased does not have a hole to permit this small side tube to pass through, only a series of small holes.
So, my question is: does this tube need to poke up above the gasket and into the engine case, and therefore I need to somehow cut the hole in the gasket. Or can I just trim half an inch off the top of the pipe, and so a small amount of exhaust pressure would pass through three of the small perforations in the gasket and into the tube below?

Another question: the later style exhaust tube is quite a bit longer than the old style, and obviously plugged into a fitting at the gear case end? Should I leave as-is, or trim to the length of the original pipe?
 

ahicks

Captain
Joined
Sep 16, 2013
Messages
3,957
Ok, so I’m ready to start reassembly and now that I am intending to use the later style oil pan I also have to use the later exhaust pipe. This style of pipe has an additional small tube coming out the side which pokes up into the under side of the lower engine case, above the level of the gasket. The new oil pan gasket that I purchased does not have a hole to permit this small side tube to pass through, only a series of small holes.
So, my question is: does this tube need to poke up above the gasket and into the engine case, and therefore I need to somehow cut the hole in the gasket. Or can I just trim half an inch off the top of the pipe, and so a small amount of exhaust pressure would pass through three of the small perforations in the gasket and into the tube below?

Another question: the later style exhaust tube is quite a bit longer than the old style, and obviously plugged into a fitting at the gear case end? Should I leave as-is, or trim to the length of the original pipe?
Do you have a part number for this "improved" exhaust pipe? Are you pretty sure it's for this BF35-50A series motor?

I've never seen an exhaust pipe that exits into any opening at the bottom, and I can't say I've ever seen an "improved" pipe that requires a hole in the pan gasket above it.

That's not to say one doesn't exist, only that it's beyond anything I've seen or heard of.
 

Cresco750

Petty Officer 2nd Class
Joined
Jul 7, 2012
Messages
192
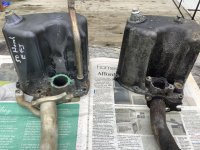
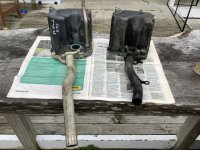
Ok, here is a side by side comparison: my original oil pan on the right (BF45A), and the replacement I sourced on the left (apparently from a BF50 EFI).
You will note on the original pan the flange to which the exhaust pipe bolts is of the early style (has a recess and requires rubber o-ring to seal), whilst the newer replacement pan has the flat flange and gasket arrangement?
Note also the difference in exhaust pipes: new one much longer, and appears to have some sort of marks on the bottom end suggesting it should be inserted into some sort of socket? Also note the additional pipe on the side of the new pipe? The discoloured 1/2” of the tip of this little pipe would protrude through the gasket level and into the primary case exhaust chamber.

So, there are two options as I see them: leave the replacement pipe as-is, carefully cut a hole in the gasket to allow the small pipe to protrude up into the underside of the primary case, and the longer length exhaust tube would poke down into the extension case further (Would that even be OK, or is it getting too close to the pump housing)?
OR: trim the top of the small tube so it is below the gasket level , and therefore the top of that tube would be exposed to some exhaust gases passing through the small perforations in that area of the gasket, and shorten the exhaust pipe to be the same length as the original?

Your thoughts would be appreciated?

Thanks.

A1EB0CAE-8D2E-42B3-A5D9-A0435152BB57.jpeg76CE70DA-FF99-4C59-A47C-AEBB5742340E.jpeg
 

MattFL

Master Chief Petty Officer
Joined
Oct 20, 2010
Messages
856
Those exhaust pipes are totally different. If the pans are the same, I would use the new pan with the old exhaust pipe, assuming the old pipe is still in serviceable condition.
 

Cresco750

Petty Officer 2nd Class
Joined
Jul 7, 2012
Messages
192
Those exhaust pipes are totally different. If the pans are the same, I would use the new pan with the old exhaust pipe, assuming the old pipe is still in serviceable condition.
Not quite that simple, unfortunately. The flange on the old pipe will not mate onto the new pan due to the fact that one is designed to squeeze a rubber(?) o-ring, and the other a plain gasket.

Yes I realise that the exhaust pipes are totally different, but is that a reason not to use it in this application?
 

ahicks

Captain
Joined
Sep 16, 2013
Messages
3,957
I think I see what the deal is here. Looks like that pan says it's from an EFI motor (BF50D). You might find SOME interchangeability from that motor to the older design (BF35, 40, 45, and 50A) but I wouldn't count on it! Same story with your new pipe I'll bet. That would certainly explain the big differences.

BTW, they both use paper gaskets, though by the looks of that original pan you'd never know it!
 

Alumarine

Captain
Joined
Feb 22, 2005
Messages
3,733
Could you cut the mounting flanges off both pipes and use the new flange on the old pipe?
 

ahicks

Captain
Joined
Sep 16, 2013
Messages
3,957
The parts we're talking about here RARELY ever go bad for any reason. For that reason, they sit around getting dusty or are scrapped out frequently.

Here's an ebay listing for BOTH parts for instance-
 

Cresco750

Petty Officer 2nd Class
Joined
Jul 7, 2012
Messages
192
BTW, they both use paper gaskets, though by the looks of that original pan you'd never know it!

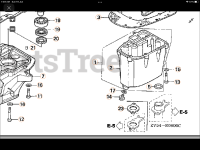
Hmm, not sure about. If you look at the screenshot of an online parts manual you will see two different styles. One clearly uses a paper gasket :#23 in the diagram (p/n 18291-zv5-010), whilst the older style like my original pan uses what appears to be a metal crush washer #5 in the diagram (p/n 18291-zv5-000).

At this stage, unless Im convinced otherwise I think my best course of action will be to cut the main exhaust tube to the same length as my original, and trim down and block off the small side tube?

76793698-1B5D-43A9-968A-D20522E227FF.png
 

ahicks

Captain
Joined
Sep 16, 2013
Messages
3,957
You're right. The 45 was only made for one year, and during that year they used both designs, depending on serial number. I have to wonder if they saw the issue you had coming and changed? See #5 and #23 here:

boats dot net/catalog/honda/outboard/45hp/bf45am-lrta-vin-blaf-1000001-to-blaf-1099999/oil-pan
 
Top