Best Water Pump for 6hp 1969 6R69M Johnson.

cprodave

Petty Officer 1st Class
Joined
Jul 1, 2012
Messages
301
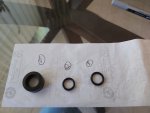
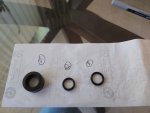
Working on overheat problem (see separate/closed thread on Stuck Head Bolts) I discovered my 5 year old pump impeller was really demolished. To my surprise, my Water Pump Housing is 323596 with Metal Water Pump Liner 324641 and Impeller 763735 and Plate 323597 as would be standard for newer outboards such as 1979 6R79E. The 6R79E diagram also calls for 2 Impeller Housing Gaskets 324901. On the other hand, Standard Housing for 6R69M is 303442 with Impeller 434424 and Plate 305303 with no Impeller Housing Gasket specified. . Per photo the Impeller 434424 I bought (anticipating the standard fix) is way too large. And the new Plate 305303 has hole configurations different than existing/installed 323597.
All parts physically below the Plate are specified identically between the 6R69M and 6R79E.


So...a couple questions: 1) is original/specified Housing 303442 better (although scarce/expensive to find) than the existing Housing 323596 with Water Pump Liner 324641? 2) is original/specified Impeller 434424 better than the existing Impeller 763735? 3) although Diagram/BillOfMaterial specifies Qty=2 Impeller Housing Gaskets 324901 the Diagram is not clear where these are to be located. Am I correct in assuming 1 Gasket goes above the plate (per Diagram) and the other 1 goes below the Plate (not shown in Diagram)?

Thanks for any advice.
 

oldboat1

Fleet Admiral
Joined
Apr 3, 2002
Messages
9,612
From bottom up, single gasket under the driveshaft housing. Housing plate on top of the driveshaft housing, and the impeller housing on top of that.
 

racerone

Supreme Mariner
Joined
Dec 28, 2013
Messages
38,035
I believe the poster is asking about the updated water pomp kit as used on the 79 models.--That can be fitted on older motors.-----Have a 63 model 5.5 HP with that 79 pump fitted.---It does use a gasket between the pump plate and the pump housing !!----The gasket will only fit above the pump plate.----The factory repair kit only shows the one gasket !
 
Last edited:

cprodave

Petty Officer 1st Class
Joined
Jul 1, 2012
Messages
301
Oldboat1, I will make sure there is a Gasket under the Driveshaft Housing 382796.

Racerone, thanks for confirming that Gasket 324901 goes above the Plate 323597 and below Housing 323596 (with Metal Liner 324641) . I have ordered Water Pump Kit 763758 to repair this.

I am guessing there is an error in Bill Of Material which specifies Qty 2 for Impeller Housing Gasket 324901, when in fact only Qty 1 is needed. That same Diagram/BOM does not show a Gasket below Driveshaft Housing 382796, but in fact a Gasket is needed there. There is another Gear Housing Kit Sierra 18-2681 that might include that Gasket for below the Driveshaft Housing. This kit might include Oil Seal 314167 that I might also need (I will test by pressurizing via the Gear Oil Fill Holes, soap bubbles, etc)

Thanks again for inputs.
 

cprodave

Petty Officer 1st Class
Joined
Jul 1, 2012
Messages
301
I installed the Water Pump Kit and the engine is still overheating--there is no "mist" coming out (as should happen with this outboard which has no telltale "pee".

Disassembling/dropping down the WaterPump/Gearcase I was able to determine that there is a blockage above the Copper Water Tube 304317 at/above the upper Water Tube Grommet. A piece of heavy weedtrimmer line cannot be pushed further up than this, nor can air be blown or sucked using a tight-fitting hose on the copper tube. I am 99% sure when the old impeller disintegrated much of that impeller material went up above the Copper Tube, lodging around the Grommet area or higher.

If possible I would like to remove this blockage without disassembling the Midsection further. I don't want to use compressed air to push the material further up where additional clog (in an even less accessible area) could result. I pulled best as I could with long pliers on the water tube (being careful to not clamp too tightly on the lower section of the tube as this could deform the tube and prevent a good seal with the Lower Grommet). No go...

Any tricks/tips to gently removing this Water Tube? I was thinking of making a wire windless/"tourniquet" that I could pull on. Then I can use a longer drill bit (gently) or rifle cleaning brush rod to clean the area of Midsection that that Water Tube goes into.
 

F_R

Supreme Mariner
Joined
Jul 7, 2006
Messages
28,226
I'd rather see you pull the powerhead and see what you find up there. it's unlikely it is plugged within the midsection. If you are lucky, the chunk got caught by the small hole in the powerhead gasket.
 

Tim Frank

Vice Admiral
Joined
Jul 29, 2008
Messages
5,346
+1 ^^^^

The added advantage is that if you remove the power head (it is NOT difficult), you can verify that the crankshaft lower bearing seal is all OK, and if not, make any necessary correction, as operating with it not correct can lead to serious damage.

I have a '75 6 HP E'rude and when I change the impeller every few years, I pull the power head.because the rest of the job is so much easier. You build that seal back up like a sandwich instead of at arms length....where you cannot see.

A few will think that is overkill, but if you do not do this particular repair fairly often, it is easy to mess up the seal assembly. I sleep easier.
 

racerone

Supreme Mariner
Joined
Dec 28, 2013
Messages
38,035
Agreed these motors are simple and if you take the time to do the repairs yourself you will not need to buy a new " plastic parts " motor from offshore.
 

cprodave

Petty Officer 1st Class
Joined
Jul 1, 2012
Messages
301
Thanks to all for the input.

OK, I will remove the Powerhead and also check the Crankshaft Lower Bearing Seal.

Looking at the Exploded View Diagram it is unclear how many bolts fasten the Powerhead. From visual inspection it appears there are 5 bolts that go upward into the Engine Block through both the Exhaust Housing and the Lower Cover. Plus there are an additional 2 bolts that go through only the Lower Cover into the Engine Block. i.e a total of 7 bolts...Is this correct? I did a Powerhead swap on a 4R76M and there were 6 bolts, so 7 seems about right for this 6HP.

A couple other questions: 1) Do I need to remove the Carburetor or is there enough room to wiggle out the Powerhead while leaving Carb in place? 2) do I need to remove the Recoil Starter? 3) where is the best place to disconnect the Throttle? Is it where the brass Throttle Control and Link Plate 380185 attaches to Spring Clip 305988? 4) OK to leave Flywheel and Timing Plate on the Powerhead? I don't want to do any unnecessary disassembly.

I very much like this old outboard for its simplicity and reliability despite chuckles I get from my buddies and at the boat ramps. It starts easily and in 10-12 years or so has left me stranded only once (mechanic did not connect shift rod properly, fell apart 2-3 years later). I have 8 small Johnson/Evinrudes at the present time, but need to "thin down my herd" to only 3 (for shed space and marriage reasons--lol). So I am wondering if this should be one of the "keepers". But that may be the subject for another Thread.

Thanks for ongoing advice.
 

Tim Frank

Vice Admiral
Joined
Jul 29, 2008
Messages
5,346
My '75 is apart right now....1) the carb is still on the powerhead,...2) so is the starter. The slow speed needle and choke are removed.
3) A few options....whatever works for you.
4) My flywheel is still on.

What I do not know is if there are any significant differences between a 1969 and 1975.

On FR;s thought, my money would be on you finding serious debris in the "compartment" between the powerhead and mid-section.
 

cprodave

Petty Officer 1st Class
Joined
Jul 1, 2012
Messages
301
Thanks Tim, I am starting the disassembly now --hunting for debris .
 

racerone

Supreme Mariner
Joined
Dec 28, 2013
Messages
38,035
Well----I do not think there is much difference between a 1969 model and a 1975 model on these wonderful 6 HP motors.----Paint and decals are different.
 

cprodave

Petty Officer 1st Class
Joined
Jul 1, 2012
Messages
301
The Powerhead removal went smoothly yesterday--no stuck bolts. I didn't find any impeller debris or any other debris in the Water Tube or above the Water Tube, not under the Powerhead Gasket nor in the area between Exhaust Housing and Powerhead. Overall the Crankshaft Lower Seal was in pretty good shape. Although I was surprised to find remnants of an O-ring above the (cork?) Driveshaft to Crankshaft Gasket 303355--no diagram shows this O-ring. Also there was no Lower Bearing O-Ring 303347--it was missing. Maybe a previous owner put the O-ring in the wrong position??? I am waiting for a new Gasket 303355 to arrive.

Meanwhile, still looking for the "smoking gun" on this overheat problem, I removed the Cylinder Head--there were a couple bits of shell/sand around 3/16 diameter that I removed. Then I removed the Thermostat Cover and pretty sure I found my dumbazz mistake--I had used some Gasket Compound when installing the new Thermostat and excess Gasket Compound had gotten onto the Thermostat. Geez... lesson learned, I probably didn't need any Compound anyhow.

So after I reassemble next week I am hoping this problem will be behind me. Although I still don't like this design (no telltale or pee stream) because it is harder to tell at-a-glance (while I am in the boat) if cooling water is circulating properly. Otherwise I agree these are great outboards.

Has anybody here retrofitted a telltale (as Leeroy's Ramblings describes--or otherwise) on this or similar vintage outboard?

Thanks again to all for advice.
 

racerone

Supreme Mariner
Joined
Dec 28, 2013
Messages
38,035
The important o-ring fits in the top of the carbon rotor of the seal.----Install a new one.-----No tell tale needed on these motors.------Maintain the impeller and thermostat is all that is needed.-----And on most motors the tell tale is NOT an indication of water circulating / cooling the block !!!!----It just tells you that the water pump is bring water up to the motor.
 

Tim Frank

Vice Admiral
Joined
Jul 29, 2008
Messages
5,346
Hopefully this is not a hijack since I think it relates to the thread directly and may answer some reassembly questions for the OP....as well as me.
I am reassembling this stage right now and I suddenly have found an extra piece. It is a small washer/spacer....made from the same material as the seal...is that carbon? It fits into it the seal perfectly....so the question would be, is that carbon seal 2 pieces or is mine broken now?

My OEM service manual is different from the parts list... and.it does not show the o-ring....strange.

Is the correct orientation of the plate...part number 0303356, with the shoulder up, to fit into the cork washer?
 

racerone

Supreme Mariner
Joined
Dec 28, 2013
Messages
38,035
`The carbon rotor is one piece.-----Likely the mystery piece is the o-ring that fits in the upper groove and has hardened / deformed over the years.----I order those o-rings all the time so they are shown on a parts list.---The # is 303347.----The plate ( stator ) goes with the shoulder up.---The carbon seal rotates against that plate.-------The carbon seal face and the stator are a precision seal assembly.-----Really good design in my opinion too.
 
Last edited:

Tim Frank

Vice Admiral
Joined
Jul 29, 2008
Messages
5,346
My o-ring was still there....beaten up a lot. :)
This "extra" piece definitely appears to be the same material as the carbon seal and is a great fit....sure seems purpose built/designed.

In the picture you see the carbon rotor (1) .....the mystery piece (2)....and the new o-ring. (3)

I know where (1) and (3) go, but if (2) does not go into (1) then the recess in (2) is too deep and the o-ring would not sit proud of the top.
If you put (2) into the recess in (1) the o-ring sits above the top surface of (2)

Should the plate not compress that o--ring?

Of course, if there is no top pressure on the o-ring by design, then I guess that mystery piece is and o-ring and has indeed hardened and taken the exact shape.of the carbon seal recess.
But it is not as thick as the recess is deep....which seems odd to me.

Lower bearing seal.jpg
 

Attachments

  • Lower bearing seal.jpg
    Lower bearing seal.jpg
    521.8 KB · Views: 0
Last edited:

racerone

Supreme Mariner
Joined
Dec 28, 2013
Messages
38,035
Post 6 close up pictures of the carbon rotor.-----And of where the carbon spins on the stator.----Why do you say / guess ---" there is no pressure on the o-ring " here.
 

Tim Frank

Vice Admiral
Joined
Jul 29, 2008
Messages
5,346
The carbon seal has a recess in both sides....the side facing down captures the top end of the tensioning spring.
The top recess I think holds the o-ring. But without that mystery piece/spacer, the recess completely "engulfs" the o-ring.
It would seem that the o-ring should be a bit proud when in that recess so that the plate above compresses it slightly.
Otherwise nothing really holds it in place.up and down....side to side it is cupped by that carbon seal recess.

Maybe I am overthinking this. ( and now in hijack territory....sorry Dave. :) )
 

racerone

Supreme Mariner
Joined
Dec 28, 2013
Messages
38,035
I have about 10 or more of these motors apart / rebuilt at this time..---I know what these parts look like and how they work.--So yes you may well be overthinking on this simple set-up.
 
Top