j_k_bisson
Lieutenant Junior Grade
- Joined
- Oct 6, 2010
- Messages
- 1,082
To all those of you that do not know me I am the guy that is rebuilding/restoring his 1991 Bayliner Trophy 2002WA boat. I had to replay the transom and stringers due to rot issues. The link in my signature is that thread. I am currently just finishing that portion of the project up and starting into the cosmetic issues. That is why I?m posting this thread.
I am asking for all the collective knowledge here on the proper way to do liquid gel coat stress/impact crack repairs. I have never done this but I am willing to learn and try. I figure that the worst that can happen is I grind it out and start over. The reason for this thread is to pick every pros brain out there and get the whole process down before any grinding is even started.
I stopped yesterday after work to pick of the supplies that Yacht Dr. told me I would need. Between Yacht Dr. and the sales man at Michigan Fiberglass in Gross Point, Michigan this is what I got.
1) Polyester Resin (Special Blend MFR-101a Laminating Resin Low VOC 1qt
2) Bright White Liquid Gel Coat (MF-GC10) 1qt
3) M.E.K Peroxide Hardener 2 oz
4) M.E.K. Solvent 1 qt
5) Parting FilmNo.10 Clear 1 pt
6) Preval spray gun 1 pcs
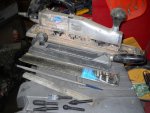
Here is a pic of the stuff

This is the procedure that I believe is the way to do the fiberglass repair portion of the job.
1) Designate the area to be repair. Clean and wash area and the surrounding 12-16?. Cover and mask off all other parts of boat that will not be involved with the repair from dust and overspray.
2) Wash the repair area and 12-16? larger with Acetone. This is to remove any old wax that may be present on the surface.
3) Grind the stress cracks down through the gel coat to completely remove the crack. If the crack extends down into the laminating mat then continue grind until the bottom of the crack has been removed. Ensure to dome the area out and feather the edges into the surrounding glass gradually. Maximum grit finish before moving on to laminating is 220 grit finish. 150 grit also acceptable. The resin is a mechanical bond.
4) Clean the area with a clean (Acetone free) rag. Proceed to blow wiped area off with oil free compressed air.
5) Preheat area to 72-75?F using a 500w halogen work lamp. Do not place lamp any closer to the work surface than 2?. 3-4? preferred. Check to ensure that surface temp is correct by using a pyrometer if available. If not heat for approximately 20-30 minutes.
6) While the area is heating, pre cut 1.5 oz chop mat to required shapes to fill the repair area. Use overlapping layers to slowly extend out from the center to build up area. This needs to be done before hand as when the resin is mixed it has a window of time before is hardens. Also when you are finished cutting the mat to the shape, pull loose the edges. This will help feather the edges between the layers.
7) Mix resin in small amounts, 5-6oz at a time. This will reduce the waste. If any pigment is available add to the resin. Also ensure everything is pre staged so nothing will be needed to be found after the resin has been mixed. First paint the area to be filled with the first layer of mat with resin. DO not apply a ton of resin, be clean as it could drip. Apply mat and coat with resin. Wait 30sec to 1 minute for mat to ?wet out?, then reapply a second coat of resin and mat until all layers have been applied.
8) When completed the laminating, use a piece of wax paper to cover the area of repair. This will help seal the area from contamination and help the resin from draining from the mat. Sort of like vacuum bagging. If vacuum bagging is available by all means use it.
9) Reapply the 500w halogen lamp. Again not to close. Keep applied for 3-4 hrs until tough hard.
10) Leave the area harden for 1-2 days before starting to sand. When sanding make sure to sand it flat using boards and do not leave it high. You will want to actually dome is under flush by .020?-.030?. If it is too low though then reapply a coat of resin to build up and re-sand until proper. Do not sand with any grit higher than 220 grit. 150 grit acceptable.
This is how I was lead to believe it was done. Please if there is any other tips/tricks please let me know.
Here is how the gel it applied.
1) Again wipe and clean the area from dust. Do not use any solvents as these can carry into the repair area dissolved waxes and such. Just wipe dry rage to remove fine powder and blow with oil free compressed air. Also mask off boat 1-2? away from repair area. Also make sure rest of boat is covered from over spray.
2) Check to ensure that the liquid gel does match the colour of you boat. Simply take a dab of the liquid and put in on the gel in the area of repair. If it does not match bring it to a pro to get matched. Try to to do this before you start grinding. That way if you need to get a ``chip`` then you can remove on from the repair area. I?m colour blind and do not do this kind of work. Matching that is. Wipe off dab when you area satisfied it matches.
2) Again preheat the area with the 500w shop lamps to 72-75?F surface temp. Not too close with the lamps again. Also heat area for 20-30 minutes before starting repair.
3) Ensure area in prep?d for all tools and materials that could be required. Once the gel is mixed time is of the essence. Mix gel coat to hardener to manufacture recommendations. Then add M.E.K solvent to reduce the gel to a spray able compound. Add M.E.K. solvent in steps as the mixture viscosity will need to be only to the point that it will spray like a gummy paint. Not a automotive fan paint. 10-12% max ratio. Strain the mixture before filling the Preval sprayer. Also remove the screen from the hose on the Preval sprayer to help spray the mixture.
4) Spray the area using even semi thick coats. Just enough so it does not run. Give 2-4minute between coats. Lamp helps between coats. Not too close again. Spray all coats while the mixture is wet. 4-5 coats should be enough. But if in doubt spray more, you will only have to sand it off later is there is too much.
5) Leave the gel exposed to the air for 10-20 minute after finish spraying. Reapply heat lamp. This stage is to allow the M.E.K. Solvent to evaporate from the mixture. If not you will get voids/porous in the gel coat where the M.E.K. solvent vapours will collect.
6) After waiting spray the parting film directly on the gel using a spray mist bottle from the dollar store. This will help seal the gel and aid in the hardening process. I don?t know anything about this stage, its what the guy from store told me to do. Need more info on this portion of the process.
7) Cover gel with wax paper but do not wet out paper to gel . If it does touch leave it alone. This is to protect the gel from contamination. Also leave the lamp on it for 3-4 hrs.
8) Leave gel 2-3 days before sanding and buffing. Allow it to cure/harden. If sanded too early the gel will still be shrink and could possible crack because it is too thin after sanding. Best to wait the proper time.
9) Sand and buff feathering out edges by 4-5 inches past repair spot. Buff to high gloss shine.
Yacht Dr. Told me to use Patch Repair Aid instead of M.E.K. the guy at Michigan Fiberglass told me not to. The sales man stated I did not want to because it was purple and would tint my gel purple. Also that it would cause the gel to shrink more then with the M.E.K. and finally it would cause the mixture cook off faster than with the M.E.K. I finally agreed with the sales guy because I have never done this and would probably need all the time I could get with this stuff. So I did not buy it. But if Yacht Dr, Opps, or any other pro says to use it then I will. I?ll go and pick some up next week.
That is the process that I was told to do. If anyone has anything to add please feel free. I will not be starting this project till next week after boxing day. So I hope to have all the input before then.
I am asking for all the collective knowledge here on the proper way to do liquid gel coat stress/impact crack repairs. I have never done this but I am willing to learn and try. I figure that the worst that can happen is I grind it out and start over. The reason for this thread is to pick every pros brain out there and get the whole process down before any grinding is even started.
I stopped yesterday after work to pick of the supplies that Yacht Dr. told me I would need. Between Yacht Dr. and the sales man at Michigan Fiberglass in Gross Point, Michigan this is what I got.
1) Polyester Resin (Special Blend MFR-101a Laminating Resin Low VOC 1qt
2) Bright White Liquid Gel Coat (MF-GC10) 1qt
3) M.E.K Peroxide Hardener 2 oz
4) M.E.K. Solvent 1 qt
5) Parting FilmNo.10 Clear 1 pt
6) Preval spray gun 1 pcs
Here is a pic of the stuff

This is the procedure that I believe is the way to do the fiberglass repair portion of the job.
1) Designate the area to be repair. Clean and wash area and the surrounding 12-16?. Cover and mask off all other parts of boat that will not be involved with the repair from dust and overspray.
2) Wash the repair area and 12-16? larger with Acetone. This is to remove any old wax that may be present on the surface.
3) Grind the stress cracks down through the gel coat to completely remove the crack. If the crack extends down into the laminating mat then continue grind until the bottom of the crack has been removed. Ensure to dome the area out and feather the edges into the surrounding glass gradually. Maximum grit finish before moving on to laminating is 220 grit finish. 150 grit also acceptable. The resin is a mechanical bond.
4) Clean the area with a clean (Acetone free) rag. Proceed to blow wiped area off with oil free compressed air.
5) Preheat area to 72-75?F using a 500w halogen work lamp. Do not place lamp any closer to the work surface than 2?. 3-4? preferred. Check to ensure that surface temp is correct by using a pyrometer if available. If not heat for approximately 20-30 minutes.
6) While the area is heating, pre cut 1.5 oz chop mat to required shapes to fill the repair area. Use overlapping layers to slowly extend out from the center to build up area. This needs to be done before hand as when the resin is mixed it has a window of time before is hardens. Also when you are finished cutting the mat to the shape, pull loose the edges. This will help feather the edges between the layers.
7) Mix resin in small amounts, 5-6oz at a time. This will reduce the waste. If any pigment is available add to the resin. Also ensure everything is pre staged so nothing will be needed to be found after the resin has been mixed. First paint the area to be filled with the first layer of mat with resin. DO not apply a ton of resin, be clean as it could drip. Apply mat and coat with resin. Wait 30sec to 1 minute for mat to ?wet out?, then reapply a second coat of resin and mat until all layers have been applied.
8) When completed the laminating, use a piece of wax paper to cover the area of repair. This will help seal the area from contamination and help the resin from draining from the mat. Sort of like vacuum bagging. If vacuum bagging is available by all means use it.
9) Reapply the 500w halogen lamp. Again not to close. Keep applied for 3-4 hrs until tough hard.
10) Leave the area harden for 1-2 days before starting to sand. When sanding make sure to sand it flat using boards and do not leave it high. You will want to actually dome is under flush by .020?-.030?. If it is too low though then reapply a coat of resin to build up and re-sand until proper. Do not sand with any grit higher than 220 grit. 150 grit acceptable.
This is how I was lead to believe it was done. Please if there is any other tips/tricks please let me know.
Here is how the gel it applied.
1) Again wipe and clean the area from dust. Do not use any solvents as these can carry into the repair area dissolved waxes and such. Just wipe dry rage to remove fine powder and blow with oil free compressed air. Also mask off boat 1-2? away from repair area. Also make sure rest of boat is covered from over spray.
2) Check to ensure that the liquid gel does match the colour of you boat. Simply take a dab of the liquid and put in on the gel in the area of repair. If it does not match bring it to a pro to get matched. Try to to do this before you start grinding. That way if you need to get a ``chip`` then you can remove on from the repair area. I?m colour blind and do not do this kind of work. Matching that is. Wipe off dab when you area satisfied it matches.
2) Again preheat the area with the 500w shop lamps to 72-75?F surface temp. Not too close with the lamps again. Also heat area for 20-30 minutes before starting repair.
3) Ensure area in prep?d for all tools and materials that could be required. Once the gel is mixed time is of the essence. Mix gel coat to hardener to manufacture recommendations. Then add M.E.K solvent to reduce the gel to a spray able compound. Add M.E.K. solvent in steps as the mixture viscosity will need to be only to the point that it will spray like a gummy paint. Not a automotive fan paint. 10-12% max ratio. Strain the mixture before filling the Preval sprayer. Also remove the screen from the hose on the Preval sprayer to help spray the mixture.
4) Spray the area using even semi thick coats. Just enough so it does not run. Give 2-4minute between coats. Lamp helps between coats. Not too close again. Spray all coats while the mixture is wet. 4-5 coats should be enough. But if in doubt spray more, you will only have to sand it off later is there is too much.
5) Leave the gel exposed to the air for 10-20 minute after finish spraying. Reapply heat lamp. This stage is to allow the M.E.K. Solvent to evaporate from the mixture. If not you will get voids/porous in the gel coat where the M.E.K. solvent vapours will collect.
6) After waiting spray the parting film directly on the gel using a spray mist bottle from the dollar store. This will help seal the gel and aid in the hardening process. I don?t know anything about this stage, its what the guy from store told me to do. Need more info on this portion of the process.
7) Cover gel with wax paper but do not wet out paper to gel . If it does touch leave it alone. This is to protect the gel from contamination. Also leave the lamp on it for 3-4 hrs.
8) Leave gel 2-3 days before sanding and buffing. Allow it to cure/harden. If sanded too early the gel will still be shrink and could possible crack because it is too thin after sanding. Best to wait the proper time.
9) Sand and buff feathering out edges by 4-5 inches past repair spot. Buff to high gloss shine.
Yacht Dr. Told me to use Patch Repair Aid instead of M.E.K. the guy at Michigan Fiberglass told me not to. The sales man stated I did not want to because it was purple and would tint my gel purple. Also that it would cause the gel to shrink more then with the M.E.K. and finally it would cause the mixture cook off faster than with the M.E.K. I finally agreed with the sales guy because I have never done this and would probably need all the time I could get with this stuff. So I did not buy it. But if Yacht Dr, Opps, or any other pro says to use it then I will. I?ll go and pick some up next week.
That is the process that I was told to do. If anyone has anything to add please feel free. I will not be starting this project till next week after boxing day. So I hope to have all the input before then.


