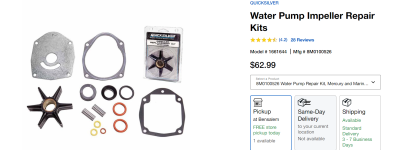
Alpha I Gen II Impeller Replacement

Joined
Jan 4, 2021
Messages
74
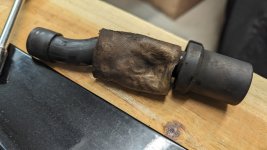
I have a couple of questions for the experts here. This is the first time I have replaced the impeller on this outdrive. While removing the lower unit, I found that the front mounting bolt had red loctite on it, not sure why. After removing the lower unit, I found that there was no water seal around the shaft. I have no idea who worked on this last. Anyway, I assume that the thing around the outlet tube was once the guide? What would cause this to shrink up like that, excessive exhaust gas temps?
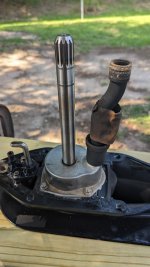
Lower Unit 5-29-24.jpg


Water Pick Up Tube 2.jpg

I watched Chris' replacement/assembly videos in the sticky section, but still have a few more questions........

Should all of the mounting bolt threads be greased only?
Should any sealant be used between the gaskets and plate of the water pump housing?
Do I need to replace the outlet tube guide or can it be reassembled without it?

Thanks in advance for answers and advice.
 

dubs283

Vice Admiral
Joined
Jul 27, 2005
Messages
5,322
Not uncommon to see loctite on the fwd most fastener between the halves, mainly for anti corrosion purposes

The "seal" on top of the housing is a slinger in place to prevent water wicking up the driveshaft during operation. The new kit (hopefully oem) comes with it

The guide piece has melted from a lack of water flow through the exhaust, replace it. Also the water passage tube has come free from the driveshaft housing upper bushing, maybe due to corrosion/melting. Need to check that out and replace the bushing/passage tube if either are deformed

Gasket sealer is fine for the water pump housing threads, or grease. Your choice

Gasket sealer on the lower gasket between the plate and gearcase especially at the aft area next to the water intake and exhaust passage wall

Best to replace the seal/carrier assy below the pump at this time as well. Pressure test prior to filling with lube
 

Bt Doctur

Supreme Mariner
Joined
Aug 29, 2004
Messages
19,291
the curved section is installed first in the upper unit , the guide tube and O eing retainer goes on the pump
 

Scott06

Admiral
Joined
Apr 20, 2014
Messages
6,438
I have a couple of questions for the experts here. This is the first time I have replaced the impeller on this outdrive. While removing the lower unit, I found that the front mounting bolt had red loctite on it, not sure why. After removing the lower unit, I found that there was no water seal around the shaft. I have no idea who worked on this last. Anyway, I assume that the thing around the outlet tube was once the guide? What would cause this to shrink up like that, excessive exhaust gas temps?
View attachment 398753


View attachment 398752

I watched Chris' replacement/assembly videos in the sticky section, but still have a few more questions........

Should all of the mounting bolt threads be greased only?
Should any sealant be used between the gaskets and plate of the water pump housing?
Do I need to replace the outlet tube guide or can it be reassembled without it?

Thanks in advance for answers and advice.
That melting is due to lack of water flow from impeller at some point. There is some water flow into exhaust at all times to cool it. This is indicative of problems with water flow or impeller lost a vane

I have never put anything on the screws although using perfect seal/ permatex #3 can help them from corroding in place

Have installed the pump plate gaskets both dry and with #3 so dealers choice. Merc tech support told me install dry local marine mech said use permatex #3 so dealers choice. If you have pitting of sealing surface would use sealant…


Would replace the outlet guide tube for sure look up in upper make sure any seals up there are good. Take your down turn elbow and rubber boots on exhaust off inspect them and flappers for melting. Look at shift cable basically anything that could have gotten melted when exhaust got hot.

While drive is off back flush from thermostat out to bellhousing water port see if any bits of old impeller come out. This can block PS cooler and thermostat housing

This is a good place to use only oem merc parts. In my experience their impellers last a long time vs aftermarket stuff not worth the $25 savings vs cheap Amazon impellers
 
Joined
Jan 4, 2021
Messages
74
That melting is due to lack of water flow from impeller at some point. There is some water flow into exhaust at all times to cool it. This is indicative of problems with water flow or impeller lost a vane

I have never put anything on the screws although using perfect seal/ permatex #3 can help them from corroding in place

Have installed the pump plate gaskets both dry and with #3 so dealers choice. Merc tech support told me install dry local marine mech said use permatex #3 so dealers choice. If you have pitting of sealing surface would use sealant…


Would replace the outlet guide tube for sure look up in upper make sure any seals up there are good. Take your down turn elbow and rubber boots on exhaust off inspect them and flappers for melting. Look at shift cable basically anything that could have gotten melted when exhaust got hot.

While drive is off back flush from thermostat out to bellhousing water port see if any bits of old impeller come out. This can block PS cooler and thermostat housing

This is a good place to use only oem merc parts. In my experience their impellers last a long time vs aftermarket stuff not worth the $25 savings vs cheap Amazon impellers
Thanks for the advice, I will definitely back flush. She runs in saltwater so I am going to put something on the threads as they are all slightly corroded. I already have the QuickSilver impeller kit. The old impeller is in-tact with only minor wear marks on the blades, it feels just as soft as the new one, so I'm not sure how long it has been on. Maybe the overheating happened prior to this one being installed. I have #3 on hand and will use on the housing surface as it is slightly pitted.
 
Joined
Jan 4, 2021
Messages
74
Not uncommon to see loctite on the fwd most fastener between the halves, mainly for anti corrosion purposes

The "seal" on top of the housing is a slinger in place to prevent water wicking up the driveshaft during operation. The new kit (hopefully oem) comes with it

The guide piece has melted from a lack of water flow through the exhaust, replace it. Also the water passage tube has come free from the driveshaft housing upper bushing, maybe due to corrosion/melting. Need to check that out and replace the bushing/passage tube if either are deformed

Gasket sealer is fine for the water pump housing threads, or grease. Your choice

Gasket sealer on the lower gasket between the plate and gearcase especially at the aft area next to the water intake and exhaust passage wall

Best to replace the seal/carrier assy below the pump at this time as well. Pressure test prior to filling with lube
If loctite was going to be used as a thread sealant wouldn't blue be best? The kit did not come with a driveshaft seal, when I drained the lube there was no water in it that I could see. The tube and bushing don't look deformed, but the receiver hole in the upper did have corrosion on the surface. I was just going to clean that up and use some permatex on the sealing surface. The area below the pump was also bone dry, but guess I should order some more parts.
 

Scott06

Admiral
Joined
Apr 20, 2014
Messages
6,438
Thanks for the advice, I will definitely back flush. She runs in saltwater so I am going to put something on the threads as they are all slightly corroded. I already have the QuickSilver impeller kit. The old impeller is in-tact with only minor wear marks on the blades, it feels just as soft as the new one, so I'm not sure how long it has been on. Maybe the overheating happened prior to this one being installed. I have #3 on hand and will use on the housing surface as it is slightly pitted.
yes likely happened prior to this change out. In salt the rubber I believe doesn't last quite as long but in fresh I changed my neighbors original to the boat 11-12 yr old impeller, looked new. Did mine after 6 years also looked new. OEM bellows lasted 18 years.

Sounds like you are on right track. If you dont have it yet get Merc manual #14 for the Gen 2 outdrives. it lays out what sealants, loctites, grease etc to use where.
 
Joined
Jan 4, 2021
Messages
74
The "seal" on top of the housing is a slinger in place to prevent water wicking up the driveshaft during operation. The new kit (hopefully oem) comes with it
I cannot locate this on the parts diagram, can anyone point me in the right direction or provide me a part number??
 

Scott06

Admiral
Joined
Apr 20, 2014
Messages
6,438
I cannot locate this on the parts diagram, can anyone point me in the right direction or provide me a part number??
if you get the quicksilver merc impeller kit with the base plate and gaskets + orrings its in there

its #25 in this dwg- the kit comes with a tool to install it- its just a cup you use as a gauge to slide the slinger seal down the driveshaft while lifting up on drive shaft. I think it just keeps the seal just of the top of the stainless impeller housing. Not rocket surgery dont over think it ....


Slinger is black ring just below the gasket in top row middle

1717096872551.png
 
Last edited:
Joined
Jan 4, 2021
Messages
74
Okay, thanks for the clarification.....I have that same kit. I was getting mixed up, thought that Dubs was referring to the shaft seal in the upper housing. But that one requires a lot of disassembly.
 

Scott06

Admiral
Joined
Apr 20, 2014
Messages
6,438
Okay, thanks for the clarification.....I have that same kit. I was getting mixed up, thought that Dubs was referring to the shaft seal in the upper housing. But that one requires a lot of disassembly.
Yes upper gear case seal you should definitely inspect or do a pressure test when you reassemble. Can get damaged reassembling so be careful.

o change that upper seal gear and vertical drive shaft come out, seal is like first thing that goes back in .
 

Simoniz

Petty Officer 1st Class
Joined
Dec 30, 2007
Messages
242
Okay, thanks for the clarification.....I have that same kit. I was getting mixed up, thought that Dubs was referring to the shaft seal in the upper housing. But that one requires a lot of disassembly.
It does, Ive just done mine.
In principle its a straightforward job, was complicated in my case by having one of the top cover bolts snapping off.
With hindsight, maybe I should have tried to nurse it out, using gentle heat, percussion and penetrating oil over several days, but hey...
Anyway my local machine shop got the broken bit out and installed a helicoil which seems to be a success.
 

Stinnett21

Chief Petty Officer
Joined
Jun 24, 2012
Messages
499
Consider getting the guide pins also. They hold the pump housing and new impeller in exactly the right position as you install it. This helps get the maximum use out of the impeller as it rides off center. Search for Achris's videos on YT.
 

JASinIL2006

Vice Admiral
Joined
Feb 10, 2012
Messages
5,673
Consider getting the guide pins also. They hold the pump housing and new impeller in exactly the right position as you install it. This helps get the maximum use out of the impeller as it rides off center. Search for Achris's videos on YT.

Great advice. Those pins are very helpful.
 
Top