8hp starts but runs only at high rpms

Plandeck

Petty Officer 2nd Class
Joined
Jul 8, 2012
Messages
115
Clearly your valves are seating. No need to lap them. I would reassemble, do a Proper carb cleaning, and then decarbon spray after it's running better.

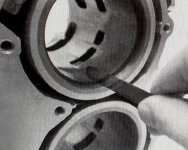
Have you removed by chance the installed piston's rings ? How about installing a new set of rings on both pistons ? Light cylinder scratches or burns can be removed with water-resistant sand paper of around #400 and #600 to finish.

Happy Boating
Rings and head gasket are ordered. I don't see cross hatching on the bores
Have you removed by chance the installed piston's rings ? How about installing a new set of rings on both pistons ? Light cylinder scratches or burns can be removed with water-resistant sand paper of around #400 and #600 to finish.

Happy Boating
16227472952311809296537189046355.jpgdifficult to photo bores...some discoloration and wear visible but no scratces. They are glazed. Rings are ordered and rebore is not practical. Plan is to slap in rings (with or without hone) and reassemble. May be right about the low rpm problem but doesnt explain the low compression. If engine fails to run after its back in the boat plan is for new higher hp motor install (15hp)...but that would be most of the summer project and i need my boat!
 

Sea Rider

Supreme Mariner
Joined
Sep 20, 2008
Messages
12,345
Would be interesting to check the current piston's ring gap to determine its wear : Place ring in its respective cylinder bore. Use a piston to square the ring in the bore. Check with feeler gauge..

Ring Gap Check.JPG

Check tech specs for that motor. If the cylinder walls exceeded their max allowed circumference tolerance, the new rings will surely have a poor effect to bump the compression much higher. It will only be known with a new compression test...

Happy Boating
 

Plandeck

Petty Officer 2nd Class
Joined
Jul 8, 2012
Messages
115
Would be interesting to check the current piston's ring gap to determine its wear : Place ring in its respective cylinder bore. Use a piston to square the ring in the bore. Check with feeler gauge..

View attachment 342039

Check tech specs for that motor. If the cylinder walls exceeded their max allowed circumference tolerance, the new rings will surely have a poor effect to bump the compression much higher. It will only be known with a new compression test...

Happy Boating
Of course I don't have a lot of experience with the feeler gauge, but end gap and side gap seem well withing tolerances. Even bore dimension at top seems smaller diameter than manual calls for 2.14 instead of 2.16.
 

MattFL

Master Chief Petty Officer
Joined
Oct 20, 2010
Messages
865
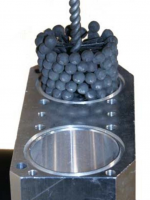
At the tippy top of the cylinder you can get a ridge that is smaller diameter than the rest of the bore. Sometimes it's difficult to pull the pistons out past the ridge and there's a tool to cut down the ridge if necessary. If the bores are glazed then I would run over them with a hone before installing the new rings. Double check me, but if it's glazed then it's probably not coated. Coated cylinders hold up really well. See if the local tool store or rental place has any bottle brush hones of the right side for rent. It goes on a drill and you just run it in and out a few times to put cross hatch, then scrub the bore out really good to get rid of the grit. If the motors apart start with hot soapy water, if you've still got the crank in it then maybe use brake cleaner and a clean rag, many times. Then get oil on it right away so it doesn't rust.

1622757767298.png
 

Plandeck

Petty Officer 2nd Class
Joined
Jul 8, 2012
Messages
115
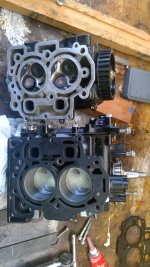
Ok piston rings replaced and new head gasket ready to install...not sure about setting the timing belt. I marked TBC on both timing gears during dissembly...how can I make sure I've got the two timing gears properly aligned?
 

Attachments

  • WIN_20210625_17_31_37_Pro.jpg
    WIN_20210625_17_31_37_Pro.jpg
    1.1 MB · Views: 5

MattFL

Master Chief Petty Officer
Joined
Oct 20, 2010
Messages
865
If you align the two marks again then you should be set. After aligning them, turn the motor over by hand once to take up any slack in the belt and re-check the alignment. If you want to double check yourself, look in the service manual and it will tell you which marks on the motor to align. If you don't have the manual, look on manualslib.com or similar web site will probably have it.

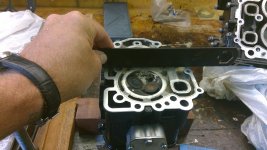
It's hard to tell from the picture, is that a gouge in the head between the cylinders, or just something white on there? Check both the head and block with a strait edge to be sure they are both flat. If either is not flat then now is the time to fix it. Also if you didn't already, give the cylinders and any moving parts you come across (cams, rockers, etc..) a good liberal smearing with oil. Looks good, let us know how it goes!
 

pvanv

Admiral
Joined
Apr 20, 2008
Messages
6,559
The wheels have timing marks from the factory. Full info is in the Factory service manual. Make 100% sure you are right, or you could bend a valve.

Again, I doubt you needed new rings. I trust you deglazed the bores and cut the ridge at the top, and adjusted the ring end gap correctly, else you did more harm than good.
 

Plandeck

Petty Officer 2nd Class
Joined
Jul 8, 2012
Messages
115
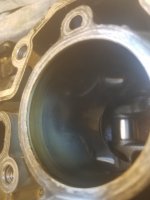
I did deglaze but knew nothing about the ridge. Besides that, there is a small tilt across the top of the valve side of the block at the center between the two pistons...maybe 1mm. (see photo). Could explain low compression? Or is the piston cylinder designed to be slightly higher so it will seal more tightly. In any case, no time or funds for a machine shop. I also found the timing mark on the crank gear but not the cam after disassembly. They are TDC. I disassembled with my own marks at BDC (of course). Probably reassemble using my own marks.
 

Attachments

  • WIN_20210627_10_25_41_Pro.jpg
    WIN_20210627_10_25_41_Pro.jpg
    3.1 MB · Views: 5

MattFL

Master Chief Petty Officer
Joined
Oct 20, 2010
Messages
865
It's difficult to tell from the picture but I'll take your word for it not being flat. The challenge is if it's not flat the gasket may not seal well. A machine shop can make it flat for you, or the shade tree method is to glue some sandpaper to a sheet of glass or something else flat and drag it around on there until it's flat.

Along that note, the tightening sequence for the head bolts can be important, the manual will have the order and procedure. The head and block will deform a tiny bit as you tighten the bolts, that's normal, but if you do it in the right order and correct procedure then everything will seal correctly.
 

Plandeck

Petty Officer 2nd Class
Joined
Jul 8, 2012
Messages
115
Well she's bolted back together and started right up....but same problem. She dies at less than 4,000 rpm. Compression measures the same around 70. Not sure what else I can do. Plan to soak the carburetor one more time over night, but other than that its order a new 15hp outboard online and replace. Any thoughts?
 

MattFL

Master Chief Petty Officer
Joined
Oct 20, 2010
Messages
865
I was afraid of that.. It's either carburetor or electrical, so at least you're getting warmer. You said earlier that the choke helps a little bit, which makes me think it's carburetor related. Just soaking the carburetor won't do it, you need to at least blow every little hole out with air. It's also worth hunting down an ultrasonic cleaner and give it a good hot soak in there for a while before blowing it out. Are you able to try a different carburetor without having to buy one?
 

Plandeck

Petty Officer 2nd Class
Joined
Jul 8, 2012
Messages
115
I was afraid of that.. It's either carburetor or electrical, so at least you're getting warmer. You said earlier that the choke helps a little bit, which makes me think it's carburetor related. Just soaking the carburetor won't do it, you need to at least blow every little hole out with air. It's also worth hunting down an ultrasonic cleaner and give it a good hot soak in there for a while before blowing it out. Are you able to try a different carburetor without having to buy one?
What could be the electrical prob? Seems like timing is stuck in advance. I replaced 2 coils and solenoid in the past. I do have a 2nd carb which i think i already tried...but ill try it one more time before i run out a buy an ultrasonic. At least she's running. Overhaul may have been disappointing but she runs and im only out of pocket a little over $100...always come out ahead if you learn something :)
 

MattFL

Master Chief Petty Officer
Joined
Oct 20, 2010
Messages
865
For $100 it's worth the adventure! For the carburetor, to summarize; there are tiny passages and often pinholes, and old gas can turn into tar like stuff that plugs up those tiny places. Just soaking alone often won't clean it out because the chemical only gets to the ends of the tube, not all the way through. Air can often blow the stuff out, but the combined heat and shock from the ultrasonic cleaner can really do a lot more than soaking alone to soften that stuff up, and following with air while it's still hot can really clean stuff out.

This might have already been mentioned, but be really sure there's no air leak between the carburetor and the motor. A bad gasket, vacuum hose that fell off or is cracked, etc.. The tiniest leak can really cause problems.
 

Sea Rider

Supreme Mariner
Joined
Sep 20, 2008
Messages
12,345
Assume the motor was tested at open water, so idles fine, runs strong past idle till say 3/4 throttle (4K) and them misses, bogs down ? When that occurs is it easy to re start it inmediately or will start after some minutes ? Have you tried to check compression with other tester aside from current one ?

Happy Boating
 

km1125

Chief Petty Officer
Joined
Aug 10, 2016
Messages
515
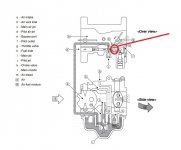
In the carb, there are two main circuits for the fuel flow. The high speed circuit, which is really just the main jet that feeds directly out of the float bowl and the "everything else" circuit which feeds the idle and off-idle circuits. You can easily clean the high speed main jet by removing it but the other circuit is full of passageways that aren't available to be poked though with a wire, nor blown through with air. If you follow the below diagram, the grey lines are the "everything else" fuel flow. The small compartment circled in the top half (that's the same carb pictured, just two different persepectives of it) is the "everything else" fuel circuit where it splits to feed the idle circuit and the 'off idle' circuit. I've had gunk in there before and had the exact same symptoms as the OP. I cleaned the carb SEVERAL times and thought I ruled it out and started chasing electrical issues. Came back to the carb and SOAKED IT OVERNIGHT in good cleaner and the problem was GONE. (btw, the title of that pic says "Honda", but it's the exact same carb with slightly different mounting holes)
 

Attachments

  • Honda_carb_problem.jpg
    Honda_carb_problem.jpg
    79.4 KB · Views: 1

pvanv

Admiral
Joined
Apr 20, 2008
Messages
6,559
What could be the electrical prob? Seems like timing is stuck in advance. I replaced 2 coils and solenoid in the past. I do have a 2nd carb which i think i already tried...but ill try it one more time before i run out a buy an ultrasonic. At least she's running. Overhaul may have been disappointing but she runs and im only out of pocket a little over $100...always come out ahead if you learn something :)
Which coils were changed, and why? Spark advance is built in to the CD, so that just doesn't get stuck at full advance. My money is still on the carb.
 

Plandeck

Petty Officer 2nd Class
Joined
Jul 8, 2012
Messages
115
Which coils were changed, and why? Spark advance is built in to the CD, so that just doesn't get stuck at full advance. My money is still on the carb.
Sorry to disappoint all you ultrasonic carb freaks but, dissembling the head a 2nd time and spending the $75 having it shaved improved the compression, not by much, bet enough to get her to run at low rpm. The head was slightly warped transversally so head gasket (between pistons my guess) leaked reducing compression evenly between both pistons- perhaps some exhaust gas reached piston 1 to compromise air-gas mixture and piston 2 received some of the forced gas from the firing of the plug. In any event she runs at regular rpms now. 70 compression is just too low for proper operation. Really motor has seen 14 seasons on Lake Michigan and sat out Chicago winters in a yard. She's old and ready to pass the torch. If it was salt water she would have passed long ago.
 

Sea Rider

Supreme Mariner
Joined
Sep 20, 2008
Messages
12,345
Did the motor overheated badly to have a warped head ? Way to go shaving the cylinder head to sit flat against the new head gasket and crankcase matting surfaces.. If the carb was run dry when the motor was not in use, a meticulous clean out would have suffice...

Happy Boating
 

MattFL

Master Chief Petty Officer
Joined
Oct 20, 2010
Messages
865
Glad you found the cause and thanks for reporting back! It's difficult to diagnose over the internet, but glad you ultimately figured it out. Out of curiosity, how much did that bring the compression up? Shaving the head to flatten it will raise the compression a little, sometimes there are thicker head gaskets available to mitigate this when necessary. But if you had a leak then that's a whole other story.

In hindsight, you did mention early on that it was fine until a day of high RPM running, which with an old motor makes an overheat a real possibility, which can warp the head. Though I will be the first to admit that I didn't think it was a compression problem.
 
Top