8hp Evinrude running poorly.

Joined
Mar 10, 2012
Messages
59
Quick update... just got home and threw the DVA adapter on the multimeter and tested the sensor coil again - still getting a relatively high voltage (13-15 volts) from the sensor when giving starter rope a good pull. Seems way higher than spec which the manual says is around 3 volts. I think my next step should be to replace the sensor with the new one I got and repeat the test, since this the first component that I feel I actually have a verified out-of-spec reading from.

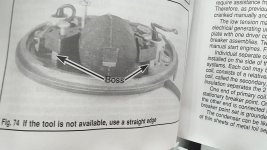
Question, the manual shows locating the sensor and the charge coil using a special ring tool from Evinrude. I don't have this, and since the flywheel sits over top of these components I can't exactly get a feeler gauge in there to gap it. Any tips or tricks on the best way to gap this thing off the flywheel correctly?
 

saltchuckmatt

Commander
Joined
Jul 19, 2019
Messages
2,638
Quick update... just got home and threw the DVA adapter on the multimeter and tested the sensor coil again - still getting a relatively high voltage (13-15 volts) from the sensor when giving starter rope a good pull. Seems way higher than spec which the manual says is around 3 volts. I think my next step should be to replace the sensor with the new one I got and repeat the test, since this the first component that I feel I actually have a verified out-of-spec reading from.

Question, the manual shows locating the sensor and the charge coil using a special ring tool from Evinrude. I don't have this, and since the flywheel sits over top of these components I can't exactly get a feeler gauge in there to gap it. Any tips or tricks on the best way to gap this thing off the flywheel correctly?
My book tells you how to do it with and without the ring but it's a slightly different Evinrude. You match up the face with the machined surface located on the plate below. Others probably know better than me so wait for them to concur.

It's always somethings with these things motors!
 

saltchuckmatt

Commander
Joined
Jul 19, 2019
Messages
2,638
Quick update... just got home and threw the DVA adapter on the multimeter and tested the sensor coil again - still getting a relatively high voltage (13-15 volts) from the sensor when giving starter rope a good pull. Seems way higher than spec which the manual says is around 3 volts. I think my next step should be to replace the sensor with the new one I got and repeat the test, since this the first component that I feel I actually have a verified out-of-spec reading from.

Question, the manual shows locating the sensor and the charge coil using a special ring tool from Evinrude. I don't have this, and since the flywheel sits over top of these components I can't exactly get a feeler gauge in there to gap it. Any tips or tricks on the best way to gap this thing off the flywheel correctly?
Little alignment bosses that you use a straight edge on.
 

Attachments

  • IMG_20220902_154838656.jpg
    IMG_20220902_154838656.jpg
    680.2 KB · Views: 2
Joined
Mar 10, 2012
Messages
59
Little alignment bosses that you use a straight edge on.
Thanks, when I had the flywheel off earlier thats what the charge and sensor coil line up with on my motor as well.

So here are the results of the testing with the DVA - charge coil voltage is around 275 volts at cranking. Down a bit from the 300+ taken with the Fluke on peak mode.

Sensor coil voltage reads about 12-15 volts with the DVA, down from the 20+ with the Fluke. So it seems that while the 88V on peak mode will get you ballpark readings if a component is good or bad, the DVA adapter is still great to have for more accurate readings.

After installing the new CDI sensor coil, it was rubbing against the flywheel even pushed back as far as I could. I shaved some off the plastic mounting holes to get it back further, and the magnets were still just grazing the plastic on the outer edge of the coil face. It literally looks like they pour the plastic over the coil, then just shove it on a belt sander until it's ground down a bit and call it good. Not impressed with the quality of that one.

I rubbed away at it with my knife for a bit and got it to where I can just barely hear a faint tick from plastic getting rubbed as it scraped by. Good enough for a test. After that, threw the flywheel back on and the recoil starter and got around 5 volts cranking with no plugs in. Still higher than spec, but much closer.

Since I don't have the tools to push the pin out of the rubber connectors, I cut the old coil wires near the plug, stripped the wires left on the plug, and wrapped them around the new pins for the time being. I guess I need to get the tools to do it all the right way, as I need to remove ALL the wires from the plug to put heat shrink around the new sensor and old charge coil wires to protect them from abrasion. Until I spend more money on tools for this motor though, I will just cut the pins off the new coil and solder the wires together at the rubber connector.

Immediately after starting I noticed the engine returns to idle better. You can give it a rev, let it idle down and it just sits there happily no problem. Huge improvement. It still doesn't like going down as low as 700ish, but then again that may be the inductive pickup I have for the DMM reading it wrong.

I still get some 4-stroking/missing at mid-rpms. I hooked two little test lights up between the spark plugs and the wires and watched them. Sometimes #2 would occasionally drop out a bit. Not for any amount of time, but definitely a miss here or there.

Finally found my spark tester that you can set a gap on. Coil for #1 is sparking like a champ, it will jump almost 3/4 of an inch no problem.

#2 however will start missing occasionally at not even 1/4 of an inch.

Swapped the plug wires to the same result.

Tried to do the running voltage test by jamming a wire up in the primary connector at the ignition coil from the power pack, but only saw around 4-5 volts for #1. This must not work well, I think I need the extender.

So, we're dropping down to idle much better now, but still not idling low enough, and still some 4-stroking in mid-higher range RPMs.

Ordered a CDI ignition coil after seeing the weak spark on #2 compared to #1. Should be here Sunday. Hope it's a better quality coil than their sensor coil is, lol. I can get a Sierra coil but not until later next week. I'm determined to see this thing run right this weekend.

Cautiously optimistic I'm finally getting somewhere. Even the little win with the new sensor coil letting things come down to idle smoother has me in a better mood.
 

saltchuckmatt

Commander
Joined
Jul 19, 2019
Messages
2,638
Thanks, when I had the flywheel off earlier thats what the charge and sensor coil line up with on my motor as well.

So here are the results of the testing with the DVA - charge coil voltage is around 275 volts at cranking. Down a bit from the 300+ taken with the Fluke on peak mode.

Sensor coil voltage reads about 12-15 volts with the DVA, down from the 20+ with the Fluke. So it seems that while the 88V on peak mode will get you ballpark readings if a component is good or bad, the DVA adapter is still great to have for more accurate readings.

After installing the new CDI sensor coil, it was rubbing against the flywheel even pushed back as far as I could. I shaved some off the plastic mounting holes to get it back further, and the magnets were still just grazing the plastic on the outer edge of the coil face. It literally looks like they pour the plastic over the coil, then just shove it on a belt sander until it's ground down a bit and call it good. Not impressed with the quality of that one.

I rubbed away at it with my knife for a bit and got it to where I can just barely hear a faint tick from plastic getting rubbed as it scraped by. Good enough for a test. After that, threw the flywheel back on and the recoil starter and got around 5 volts cranking with no plugs in. Still higher than spec, but much closer.

Since I don't have the tools to push the pin out of the rubber connectors, I cut the old coil wires near the plug, stripped the wires left on the plug, and wrapped them around the new pins for the time being. I guess I need to get the tools to do it all the right way, as I need to remove ALL the wires from the plug to put heat shrink around the new sensor and old charge coil wires to protect them from abrasion. Until I spend more money on tools for this motor though, I will just cut the pins off the new coil and solder the wires together at the rubber connector.

Immediately after starting I noticed the engine returns to idle better. You can give it a rev, let it idle down and it just sits there happily no problem. Huge improvement. It still doesn't like going down as low as 700ish, but then again that may be the inductive pickup I have for the DMM reading it wrong.

I still get some 4-stroking/missing at mid-rpms. I hooked two little test lights up between the spark plugs and the wires and watched them. Sometimes #2 would occasionally drop out a bit. Not for any amount of time, but definitely a miss here or there.

Finally found my spark tester that you can set a gap on. Coil for #1 is sparking like a champ, it will jump almost 3/4 of an inch no problem.

#2 however will start missing occasionally at not even 1/4 of an inch.

Swapped the plug wires to the same result.

Tried to do the running voltage test by jamming a wire up in the primary connector at the ignition coil from the power pack, but only saw around 4-5 volts for #1. This must not work well, I think I need the extender.

So, we're dropping down to idle much better now, but still not idling low enough, and still some 4-stroking in mid-higher range RPMs.

Ordered a CDI ignition coil after seeing the weak spark on #2 compared to #1. Should be here Sunday. Hope it's a better quality coil than their sensor coil is, lol. I can get a Sierra coil but not until later next week. I'm determined to see this thing run right this weekend.

Cautiously optimistic I'm finally getting somewhere. Even the little win with the new sensor coil letting things come down to idle smoother has me in a better mood.
One things for sure, you are persistent.

Everyone complains a lot on here about how parts are built way out of spec. I noticed the OEM parts were available for your engine. You should always buy those first if you can.

Omc has a tool to push those out and another tool to push them in. It is easy to push in without the tool, the trick to push them out is I use a little hand sanitizer (alcohol) and they come out easy with a small pick tool. Works great.

Pretty soon you should have a fine working outboard!
 
Joined
Mar 10, 2012
Messages
59
One things for sure, you are persistent.

Everyone complains a lot on here about how parts are built way out of spec. I noticed the OEM parts were available for your engine. You should always buy those first if you can.

Omc has a tool to push those out and another tool to push them in. It is easy to push in without the tool, the trick to push them out is I use a little hand sanitizer (alcohol) and they come out easy with a small pick tool. Works great.

Pretty soon you should have a fine working outboard!

Yeah if I could get the OEM parts here as fast as I can aftermarket I would do everything OEM. Definitely worth the extra cost, unfortunately when ordering parts online it seems I can get most aftermarket parts in 1-2 days whereas OEM take 4+. Kinda makes it hard time wise for diagnostics unless I just ordered everything at once, and sent back the stuff I didn't need. Plus a lot of places don't like doing returns, and I understand it. They're trying to sell parts, not be everyone's source for "throw a part at it diagnostics" that get lots of returns.

My plan is to get this thing running good, then I will go through and get OEM spares for everything I've put on this engine so far, so when they fail (and from my experience most aftermarket stuff, they will) I'll have a good replacement on hand and ready to go.

If the new ignition coil doesn't get things going I'm almost certainly looking at some internal issue with the engine and will just have to tear it down and see whats going on.

I really do think its an ignition-related issue though - this missing / 4 stroking is somewhat sporadic and even today I had it running rough at a mid RPM, then for a few seconds it clears right up and runs beautifully and then goes back to it. The Sierra carb kit should finally be here soon so I'll swap out the cheapo gasket set I got here for testing as I'm sure the gaskets won't last another week.

If things run smoothly after the ignition coil goes on, I might go out to the lake on Monday and see how it runs on the boat, but with it being a holiday I might just save that for another time. If it runs smooth in the test drum I'll be real happy, and can wait an extra few days for a quiet day out on the lake to get everything fine-tuned.

Worst comes to worst I bought an old Merc 110 9.8hp from someone at work for $200. Got it to crank but the carb is leaking and the water pump isn't pumping so I haven't ran it for more than a few seconds. That'll be the next project regardless of what ends up happening with this little motor. Which ever one I end up liking the best I'll hang on to, and sell the other.
 

saltchuckmatt

Commander
Joined
Jul 19, 2019
Messages
2,638
Yeah if I could get the OEM parts here as fast as I can aftermarket I would do everything OEM. Definitely worth the extra cost, unfortunately when ordering parts online it seems I can get most aftermarket parts in 1-2 days whereas OEM take 4+. Kinda makes it hard time wise for diagnostics unless I just ordered everything at once, and sent back the stuff I didn't need. Plus a lot of places don't like doing returns, and I understand it. They're trying to sell parts, not be everyone's source for "throw a part at it diagnostics" that get lots of returns.

My plan is to get this thing running good, then I will go through and get OEM spares for everything I've put on this engine so far, so when they fail (and from my experience most aftermarket stuff, they will) I'll have a good replacement on hand and ready to go.

If the new ignition coil doesn't get things going I'm almost certainly looking at some internal issue with the engine and will just have to tear it down and see whats going on.

I really do think its an ignition-related issue though - this missing / 4 stroking is somewhat sporadic and even today I had it running rough at a mid RPM, then for a few seconds it clears right up and runs beautifully and then goes back to it. The Sierra carb kit should finally be here soon so I'll swap out the cheapo gasket set I got here for testing as I'm sure the gaskets won't last another week.

If things run smoothly after the ignition coil goes on, I might go out to the lake on Monday and see how it runs on the boat, but with it being a holiday I might just save that for another time. If it runs smooth in the test drum I'll be real happy, and can wait an extra few days for a quiet day out on the lake to get everything fine-tuned.

Worst comes to worst I bought an old Merc 110 9.8hp from someone at work for $200. Got it to crank but the carb is leaking and the water pump isn't pumping so I haven't ran it for more than a few seconds. That'll be the next project regardless of what ends up happening with this little motor. Which ever one I end up liking the best I'll hang on to, and sell the other.
That little Rude will be the one to keep, trust me. My 1992, in 30 years, has had one water pump and 1 plastic carb bowl replaced with a billion hours on it.
 
Joined
Mar 10, 2012
Messages
59
That little Rude will be the one to keep, trust me. My 1992, in 30 years, has had one water pump and 1 plastic carb bowl replaced with a billion hours on it.

New ignition coil got here today. Threw it on the motor, nice blue spark will jump a 3/4" gap no problem on both cylinders now. Starts much nicer at low RPM now that both cylinders are getting a strong spark. Will also start and run briefly with the choke completely on now which it wouldn't do before, guessing it was too rich of a mixture for that weak spark on that one cylinder. Had to give it a pull on choke, then push the choke in and another couple pulls to get it to fire when cold. Now it will fire with the choke on.

But this thing STILL won't smooth out in the midrange, gets the shakes to it.

I swear this motor is CURSED.

Pulled the exhaust covers off to have a look in the cylinders. Pistons look great to me. It is interesting how cylinder #1 has the dark spot on it (guessing some carbon buildup?) between the upper and lower rings, whereas cylinder #2 has none. Cylinders had some light scratches on the thrust axes but for a motor from 1994 looked OK to me, honestly the crosshatching looked really good and I didn't see any glazing. There is that one wider mark on cylinder #2, but I swear I can see the crosshatching over it. Not sure what that is. Can't get my finger in there to feel anything, but it all looks really good to me for an engine of this age.

Pulled the carb mounting plate off to have a look at the reed valves. They are all sitting nice and flat against their plate and nothing appeared bent or held open.

The gaskets tore off pulling the exhaust covers off, so I ordered a powerhead gasket kit since that was cheaper than buying them individually. Plus it appeared to include the upper and lower crank case seals which I at least know I will need to do the upper at at some point. How do you know if the lower is going bad?

Can't take it out to the lake to really let it run until those new gaskets get in. Was hoping they would stay in one piece, but they're probably the original gaskets so that's not surprising.

I've attached a picture of the reed valves and a video of the piston/borescope footage looking in the cylinders from the exhaust ports.

So, where am I at now with this thing? Gonna go look at a Tohatsu 6hp 4-stroke on Craigslist LOL. Beach trip with my family coming up soon and want to have the boat to putz around in. Just don't think it will be with this motor this time around.

Definitely not giving up on this thing, I really like the power/weight ratio of a 2-stroke and it's just the right weight for it to not be a pain to throw in the back of the truck and take to the lake. Plus I have put WAY to much time and money into this motor to not get it running right.

I'm truly at a loss now as to what could be causing the problem. All the spark issues seem to be resolved with the new sensor and the new coil. Inside the engine looks good to me, as far as I can tell without splitting the crankcase open. Guess that puts me back to a fuel/air issue. I fail to see anything wrong with the carb now, but it's obviously there is an issue with some part somewhere on this engine. With the fixed timing on this engine I don't see how that could be any issue. The plate that moves with the twist throttle that has all the ignition components on it is secure and not loose or flopping around.

I guess before I go spending any more time or money on this thing I will put it all back together, take it out to the lake and fine tune everything best I can and see how it runs and go from there. I'll be sure to get some video in case it might help.


s6d7r68.jpg
 
Joined
Mar 10, 2012
Messages
59
For what it's worth the one curious thing I find about this carb is the fact that the mixture needle needs to be around 6 turns out to get it in the sweet spot. The manual says to start tuning at 3 turns. This thing won't even pretend to stay running at 3 turns. Running too rich would explain what could be 4-stroking that I'm interpreting as running rough.

And when I say 6 turns, that's 6 turns out from the spring starting to really compress when I have it turned in. I've even tried removing the spring and turning the needle in by hand, it never really has a solid "seating" feel when all the way in. I'm trying to be very careful with it because of the plastic.

The needle seat looks OK to me, though it's in a plastic housing so who knows.

Thoughts on the 6 turns out on the idle mixture? Is it normal to have some carbs that just need quite a bit different adjustment compared to others, or could I have some deep seated issue in the carb (or air getting in from somewhere else causing me to need to run the carb really rich??)
 
Last edited:
Joined
Mar 10, 2012
Messages
59
Of course I said I was not going to spend more time or money on this thing until I got it out on the lake, but curiosity has gotten the better of me lol.

I took the fuel pump completely apart to check it out, figured it was possible one of the little diaphragms had ruptured that could possibly be causing some issues. No ruptures, but one was definitely folded over itself a bit. Managed to straighten that out without tearing it. In the mid section of the pump I did notice one little spring was out of center. Figured that was noteworthy, although I don't think it's at all related to my running issue.

I was looking around on eBay and found a carb that the seller listed as for an '86, but looks nearly identical to mine. Defiantly has the same top cover at least, all the other holes and plugs and what not seem to match up. Got the whole carb for what a replacement cover would cost, so went ahead and bought it. No idea what kind of shape it is in inside, pictures were only from the outside. Figure it'll be worth a shot to clean it out and try it on this engine and see if it performs at all differently from the carb this motor came with.

At this point, I think the rough running I'm feeling is the engine 4-stroking... running way too rich. The plugs look dark and a bit wet, and although they don't have much time on them, they've been going through all my testing. I'll throw a new set on there when I get this thing back together.

I know spark isn't an issue since I've gone through the whole ignition system, tested everything, and replaced the parts that showed out of spec.

Carb has been cleaned to the best of my ability, and set back to factory settings the best I can, however maybe it is missing _something_ or has been messed with while the previous owner(s) had it in ways that I'm not noticing.

Will be interesting to see if the "new" carburetor will run the engine with the mixture screw in the more usual 3-turns-out position rather than the 6 turns out mine currently has to run at.

t5oXWqr.jpg

wTQFBAE.jpg
 

saltchuckmatt

Commander
Joined
Jul 19, 2019
Messages
2,638
Of course I said I was not going to spend more time or money on this thing until I got it out on the lake, but curiosity has gotten the better of me lol.

I took the fuel pump completely apart to check it out, figured it was possible one of the little diaphragms had ruptured that could possibly be causing some issues. No ruptures, but one was definitely folded over itself a bit. Managed to straighten that out without tearing it. In the mid section of the pump I did notice one little spring was out of center. Figured that was noteworthy, although I don't think it's at all related to my running issue.

I was looking around on eBay and found a carb that the seller listed as for an '86, but looks nearly identical to mine. Defiantly has the same top cover at least, all the other holes and plugs and what not seem to match up. Got the whole carb for what a replacement cover would cost, so went ahead and bought it. No idea what kind of shape it is in inside, pictures were only from the outside. Figure it'll be worth a shot to clean it out and try it on this engine and see if it performs at all differently from the carb this motor came with.

At this point, I think the rough running I'm feeling is the engine 4-stroking... running way too rich. The plugs look dark and a bit wet, and although they don't have much time on them, they've been going through all my testing. I'll throw a new set on there when I get this thing back together.

I know spark isn't an issue since I've gone through the whole ignition system, tested everything, and replaced the parts that showed out of spec.

Carb has been cleaned to the best of my ability, and set back to factory settings the best I can, however maybe it is missing _something_ or has been messed with while the previous owner(s) had it in ways that I'm not noticing.

Will be interesting to see if the "new" carburetor will run the engine with the mixture screw in the more usual 3-turns-out position rather than the 6 turns out mine currently has to run at.

t5oXWqr.jpg

wTQFBAE.jpg
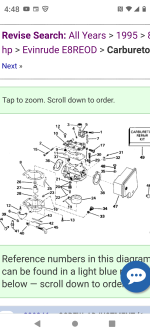
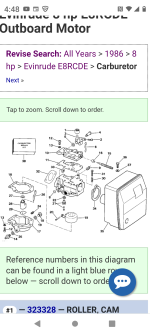
I think your going to find a lot of differences between the 86 carb and yours.
 

Attachments

  • Screenshot_20220904-164806.png
    Screenshot_20220904-164806.png
    536.1 KB · Views: 2
  • Screenshot_20220904-164831.png
    Screenshot_20220904-164831.png
    556.1 KB · Views: 2
Joined
Mar 10, 2012
Messages
59
I think your going to find a lot of differences between the 86 carb and yours.

I think the year the seller listed must be wrong. The main reason I bought it was after seeing the part # on the plastic top plate is identical to the one on my carb, and everything else looks identical, minus the choke thru-pin.

Here are some pictures for comparison:

My carb:

9Zd5vWT.jpg

VbJL9R3.jpg


Carb I bought off eBay:

DgkPaiG.jpg

CVW6CP4.jpg

iSDhlS7.jpg
 

saltchuckmatt

Commander
Joined
Jul 19, 2019
Messages
2,638
I think the year the seller listed must be wrong. The main reason I bought it was after seeing the part # on the plastic top plate is identical to the one on my carb, and everything else looks identical, minus the choke thru-pin.

Here are some pictures for comparison:

My carb:

9Zd5vWT.jpg

VbJL9R3.jpg


Carb I bought off eBay:

DgkPaiG.jpg

CVW6CP4.jpg

iSDhlS7.jpg
Maybe, it has the rich/lean screw on the right side like your old one. 86 was in the front.

What you hope now is you don't have two crappy carbs!
 
Joined
Mar 10, 2012
Messages
59
Maybe, it has the rich/lean screw on the right side like your old one. 86 was in the front.

What you hope now is you don't have two crappy carbs!
Right??

We'll see how it turns out. And that is assuming there is something wrong with my carb in the first place. But I don't know what else it would be at this point.
 

ct1762@gmail.com

Master Chief Petty Officer
Joined
Jan 17, 2019
Messages
859
if that plastic top has some sort of fault, or the needle seat in the plastic is worn, it will do as described. You could also have an issue with the emulsion tube not sealing. Usually when a motor kind of surges at high speed, its because its running lean. another possibility is a crack in the block that only shows up at high speed. very unlikely, but possible.
 
Joined
Mar 10, 2012
Messages
59
if that plastic top has some sort of fault, or the needle seat in the plastic is worn, it will do as described. You could also have an issue with the emulsion tube not sealing. Usually when a motor kind of surges at high speed, its because its running lean. another possibility is a crack in the block that only shows up at high speed. very unlikely, but possible.
Is the emulsion tube the little rubber tube that runs down from the idle jet to the well, or the brass tube that runs down from the middle of the carb that the well surrounds?

After looking at the fuel pump further and taking it apart again I ordered a replacement pump from Sierra. Whatever is on there is some no-name pump it seems. Like I said in an earlier post I didn't see any tears that would allow fuel to leak past the diaphragm into the engine, but its possible I missed something, as after I reassembled it I plugged off the line to the carb and squeezed the primer bulb and I saw some fuel come out the rear of the pump housing where it connects to the block. I took it apart again and reassembled it, and I don't see any leaks out the rear now, but it's hard to test it as it leaks everywhere else without all the bolts in that hold it together (two of the four are it's mounts to the block as well as holding the body of the pump together). Most likely I cause the leak after taking it apart and reassembling it the first time...

I guess its possible that if that diaphragm was leaking it would be letting fuel straight into the intake manifold (I'm assuming that's where the pump gets it's "pulse" from, and not crankcase pressure?), causing it to run rich.

That wouldn't explain the idle mixture needle needing to be so far out, in fact I would think I would need to lean it out, but I could see it leading to a very rich burn nonetheless.

I'm considering making my own temporary gaskets for the exhaust covers on the side of the engine until the OEM kit gets here to do some more testing. I'm wondering if I can gravity feed the carb fuel, bypassing the fuel pump, and seeing if this changes how it runs? I'm way to impatient to wait half a week for the new parts to show up. Not having this thing figured out is driving me nuts.
 
Last edited:

ct1762@gmail.com

Master Chief Petty Officer
Joined
Jan 17, 2019
Messages
859
the emulsion tube is what sticks into the carb venturi. some have a 2 piece ... smaller tube is for low speed, wider/thicker tube is connected to high speed jet. they can certainly have issues, but you can just put some thread locker around the base to rule it out. i still think its either that plastic top piece, or the needle (again, all in the plastic idle circuit cover). did you manually squirt fuel into the carb when its acting up? that should tell you all you need to know. those tiny fuel pumps are rebuild-able, but aftermarket cheap ones are like $14 and seem to work well. i dont rebuild those anyomore... too easy to get the spring / diaphragm cocked or pinched. ps they all leak without the 4 screws in place and snug.
 
Joined
Mar 10, 2012
Messages
59
the emulsion tube is what sticks into the carb venturi. some have a 2 piece ... smaller tube is for low speed, wider/thicker tube is connected to high speed jet. they can certainly have issues, but you can just put some thread locker around the base to rule it out. i still think its either that plastic top piece, or the needle (again, all in the plastic idle circuit cover). did you manually squirt fuel into the carb when its acting up? that should tell you all you need to know. those tiny fuel pumps are rebuild-able, but aftermarket cheap ones are like $14 and seem to work well. i dont rebuild those anyomore... too easy to get the spring / diaphragm cocked or pinched. ps they all leak without the 4 screws in place and snug.

Thanks, I think I understand what you're talking about. What information does spraying fuel into the carb when it starts running rough provide me? If it smooths out, I assume its an issue with the engine not getting enough fuel.
But it won't help me diagnose if the engine is getting too much fuel, correct?

And just to confirm - the idle mixture screw is adjusting the amount of FUEL, not the amount of air, right? My theories below will be totally off if I'm wrong about this. I figure since turning the screw CCW/out = rich, that means more fuel, right?

I feel like I'm down to to of the most likely issues here, let me know what you think:

1. Idle mixture adjustment is out 6 turns because the engine needs more fuel than usual to run, meaning air is entering the carb or crankcase somewhere else (possibly lower seal?) and it needs more fuel to balance it out and stay running. Engine runs rough because the final fuel mixture that reaches the combustion chamber is way off for the spark timing the engine is at.

2. Idle mixture adjustment is out 6 turns because that's just where the needle wants to normally be on this carb, nevermind the usual 3 turns out. Excess fuel is entering from somewhere in the carb, or possibly from a leaking fuel pump diaphragm.

To me, the engine is running rich - plugs are dark, can't idle down to 700RPM happily, 4-strokes at mid range RPM because it can't burn all the fuel.

I'm off to try to see if I can make up some temporary exhaust cover gaskets and am gonna try to bypass the fuel pump.
 
Joined
Mar 10, 2012
Messages
59
Ok, so I made some temporary gaskets which (mostly) sealed things up at the exhaust cover, ran fuel line straight from tank to the carb, ran it lightly squeezing the primer to keep the bowl full. Still didn't run right. So I don't think the fuel pump is to blame. It'll be replaced regardless when I get the new one.

So I went ahead and separated the power head from the mid section. I see quite a bit of what I would assume is oil around the lower crankcase seal, very milky looking.

Looking at the exhaust it looks like that "manifold" piece directs the exhaust deeper down into the midsection. So I would this all of this oil would have to be coming from the lower crank gasket. Maybe it's worn to the point of sucking air back into the crankcase here, screwing with the mixture?

LxjskRb.jpg

P1R9Sbm.jpg

aG21UIk.jpg

gahNA46.jpg
 

ct1762@gmail.com

Master Chief Petty Officer
Joined
Jan 17, 2019
Messages
859
the exhaust is a wet water-cooled exhaust so it will look milky when freshly mixed with water. if it wasn't cooled by a "wall of water" it would get so hot paint would melt off the midsection. while your in there id replace the gaskets... which is sort of more of a pain on those as it has an adapter plate. doesnt seem bad to me though. i still think your issue is the carb. 6 turns out seems quite rich. what does the manual say? i believe its around 4 turns. you arent gonna get a bad lean sneeze from plastic topped motors generally the needles are more sluggish. run it full throttle for a couple minutes then quickly back off till you get it to sneeze, then richen (counterclockwise) until it just stops sneezing, then back off 1/8 to prevent a lean idle in neutral. id try one of the older carbs as i mentioned.
 
Top