85 force check valve

mick97

Petty Officer 1st Class
Joined
Mar 24, 2010
Messages
207
Well I finally got my diaphram today for the 1985-85hp force.
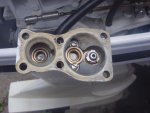
I got it torn apart,and want to know how these check valves work,and how to test them.

Do you have to take them out,or can u just use a tooth pick,and push on them to see if they stick?

Got a picture of them below.
Thanks,
Scotty
 

Attachments

  • checkv.jpg
    checkv.jpg
    135.2 KB · Views: 2

further

Lieutenant Junior Grade
Joined
Jun 18, 2009
Messages
1,034
Re: 85 force check valve

Push gently on the spring loaded center and if they stick, they need to be replaced. Those look like the original valves that don't do well with ethanol. New ones are typically black.
 

mick97

Petty Officer 1st Class
Joined
Mar 24, 2010
Messages
207
Re: 85 force check valve

ok,
just got one out with the screws,and was a tad sticky,but cleaned it and it works fine now.The big one workes good.

But the tiny one on the left looks like its stuck open.
Thats probably the problem hu?
Evidently it takes some type of tool to get it out hu?

So if thats stuck open,then Im guessing it floods and thats why it doesnt run at wot?

Do you know where i can get a set of these?
Thanks a million,
Scotty
 

mick97

Petty Officer 1st Class
Joined
Mar 24, 2010
Messages
207
Re: 85 force check valve

Ok,

Thanks a million.
Ya might as well do it right.

I'll get one ordered.

Thanks,
Scotty
 

mick97

Petty Officer 1st Class
Joined
Mar 24, 2010
Messages
207
Re: 85 force check valve

Boy,
How the heck do you get that small check valve out?
Any ideas?
Scotty
 

geeco1

Petty Officer 1st Class
Joined
Jul 16, 2009
Messages
373
Re: 85 force check valve

Scotty,

I just replaced mine this weekend. All I can say is GOOD LUCK. The one in the left side of your picture is a booger to get out.

Some on here have suggested using two paint can openers to hook inside and the pull them out. That didn't work for me. I ended up using a rounded rasp attached to my drill to grind away the brass. I then used a small screwdriver and was able to pry the remaining brass ring away from the wall and remove. The entire time, I was afraid that I was going to crack the housing, but it worked out. I will warn you... the housing has a lip just under the brass ring that the check valve sits on. Be careful to not grind it away. You can look at the other check valves to determine how thick they are.

After you get it removed, put the new valve in, put a deep well socket over the brass ring and gently tap with a hammer to seat the new valve.
 
Top