82 sea sprite I/O overhaul??

SeaSpriteDan

Cadet
Joined
Oct 24, 2010
Messages
15
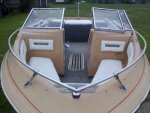
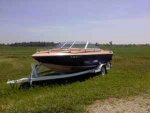
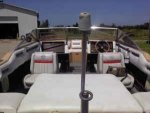
So i traded about $800 worth of guns and accessories for this boat and I would like to do a complete overhaul on the interior. It runs and, mechanically, just needs a new prop and he said there is a seal in the prop assembly that needs replaced because it leaks oil? Does this sound familiar to anyone? How difficult would this repair be for a do-it-yourselfer?? Also, from reading several threads in this forum (I have become addicted to a lot of threads here but so far, oops! is my hero... Lol) I've learned that the floor and transom in a boat this age is almost guaranteed to need replaced. How costly would this type of overhaul be? Finally, I live in Madison, IN which is about an hour and a half south of Indianapolis, but my boat is currently at my parents' in Indianapolis so anyone in that vicinity that might be willing to help me out with this project would be GREAT since this is my first boat and I know absolutely nothing about them other than the tons of information I've crammed in the past 12 hours of being glued to these forums.
 

Attachments

  • 3me3p13o25T65X35R6aa887443f992239165a.jpg
    3me3p13o25T65X35R6aa887443f992239165a.jpg
    7.4 KB · Views: 0
  • 3n13me3p95O25Z15U1aa8478ffb6145dc102c.jpg
    3n13me3p95O25Z15U1aa8478ffb6145dc102c.jpg
    5.8 KB · Views: 0
  • 3k23m53p25O45T65R1aa8589bb062baa21a9c.jpg
    3k23m53p25O45T65R1aa8589bb062baa21a9c.jpg
    6.8 KB · Views: 0

SeaSpriteDan

Cadet
Joined
Oct 24, 2010
Messages
15
Re: 82 sea sprite I/O overhaul??

Another thing, I've read a lot of threads here and Ive got some big plans as far as electronics and accent lighting. I haven't yet found anyone that utilized a centralized fuse panel for the boat electronics (I.e. radio, depth finder, amplifiers for the speakers, lighting, etc....). Is it more practical to use in line fuses for everything or have I just not read the right threads yet??
 

parrisw

Ensign
Joined
Jun 8, 2009
Messages
985
Re: 82 sea sprite I/O overhaul??

Yes you would be wise to use a main fuse panel. It makes it much more clean install then inline fuse setup.

Good luck with the boat.
 

erikgreen

Captain
Joined
Jan 8, 2007
Messages
3,105
Re: 82 sea sprite I/O overhaul??

Glad to see you're reading to start with. That puts you ahead of a lot of the folks here.

Mostly it's larger boats with fuse or breaker panels.. some of the boats here have them. For the smaller ones you can use inline fuses, but a lot of us do use either integrated switch/fuse panels or fuse blocks, which are barrier strips with integrated slots for blade type fuses. These are usually located in the console.

Look around and you'll see some here. I'd recommend fuses in the console and at the other end of any long wire runs for just about any boat.

Erik
 

SeaSpriteDan

Cadet
Joined
Oct 24, 2010
Messages
15
Re: 82 sea sprite I/O overhaul??

Great! Thanks...

What about the deck and transom? What's an average cost of a repair like this? From my reading on this site, I think I'll be using 3/4 ext ply soaked in ??water repellent?? Followed by a couple layers of fiberglass? Does this sound right?
 

parrisw

Ensign
Joined
Jun 8, 2009
Messages
985
Re: 82 sea sprite I/O overhaul??

Great! Thanks...

What about the deck and transom? What's an average cost of a repair like this? From my reading on this site, I think I'll be using 3/4 ext ply soaked in ??water repellent?? Followed by a couple layers of fiberglass? Does this sound right?

No that doesn't sound right. Don't use water repellent. Use resin or epoxy to soak it then a layer of glass.
 

SeaSpriteDan

Cadet
Joined
Oct 24, 2010
Messages
15
Re: 82 sea sprite I/O overhaul??

Is the resin the same type of stuff that is used with the fiberglass? Just without the fibers? So just a single layer of resin, let cure, then a single layer of fiberglass?
 

erikgreen

Captain
Joined
Jan 8, 2007
Messages
3,105
Re: 82 sea sprite I/O overhaul??

Read around for more info... this is probably the most common task people here do.

Basically you do this:

Laminate the transom core together. If using epoxy, just thicken it and glue. If using poly, roll a layer of resin on both sides and let tack up (not full cure) then put a layer of mat on one side and wet it out. Put the other side on top of the wet mat and clamp.

Take the core that you laminated and glue it to the existing transom. Do this by rolling a layer of resin onto the fiberglass surface that's left after you removed the old core. At the same time roll resin onto the back side of the transom core. Let it tack up, then use mat again, wet it out, maybe use another mat layer depending on how uneven your transom is. Then press your transom core into the mat and clamp. Let it cure.

Go around the outside edges of the now glued-in transom with resin putty (or "peanut butter") to fill the gaps and form a fillet.

Then proceed to fiberglass the transom in place with multiple layers of cloth overlapping the sides.

The reason you roll resin on the wood or surface to be glued first is to fill the pores and seal it, preventing it from pulling resin away from the fiberglass cloth or mat. You also improve adhesion by pre-wetting.

Read a few of the specific "transom replacement" threads to find out more.

Erik
 

parrisw

Ensign
Joined
Jun 8, 2009
Messages
985
Re: 82 sea sprite I/O overhaul??

Is the resin the same type of stuff that is used with the fiberglass? Just without the fibers? So just a single layer of resin, let cure, then a single layer of fiberglass?

Yes, there is more then one way to do it, be prepared to make a decision, you'll get many opinions on how to do it. This is what I just did. Now take it for what its worth, this is my first time doing this, and I'm not even done, but I do have the transom ready to go in.

I cut out a basic square of plywood a little larger then the transom will be, make 2 of those, screw them together with a few screws, now cut the transom to shape, cut, then sand whatever you need to do to make it fit in there, then the 2 pieces will be exactly the same, once its fitted, I unscrewed it, then glued the two pieces together with a waterproof wood glue, I used Tightbond-3. No need to use resin and matt to glue the 2 pieces of ply together, they didn't do that when they built the plywood. I then mixed up fiberglass resin with hardner, and painted the whole transom with it, until it wont soak up any more resin. I let it tack off, then covered the side that will be glued to the transom, with CSM(chopped strand matt), now wet out the matt with resin, and wrap the sides with it as well, so its sealed well. Now once that is dry, glue it into your boat with a PB mix, that's resin with cabosil to thicken it up to make a glue. I'll probably add milled fibers to it as well.
 

SeaSpriteDan

Cadet
Joined
Oct 24, 2010
Messages
15
Re: 82 sea sprite I/O overhaul??

Thanks a LOT! Some very helpful info here... These forums are GREAT! Ill be starting a new thread in a couple of weeks when i start the project, complete with tons of pictures... I'm sure I'll be needing more advice and pointers so Thanks in advance for ALL of the help!!!
 

parrisw

Ensign
Joined
Jun 8, 2009
Messages
985
Re: 82 sea sprite I/O overhaul??

Thanks a LOT! Some very helpful info here... These forums are GREAT! Ill be starting a new thread in a couple of weeks when i start the project, complete with tons of pictures... I'm sure I'll be needing more advice and pointers so Thanks in advance for ALL of the help!!!

Great! If your starting another thread, try to keep all the questions you have in there, it will be much easier for you to go back and read through all the tips, with not having to bounce back between two threads.

Will
 

SeaSpriteDan

Cadet
Joined
Oct 24, 2010
Messages
15
Re: 82 sea sprite I/O overhaul??

Just curious... how difficult are the Windows to remove? I'm assuming that ill have to take the cap off which I'm sure would be easier and lighter if I removed the Windows.
 

ezmobee

Supreme Mariner
Joined
Mar 26, 2007
Messages
23,767
Re: 82 sea sprite I/O overhaul??

Shouldn't be difficult. They are usually screwed or through-bolted. There may be a black strip near the bottom of the frame that can be removed to reveal the fasteners. If there isn't, then the bolts are slid through a channel on the bottom of the frame.
 
Top