'75 850 Lower Bearing

emckelvy

Commander
Joined
Jan 16, 2004
Messages
2,506
Re: '75 850 Lower Bearing

Well, I guess I just "knew" (from experience, that is!) that a plain "206" bearing works in that application. But here's some good info from one of the bearing manufacturers, on the specs for a 6206 bearing, which belongs to the group of bearings called "6200-Series".

6200 Series Ball Bearings from National Precision

As you'll see, the basic dimensions (O.D., I.D., thickness) should be the same regardless of the type of shield (rubber, metal, etc) or snap ring (special application).

In fact, I've gotten a lot of good eBay deals on shielded bearings in the past. When the shields are unnecessary, such as in an outboard application, you just pry them out of the bearing, clean out the grease, and lube with some motor oil for the initial startup.

At any rate, that's an excellent deal for a 206 bearing, I was sorely tempted to snap 'em up but I figured you'd put it to better use! The "206" is just a mfr's different designation for a bearing, but it crosses over to a "6206" as well.

SKF 206 bearing 206 SKF bearings dimensions

Cheers & Happy Thanksgiving...........ed
 

mercurymang

Master Chief Petty Officer
Joined
Jul 14, 2012
Messages
853
Re: '75 850 Lower Bearing

Thanks much Ed. I wasn't doubting you, i just wanted to understand and I figured out what was giving me heartburn was that I was inadvertantly punching in 6206 and 6026. I didn't realize it and led to all sorts of confusion on my part. Thanks for all your help. I'm in the process of trying to get that bearing off at the moment. I managed to get it to budge about 1/64" and then broke my puller. Gotta find another one before before I go any further.

thanks again and Happy Thanksgiving.
 

emckelvy

Commander
Joined
Jan 16, 2004
Messages
2,506
Re: '75 850 Lower Bearing

Hey, I know the feeling, I'm always swapping numbers and letters like that.

As I've said for years, Lys-Dexics of the World, Untie! ;)

Have a good Turkey Day...........ed
 

mercurymang

Master Chief Petty Officer
Joined
Jul 14, 2012
Messages
853
Re: '75 850 Lower Bearing

I received the skf bearing I purchased on ebay today. Sure enough, i mic'd it and it was a perfect match.
I also managed to finally get the old bearing off. I used some ice to get the crank cold as possible before heating the bearing and after doing some re-bending on my old puller managed to slip it off.
For the re-install, I need to find some sort of drift that will slide over the crank and allow me to tap the bearing into place.
 

emckelvy

Commander
Joined
Jan 16, 2004
Messages
2,506
Re: '75 850 Lower Bearing

For the re-install, I need to find some sort of drift that will slide over the crank and allow me to tap the bearing into place.

Toaster oven works better! Heat 'er up and she goes on like Butta! If you don't have a toaster oven, just bake it in the regular oven at 240 deg F for about 30 minutes and get 'er on the crankshaft fast as you can. If you cool the crankshaft as well, more's the better. It'll just go on that much smoother.

There's much less chance of damaging anything using the heat method, vs driving the bearing on. If you do it that way, just be sure to drive on the inner race only.

Cheers..........ed
 

mercurymang

Master Chief Petty Officer
Joined
Jul 14, 2012
Messages
853
Re: '75 850 Lower Bearing

Thanks Ed. Before I proceed. The bearing I bought has a metal cage that somewhat covers the rollers ( I think you know what I'm referring to). Those aren't supposed to be removed are they?
 

emckelvy

Commander
Joined
Jan 16, 2004
Messages
2,506
Re: '75 850 Lower Bearing

Thanks Ed. Before I proceed. The bearing I bought has a metal cage that somewhat covers the rollers ( I think you know what I'm referring to). Those aren't supposed to be removed are they?

OK, there should be a riveted "cage" that contains each ball bearing in its own "pocket" and keeps it aligned with the other ball bearings, instead of them all piling up on one side of the bearing.

If that's the one you're talking about, you don't want to mess with that.

If you're seeing a seal (aka "shield") which snaps into the outer race, covering up the balls, you don't want that on there. It's for a different application where the bearing is greased and the shield keeps the grease in.

The shields just pry out; the bearing grease should be cleaned out with some solvent, & then the bearing lightly oiled.

Here's an illustration I found for the parts of a ball bearing:

Why Can

HTH........ed
 

mercurymang

Master Chief Petty Officer
Joined
Jul 14, 2012
Messages
853
Re: '75 850 Lower Bearing

The BB looks like this so from what you are saying leave it alone?
ball-bearings-pinion-wheels-19752487.jpg
 
Last edited:

mercurymang

Master Chief Petty Officer
Joined
Jul 14, 2012
Messages
853
Re: '75 850 Lower Bearing

Does anyone know how much 518 i should get to seal the halves? I see a 50ml quantity but not sure if that would be enough.
 

emckelvy

Commander
Joined
Jan 16, 2004
Messages
2,506
Re: '75 850 Lower Bearing

A small tube will do. Best way that was taught to me is to lay a very thin bead on the block side flanges, try to make it a continuous bead from top to bottom. If you do break the beadline along the way, don't worry, just overlap a bit. Slap a rubber/vinyl/etc glove on, and use a gloved finger to smear/spread the sealer all over the flange. Work it in a bit. A coating that you can barely see is enough, as long as it's completely covering all the flanges' surface. A thick coating will just squish out, make a mess, and waste a lot of sealer. As is, it'll squish some out anyway. Nice thing is, the stuff that squishes out will never cure and you can just wipe it away, on the outside. On the inside, the fuel/oil mixture will harmlessly wash away all the sealer. The material that gets squished between the flanges will cure/harden in the absence of air. Cool Stuff!

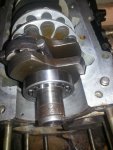
Now, on to another area of concern before you slap 'er back together. The bottom of the crank looks a bit rusted/pitted. If it's bad enough in the area where the crank seals ride on the crankshaft, it'll suck in water. This will ruin the crank bearing and if it ingests enough water, it's going in the cylinder and causing more damage.

Hard to tell from the pic how bad it is, but what I'd do is clean up that area with some emery cloth or maybe 320 wet/dry. Needless to say you want to keep any sanding grit/debris out of your nice, new bearing!

Once she's all cleaned up, it'll be easier to evaluate the surface. If there is significant scoring or a lot of pits where the lips of the seals sit, Fear Not, for Mercury has provided a seal-saver sleeve which taps over the end of the crankshaft, giving a smooth surface for the seals to ride on.

Check out this very long thread, where we talked about a 85hp Merc with an even worse-looking crankshaft end:

http://forums.iboats.com/mercury-mariner-outboards/war-lower-unit-590009-6.html#post4106172

The crankshaft-related comments start around #147. The Mercury TSB is posted below, for handy reference.

The part number for the sleeve is 86349A 1, here's one source online I found for the part:

86349A1 | SLEEVE ASSY | Mercury | Crowley Marine

HTH........ed
 

Attachments

  • Crankshaft Repair Sleeve.jpg
    Crankshaft Repair Sleeve.jpg
    43 KB · Views: 0

mercurymang

Master Chief Petty Officer
Joined
Jul 14, 2012
Messages
853
Re: '75 850 Lower Bearing

It's hard to tell. I think that the seals ride in that smooth area, but I will have to take some measurements to be sure since I can't tell with it on (or should I just go ahead and sleeve it). Mine does not appear to be as bad as yesterdays but it still is not perfect.
 

mercurymang

Master Chief Petty Officer
Joined
Jul 14, 2012
Messages
853
Re: '75 850 Lower Bearing

So I finally received the crank sleeve which I received yesterday. Is it better to press it on or tap it on? Should I heat it up before I install it or does it just lose the heat so fast that there is no point?
 

emckelvy

Commander
Joined
Jan 16, 2004
Messages
2,506
Re: '75 850 Lower Bearing

The way I've done it in the past is to use a block of wood. Hold it squarely and tap with a hammer. Be very careful 'cause the sleeve is quite thin, and if you get it crooked it'll distort badly. Usually they tend to get a bit "warped" as the sleeve goes over the end of the crankshaft.

Use some blue or red Loctite, spread in a thin layer on the end of the crankshaft where the sleeve will ride.

It'll lock it solidly in place, help seal up irregularities in the crank surface, and act as a slight lubricant for the sleeve as it's tapped into place.

There should be some comprehensive instructions included with the sleeve, and I'd certainly follow Merc's installation advice! If you can heat the sleeve uniformly, I don't imagine that it could hurt. Having the sleeve expand a bit should make it easier to get on the shaft.

Cheers..............ed
 
Top