68 Johnson 55HP (TRL-10R) not starting, just barking.

racerone

Supreme Mariner
Joined
Dec 28, 2013
Messages
36,341
This motor does NOT need to crank at 300 RPM to produce the spark.
 

DWM76

Seaman Apprentice
Joined
Sep 4, 2018
Messages
47
Hey Racerone. The only 2 keys I know of on this motor are the flywheel key and the impeller key. If there is another key I should be aware of and check please let me know.

Thanks for clearing up the spark test. I will connect the lead to a ground instead of the spark plug, and remove all spark plugs, i had been testing with them in.
I removed the drain plug on the carbs, and the jets and cleaned with carb brushes. I did not remove the 'silver caps' though replacements came with the kits. (I watched the Dangar Marine's carb cleaning video as the carb was pretty similar to mine)
I will pick up L77JC4 plugs and try them as well.

I am also concerned about the low compression but i'm not sure how to improve it. I did remove the head cover, checked for scoring, resurfaced the faces and reassembled with new gaskets. I also removed and cleaned the exhaust manifold cover, resurfaced, and reassembled with new gaskets too. When I did the carbs I removed the reeds to inspect and resurfaced and reassembled with new gaskets as well.
I'll get another compression tester and check them again.

Thanks for all the great tips and advice.
 

racerone

Supreme Mariner
Joined
Dec 28, 2013
Messages
36,341
I mentioned to check the rotor " key " and it is part of the rotor.--It must be positioned in a notch on the crankshaft.
 

Tim Frank

Vice Admiral
Joined
Jul 29, 2008
Messages
5,333
In the 35 years I ran one of these the carbs were never a problem....except one winter a fly somehow got into the HS orifice channel and produced an intermittent blockage.
Almost every problem was ignition-related.
I would bet the farm on an ignition problem. You are on the right track.....just keep on it. :)

The harness replacement is a huge plus. I did that and got 5 more good years.
 

DWM76

Seaman Apprentice
Joined
Sep 4, 2018
Messages
47
Thanks Tim. About the wiring overhaul; I used 18 gauge wire, crimped connectors and shrink sleeves. I wonder if perhaps I should have used 16 or 14 gauge, at least for the red lead from ignition to starter solenoid and purple lead from ignition to amplifier? The shift solenoids, choke solenoid, vacuum assembly, temp switch etc. I didn't think would need much more than 18 gauge, but I am second guessing those 18's on the ignition systems. Perhaps even the yellow leads from the stator should be 16 or 14? Come to think of it maybe the black lead from the points too?

Racerone, I did replace the key, OMC part, on the drive shaft and am positive it is positioned correctly on the driveshaft and aligned with the notch in the flywheel. I expect I will have to check the points so I will be removing the flywheel again and will check the key alignment again to be sure.
 

racerone

Supreme Mariner
Joined
Dec 28, 2013
Messages
36,341
I did not ask about the flywheel key or water pump key.--------But did you confirm that the rotor is in the correct position ??-----I have done more than one of these motors.---------Remember marveling at the technology when we took one of those motors out of the box in 1968 !!
 

DWM76

Seaman Apprentice
Joined
Sep 4, 2018
Messages
47
Hi Racerone. I think I know what you mean now. The 'key' on the rotor assembly, under the distributor?
OMC 0392342
There is no ability to adjust the 'key' as this is a fixed piece of the assembly, and the rotor only fits in one position when installed by design. I'm not sure how it could be out of alignment. I will certainly check though when I inspect the points.
 

racerone

Supreme Mariner
Joined
Dec 28, 2013
Messages
36,341
I know what they look like.------Good idea to check the little details.
 

Joe Reeves

Supreme Mariner
Joined
Feb 24, 2002
Messages
13,262
DWM...... It's possible that "racerone" is suggesting that the "key" which is indeed part of the Bakelite rotor has been known to break away if not positioned correctly which would allow the rotor to float out of time. Not an everyday encounter but I've come across that a couple times.
 

DWM76

Seaman Apprentice
Joined
Sep 4, 2018
Messages
47
So I was testing spark again, and though I get a good strong spark jumping at least a 1/4" gap, the spark is what I would call intermittent or inconsistent.

If I tap the white lead from the starter to the battery positive the spark is more frequent than if I just hold it to the positive, in which case I get gaps of time with no spark, if that makes sense... I test one HT lead at a time each with similar results.

My guess is I have an issue with the points? Or does it seem more likely the issue is the Amp/Coil? Coil is new, Amp is, I think, original.

Thanks again for your time and advice.
 

oldboat1

Fleet Admiral
Joined
Apr 3, 2002
Messages
9,607
(??) will stand corrected, but believe there would be no white wire from starter to battery (i.e., no wire from starter to battery). Would expect a white wire from each of the small solenoid posts -- one to the start switch, and one to the safety switch. There should be a wire from the large solenoid post to the starter post. These connections belong to the starter circuit -- no effect on spark, unless of course the starter operation is affected. Maybe I've missed your point....
 

Joe Reeves

Supreme Mariner
Joined
Feb 24, 2002
Messages
13,262
If you have adjusted the ignition points "exactly" as I explained in a previous post for the point timing to be correct, and.........

If you actually manually cleaned the high speed jets that are located horizontally in the bottom center of the float chamber, way behind the drain screw so that fuel will reach all the other fuel passages as required, and........

If the spark plugs are the proper type and gaped to .030 and the fuel mixture is 50/1..... the engine should start and run in some fashion, perhaps not perfectly but running, unless........

The starting procedure is causing a voltage drop to the Pulse-Pack, Amplifier, Pack, whatever one wants to call it. I prefer the term Pulse-Pack myself as the type of ignition is "Battery Capacitance Discharge" which differs from what we've been used to since 1973, "Magneto Capacitance Discharge" that incorporates Powerpacks.

The main difference between the two is that the magneto capacitance setup develops it own ignition required voltage, whereas the battery capacitance setup requires battery voltage.... and the battery supplied "MUST" be a top notch battery in excellent condition, fully charged, and capable of supplying at least 75 cranking amperes of which most batteries nowadays exceed.

Now, even with a battery as mention above, my point here is that a aging starter system can pull the required voltage away from the Pulse-Pack/Amplifier which results in a non starting engine. The cure for that problem is...........

********************
(Voltage Drop To Battery Capacitance Discharge)
( Pulsepack When Electric Starter Is Engaged)
(J. Reeves)

On the older Battery Capacitance Discharge ignition systems (1968-1972), the electric starter reaches a point, even with a top notch battery, whereas the starter will draw excess voltage/current/whatever which results in a voltage drop to the pulsepack. The cure is to purchase a diode which is capable of handling 12 volts and installing it between the starter terminal of the starter solenoid (NOT the battery cable terminal) and the wiring terminal that supplies voltage to the pulsepack.

The diode must be installed so that the current flows from the starter terminal of the solenoid to the pulsepack... NOT vice versa. When that diode is installed in this manner, when the key is turned to the start position, the voltage that is applied to the starter is also applied directly to the pulsepack via the diode effectively eliminating the voltage drop and energizing the pulsepack with the required voltage needed for its proper operation.

********************
Ck eBay Ignition Diode 383538
 
Last edited:

oldboat1

Fleet Admiral
Joined
Apr 3, 2002
Messages
9,607
DWM — Still not sure what wire you are describing, but given Joe’s Reeve’s explanation, maybe you’re onto something. You might be generating a spark each time you tap the wire to the battery post. Leaving it connected gives you a timed spark — but maybe an inconsistently timed spark if the electrical connection is faulty. (Running through a shorting key switch, for example.)
 

DWM76

Seaman Apprentice
Joined
Sep 4, 2018
Messages
47
Sorry about the confusion. The white wire I mention would be connected to the ignition switch at the 's' terminal. I disconnected the ignition switch to elimi ate it as a potential problem. Touching the white to positive is like turning the key to start position.
 

racerone

Supreme Mariner
Joined
Dec 28, 2013
Messages
36,341
The white wire would be for the cranking circuit !----That has nothing to do with the circuit that makes the spark.-----More trouble shooting / testing is to be done on this motor.-----Perhaps have the rotor and distributor cap tested if you can find someone there who knows how.
 

Joe Reeves

Supreme Mariner
Joined
Feb 24, 2002
Messages
13,262
Sorry about the confusion. The white wire I mention would be connected to the ignition switch at the 's' terminal. I disconnected the ignition switch to elimi ate it as a potential problem. Touching the white to positive is like turning the key to start position.

The "S" terminal on the ignition switch stands for "Solenoid" (starter solenoid)... and that white wire you speak of connects to the small 3/8" nut terminal of the starter solenoid..... when the key is in the START position, and "ONLY" when the key is in the START position, 12v is applied to that "S" terminal to engage the starter solenoid to have the electric starter to engage. What you are describing is impossible.

Either you have one hellava wiring mess on your hands or you've been pulling our chain all along.If not the latter, I wish you luck.
 

DWM76

Seaman Apprentice
Joined
Sep 4, 2018
Messages
47
Yes correct, the white wire is coming from the starter solenoid. I touch it to the positive battery terminal to crank the motor over, replicating turning the key to start position.
I have the red wire (w/20A fuse) from the starter solenoid and the purple wire from the amplifier (that would be normally be connected to the ignition switch) connected to the battery positive.

My thinking, possibly flawed, is that white to positive would replicate turning the key to start position, to crank the motor, and when the white is removed from the battery positive, be in the run position (if the motor started)
So when I say 'tap the white' to crank the motor my understanding is it is the same as turning the key to start.

To put my previous comment in another way: when I first 'turn the key' (or tap the white) to start position I get an initial good spark but as the motor continues to crank there is no, or intermittent spark. If I 'turn the key' to start position on/off rapidly (tap the white), rather than continuous 'start'(hold white to pos.), each 'on' (or tap) key turn generates good spark.

I have some vacation time over the Christmas holidays and plan to inspect make the adjustments to the points, spark plugs, and carb jets Joe Reeves mentioned. I will also look into the voltage drop issue and install a diode as described.

Once again my sincere thanks for your help and advice. Happy holidays all. I hope I have some progress to report in the new year.
 

DWM76

Seaman Apprentice
Joined
Sep 4, 2018
Messages
47
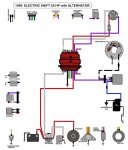
Here is a picture of the motor wiring as i have it currently, with the exception of the ignition switch. Am I missing something that is vital to the starting or the motor? 1968-OMC-55-Wiring (current state).jpg
 

racerone

Supreme Mariner
Joined
Dec 28, 2013
Messages
36,341
Have the rotor and distributor cap tested.-----Have you checked the anti-reversing spring ??
 
Top