5.0GL - No Power at Coil

kenny nunez

Captain
Joined
Jun 20, 2017
Messages
3,076
The picture #355 is a Prestolite, does it have points and condenser or is it electronic? Volvo used Prestolite on all their “V” style engines. They phased in the electronic version in the 80s and used the same body. If there is only 1 wire going into the distributor then it is a breaker point version. 2 wires then it is electronic.
If yours is the breaker point style then it needs a resistor that provides 8-9 volts when the engine is running.
 

alldodge

Moderator
Staff member
Joined
Mar 8, 2009
Messages
40,786
I thought of that early on Kenny but since it was a GL figured it had to be electronic, and he found 8V at the 10 pin. Also looked up the serial number 4110185712 and it shows electronic

What is weird is he shows a EST dizzy cap and that won't fit
 

Bt Doctur

Supreme Mariner
Joined
Aug 29, 2004
Messages
19,115
you wont see any numbers on the balancer, your looking for a line/groove cut in the balancer. That is TDC for #1 piston. Also TDC for #1 on the exaust stroke
 

Blowinup

Seaman Apprentice
Joined
Sep 1, 2021
Messages
48
The picture #355 is a Prestolite, does it have points and condenser or is it electronic? Volvo used Prestolite on all their “V” style engines. They phased in the electronic version in the 80s and used the same body. If there is only 1 wire going into the distributor then it is a breaker point version. 2 wires then it is electronic.
If yours is the breaker point style then it needs a resistor that provides 8-9 volts when the engine is running.

I really appreciate you identifying the distributor I have. It's very helpful.
Based on what you said it looks like I have an electronic because there are two wires that connect to the coil and I don't see any points.
 

Attachments

  • 20211024_160238.jpg
    20211024_160238.jpg
    3 MB · Views: 2
  • 20211024_160646.jpg
    20211024_160646.jpg
    1 MB · Views: 2

Blowinup

Seaman Apprentice
Joined
Sep 1, 2021
Messages
48
you wont see any numbers on the balancer, your looking for a line/groove cut in the balancer. That is TDC for #1 piston. Also TDC for #1 on the exaust stroke
Found them. With all this surface rust it's going to be challenging to pinpoint 8 BTDC. These pictures were taken after I did an initial wire brush and wipe down to make them a little easier to see. I clearly have more work to do.

I also need to get a shop tach or something because I don't think the helm gauge is accurate enough to set the timing.
 

Attachments

  • 20211024_162948.jpg
    20211024_162948.jpg
    1.2 MB · Views: 5
  • 20211024_180257.jpg
    20211024_180257.jpg
    362.3 KB · Views: 6
  • 20211024_180341.jpg
    20211024_180341.jpg
    379.2 KB · Views: 6
  • 20211024_180043.jpg
    20211024_180043.jpg
    789.8 KB · Views: 6

alldodge

Moderator
Staff member
Joined
Mar 8, 2009
Messages
40,786
Use a white grease pencil or bad of white paint on the notch. Adjust timing light for 8BTDC and let it line up with the pointer.

With that kind of rust you must be in salt water
 

Blowinup

Seaman Apprentice
Joined
Sep 1, 2021
Messages
48
I thought of that early on Kenny but since it was a GL figured it had to be electronic, and he found 8V at the 10 pin. Also looked up the serial number 4110185712 and it shows electronic

What is weird is he shows a EST dizzy cap and that won't fit

Thanks for looking up the serial number for me. I've been wanting to replace the cap (ordered the wrong one). I have tried to clean the contacts twice but I think I need a new one.
 

Attachments

  • 20211024_160509.jpg
    20211024_160509.jpg
    1.6 MB · Views: 1

Blowinup

Seaman Apprentice
Joined
Sep 1, 2021
Messages
48
Use a white grease pencil or bad of white paint on the notch. Adjust timing light for 8BTDC and let it line up with the pointer.

With that kind of rust you must be in salt water

It spent the last decade, maybe more, in Tampa bay. It had bottom paint when I got it so it was wet docked at some point.

If I were keeping it I'd remove the bottom paint. But I'm selling it so I just repainted it. Here's a before and after.
 

Attachments

  • 20211013_145132.jpg
    20211013_145132.jpg
    1.4 MB · Views: 5
  • 20211022_151616.jpg
    20211022_151616.jpg
    2.8 MB · Views: 5
  • 20211013_143339.jpg
    20211013_143339.jpg
    1.6 MB · Views: 5
  • 20211013_143510.jpg
    20211013_143510.jpg
    2.3 MB · Views: 4

alldodge

Moderator
Staff member
Joined
Mar 8, 2009
Messages
40,786
The cap doesn't look bad to me, but looks can be deceiving. Cap and rotor would be a good thing
 

Blowinup

Seaman Apprentice
Joined
Sep 1, 2021
Messages
48
The cap doesn't look bad to me, but looks can be deceiving. Cap and rotor would be a good thing
I found some corrosion the first time I popped the cap. I did my best to clean it up.

BTW: Looks to me like my distributor is all the way to one side of the adjustment bolt... retarded maybe?
 

Attachments

  • 20211024_160313.jpg
    20211024_160313.jpg
    3.3 MB · Views: 5

alldodge

Moderator
Staff member
Joined
Mar 8, 2009
Messages
40,786
That's a clamp which holds the dizzy but is not put of. Should be able to move once loosened.
 

Blowinup

Seaman Apprentice
Joined
Sep 1, 2021
Messages
48
I finally got around to timing the VP. Finding the timing marks was challenging but I got it done. Now there is an easy to see white paint mark on 10 BTDC. I also repainted the set mark so when lined up it looks like an arrow. I didn't capture the actual timing with video, not sure if it would show up on camera anyway, but I did upload a still of the two marks.

20211027_151847.jpg

I think it went well and I'm pleased with the results. As suspected, it was severely retarded; like probably around 8-10 ATDC. The engine runs so much stronger and more smoothly now and the hesitation is 95% gone.

It's running in the green now!
Before
View attachment Running Red - Wan'ts Green So Bad.mp4
After
View attachment Running in the Green.mp4

I want to thank everyone who helped and a special thanks to alldodge who was the first person to weigh in suggesting the accelerator pump needed to be adjusted and has been there for me every step of the way. That solved about 80% of the hesitation and the timing got me to about 95%.

Big thanks to BT Doctur and kenny as well. You guys are awesome and I couldn't have done this without you.

I can now slam it from idle to WOT with very little hesitation. It used to stutter so bad the whole engine would convulse violently sputtering, spitting fire and stalling. Seriously I've seen one foot flames come out of the carb. One of them scorched my forearm as I reach across to manually work the throttle; learned a lesson on that one. I don't have video of it at it's worst but I did upload a video showing the hesitation leading to a stall.

Before
View attachment Hesitation And Stalling-1.mp4

After
View attachment 95%.mp4

I've also included a video where it is now. It still has what seems to be a slight hesitation. If this is as good as it gets I'm totally fine with it. But if anyone has a suggestion to squeeze out that last 5% I would love to hear it. Or if you think I've gotten everything I can and should stop being greedy I'd like to hear that too. Any feedback is welcome.

Regardless of where I go from here, I can't thank y'all enough for your help.
 

kenny nunez

Captain
Joined
Jun 20, 2017
Messages
3,076
Are you sure the choke is adjusted correctly? With the key off and a cold engine all that is needed is for the choke butterfly to be barely closed. Have you actually seen the choke be fully open within 2 minutes? Does the choke housing get warm to the touch?
Otherwise you did a good job and the vacuum is really in the sweet spot.
 

Blowinup

Seaman Apprentice
Joined
Sep 1, 2021
Messages
48
Are you sure the choke is adjusted correctly? With the key off and a cold engine all that is needed is for the choke butterfly to be barely closed. Have you actually seen the choke be fully open within 2 minutes? Does the choke housing get warm to the touch?
Otherwise you did a good job and the vacuum is really in the sweet spot.

Damn you're good kenny!

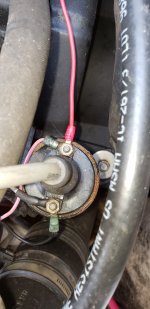
Before rebuilding the carb I noted, marked and even took a picture of where the choke was and set it back exactly where it was. Then I started noticing starting problems. So I started adjusting it and the starting problem disappeared. But I wonder if I might have gone a little too far.

BTW: it was twisted ridiculously far to the left... wouldn't even close all the way. But I didn't even know what an electric choke was at that time; I've learned so much on my journey with this engine.

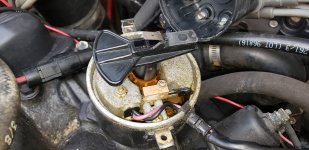
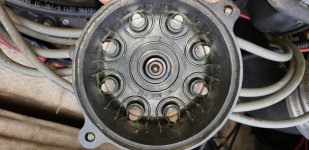
This is the picture I took before the rebuild.
20210811_181652.jpg

It was like like when I bought it. I don't know what made me think to adjust it other than it just didn't look right to me. I mean why would Holley have it twisted so far to one side that the wires were stretched and their name was nearly vertical right?

So I just decided twist it to the left until the connections were about straight down and "Holley" looked right and that solved my hard start problem. I've adjusted it back and forth a few times since then until the choke is just barely closed and it started and ran better. But now, especially after your suggestion, I'm thinking that may be where the last step in this process is.

I notice the choke doesn't open all the way when running. Sounds like it should... after two minutes you say? Or should it only open all the way at WOT? When setting the timing I manually held it wide open with a snub screw driver.

I was planning on checking Holley's website for an electric choke adjustment tutorial since their accelerator pump tutorial helped me out so much. Now that you've confirmed my suspicion I think I'll do that and see if I can get some of that last 5%.

I don't have a picture of where it is now, and it's dark outside, but I'm going to see if I can dial it in tomorrow. I'll check to see if it opens all the way after two minutes and also check to see if it's warm to the touch.

Thanks again!
 
Last edited:

Blowinup

Seaman Apprentice
Joined
Sep 1, 2021
Messages
48
Help... I'm choking!

I twisted the electronic choke back from it's nearly centered position until the butterfly just barely closed. I also noticed the butterfly was sticking to the side of the throttle body a little so I lubed and worked until it moved freely.

Following this video:
I tested the connections to the choke and was surprised to find little to no voltage (just like what was happening to my coil). So I connected it to a 12v source and the butterfly opened all the way almost in about 30 seconds. Once open it was pegged for several minutes.

kenny; You asked it it got warm to the touch. I would say it's more hot then warm. Not so hot I have to remove my hand but close And it was connected for less than a minute. Does that sound normal?

Holley's video seems to indicate that the cam should be moving with the throttle and that's not happening with mine. Moreover, the video showed how to use a set screw to adjust the high idle that should be seen under the choke housing when at WOT but I don't have that either.

I'm more confused than ever about the choke. I know when I adjusted it before it did have an affect on cold starting so I believe it is or was working. But how is that possible if it doesn't have 12v? And why did the choke open so quickly when connected to 12v? My limited understanding is that it should be closed to start and then open after the engine is started and and warms up. Is that correct?

If I turn the key that choke will open in about 30 seconds, get hot and stay open the choke (not the engine) cools down. So if for some reason it didn't start within the first 30 seconds of turning the key it would be pegged open and nearly impossible to start.

I have video but it's too big to upload

BTW: Should I start a new thread for this? We've moved past the original problem of no power to the coil, then to adjusting the accelerator pump, then to the timing (all of which a re solved) and now to adjusting the choke. Just want to make sure I'm following forum rules.
 

GA_Boater

Honorary Moderator Emeritus
Joined
May 24, 2011
Messages
49,038
BTW: Should I start a new thread for this? We've moved past the original problem of no power to the coil, then to adjusting the accelerator pump, then to the timing (all of which a re solved) and now to adjusting the choke. Just want to make sure I'm following forum rules.

Keep it all here. It really works better to everything in one place.
 

alldodge

Moderator
Staff member
Joined
Mar 8, 2009
Messages
40,786
Sorry to not respond, was taking daughter out for her BD

Its opening quick, maybe to quick, but not going full open. It should be straight up and down.

The marine carb does not have a high idle cam like an auto. The auto has a cam the will open the throttle a slight bit more. The boat idle is increased with the throttle handle in throttle only mode

It looks like your carb is working correctly for the most part
 

kenny nunez

Captain
Joined
Jun 20, 2017
Messages
3,076
Your alternator may have a stud marked “stator”. It is only hot when the engine is running, it should have 12 volts. If you have that setup connect the choke to that terminal.
You do not want to use the circuit that powers the coil.
Another way is with a electric fuel pump safety switch that is normally open until there is oil pressure. With that set up you can have the switch wired to a continuous 12 volt source, this is also a good way it wire in a hour meter.
 
Top