21' Holiday Rebuild

Watermann

Starmada Splash of the Year 2014
Joined
Jan 12, 2013
Messages
13,787
Once that new decking goes in things tend to progress very quickly from there on out, it won't be long now and just in time for spring. (y)
 

SHSU

Lieutenant Junior+Starmada Splash Of The Year 2019
Joined
Mar 8, 2017
Messages
1,725
Your first mate looks super excited. lol

As for the fairing compound, not sure why. If you are going to cover flooring don't see a practical purpose.

SHSU
 

benfish909

Petty Officer 2nd Class
Joined
Jan 4, 2021
Messages
122
Your first mate looks super excited. lol

As for the fairing compound, not sure why. If you are going to cover flooring don't see a practical purpose.

SHSU
I had a 3/8” gap between 2 of the panels. I should have started with the front panel first then worked my way back.

yeah the dog doesn’t sit still very well. 1.5 seconds later he jumped on my to throw his ball
 

benfish909

Petty Officer 2nd Class
Joined
Jan 4, 2021
Messages
122
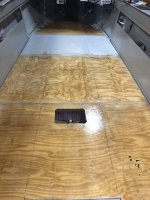
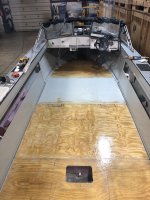
THE BOAT HAS A FLOOR!!!
Got the gaps filled with epoxy peanut butter then added a final thin coat to the entire deck besides the one that is painted. I am now officially done with epoxy and good thing bc I am out.

next steps...
1 rewire the entire boat
2 install splashwell
3 paint splashwell and back of transom
4 install vinyl flooring
5 complete the 1000 other tasks of reassemble 3954C4CD-CA95-4697-B836-BBB3B6FFE84B.jpeg4AA373BD-CB05-4F67-840E-4C3EBC5797C2.jpeg
 

benfish909

Petty Officer 2nd Class
Joined
Jan 4, 2021
Messages
122
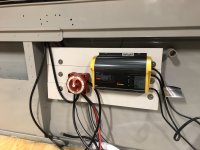
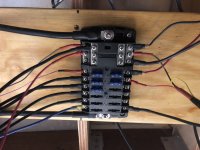
Got the majority of the wiring done just need to connect switch panel. Put the fuse box under the bow and made a panel for the charger and switch on the side under the splash well. 4 gauge tinned copper for battery terminals, the run from the back to the fuse box in the front, and made new connections to the motor. 12 gauge tinned copper for everything else except stuff like the radio and fish finer that come with wires. My hands are tired from all the crimping and heat shrink 84E56D9B-193B-4C2C-A518-F66197DE9FE6.jpegB80CBF28-D158-49AE-8B48-0F04BEAA8047.jpeg
 

sidingguy

Petty Officer 2nd Class
Joined
Nov 3, 2017
Messages
136
It's almost fun rewireing a boat! when you clean out all the junk it looks so clean and neat. Nice job!
 

benfish909

Petty Officer 2nd Class
Joined
Jan 4, 2021
Messages
122
It's almost fun rewireing a boat! when you clean out all the junk it looks so clean and neat. Nice job!
Yeah I enjoyed it. It’s nice knowing that everything will work and now if something happens I will know how to troubleshoot
 

SHSU

Lieutenant Junior+Starmada Splash Of The Year 2019
Joined
Mar 8, 2017
Messages
1,725
Very clean wiring sir!!!

Not familiar enough with the Holi, is that station in the back or up front under the console?

SHSU
 

benfish909

Petty Officer 2nd Class
Joined
Jan 4, 2021
Messages
122
Very clean wiring sir!!!

Not familiar enough with the Holi, is that station in the back or up front under the console?

SHSU
The panel with the charger is on the starboard side and will be under the splashwell. I made it out c channel riveted to the hull with pvc board. The fuse panel is under the bow a couple feet to keep it dry
 

mattsteg

Petty Officer 2nd Class
Joined
Mar 25, 2019
Messages
177
It's almost fun rewireing a boat! when you clean out all the junk it looks so clean and neat. Nice job!
Mine looked clean and night right up until I had like 20 circuits going. It still looks mostly near and labeled, but certainly a bit busy.
 

SHSU

Lieutenant Junior+Starmada Splash Of The Year 2019
Joined
Mar 8, 2017
Messages
1,725
The panel with the charger is on the starboard side and will be under the splashwell. I made it out c channel riveted to the hull with pvc board. The fuse panel is under the bow a couple feet to keep it dry

Noticed the fuse board has 15 amp fuses. What all are you powering that needs that kind of amperage?

SHSU
 

benfish909

Petty Officer 2nd Class
Joined
Jan 4, 2021
Messages
122
Noticed the fuse board has 15 amp fuses. What all are you powering that needs that kind of amperage?

SHSU
They came with the switch panel and didn’t want to lose them in all the mess around the shop. Will definitely be switching those out
 

benfish909

Petty Officer 2nd Class
Joined
Jan 4, 2021
Messages
122
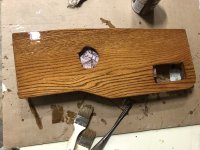
Got the dash control panel done. 4 coats of varnish. I replaced the top panel of the dash when I rebuilt it a couple years but I made it out of pvc board and paint deep gray. It warped and cracked in the sun. I have been trying to figure out what to replace it with. I have extra aluminum from the side panels so I cut and piece to be the top of the dash. Will trim the edge with the rubber trim then hydro turf the whole thing. I hope it work out like it does in my head. Will get pictures when I get to it. Next step is to reinstall the splashwell. 2CB9EC31-EBBA-43DD-9463-8BEAED309DA2.jpeg
 

benfish909

Petty Officer 2nd Class
Joined
Jan 4, 2021
Messages
122
I just realized I didn’t cut my hole for the rpm gauge in the dash
 

mattsteg

Petty Officer 2nd Class
Joined
Mar 25, 2019
Messages
177
Noticed the fuse board has 15 amp fuses. What all are you powering that needs that kind of amperage?

SHSU
I've got at least a few 15 or 20A circuits in mine I think.
Air Horn
Stereo
Feeds to secondary fuse panels at bow and under passenger console.
 

SHSU

Lieutenant Junior+Starmada Splash Of The Year 2019
Joined
Mar 8, 2017
Messages
1,725
I've got at least a few 15 or 20A circuits in mine I think.
Air Horn
Stereo
Feeds to secondary fuse panels at bow and under passenger console.

Hadn't thought about stereo. Most of mine are small items: Livewells, lights, etc... So maybe I am not running anything big enough to warrant 15 amps. Just seemed a little high for me.

SHSU
 

mattsteg

Petty Officer 2nd Class
Joined
Mar 25, 2019
Messages
177
Hadn't thought about stereo. Most of mine are small items: Livewells, lights, etc... So maybe I am not running anything big enough to warrant 15 amps. Just seemed a little high for me.

SHSU
Oh I agree I went kinda nutso on my electric.
 

benfish909

Petty Officer 2nd Class
Joined
Jan 4, 2021
Messages
122
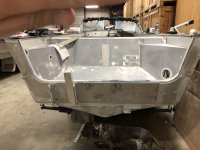
ITS A BOAT AGAIN!!! Got the splashwell installed. It’s solid as a rock. Next is paint. I called the PO to ask about paint he said the outside is an automotive primer so I’m think I little scuffing and cleaning and should be ready to paint. Yes I know I’m doing this in the wrong order but wasn’t planning on painting the outside. This isn’t a full restoration but rather just making it safe and solid for fishing. 0452A9AC-F428-4707-BC2D-D26186C1523B.jpeg
 

Moserkr

Chief Officer + Starmada Splash Of The Year 2021
Joined
Nov 23, 2020
Messages
869
Cant wait to be at that point!! Battleship looks ready for battle minus the motor and a few cannons 💣💣
 
Top