2006 Volvo penta 3.0 glp-e misfire on cylinder 4

Joined
Aug 8, 2020
Messages
11
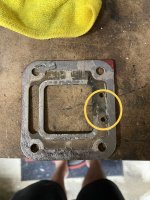
I have 2006 Volvo penta 3.0 GLP-E in a glastron gt185 boat. I replaced the manifold last year because person I bought it from tried to jB weld the underside of it. There was water in the rear or the manifold by cylinder 4. Just chalked it up to was internally cracked as well and replaced it. Inspected the riser and it looked to be ok from what I found see. So I put the old riser back on.

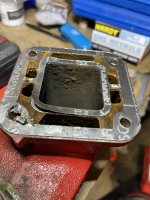
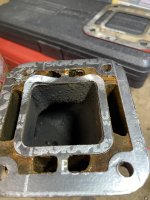
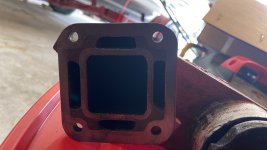
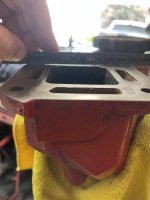
Here is the issue. I have found the water again this year and the engine will misfire. Some key details here as follows: when I start it and let it idle it runs awesome. If I snap the throttle and bring back to idle really quickly it will start to misfire on cylinder 4 . I give it some throttle again and let it burn out the water out approximately 2800 rpms and bring the throttle back slowly to idle it will not misfire. I winterized the boat last year and drained everything. I pulled off the riser last night to inspect and will attach a picture. I have checked compression on all cylinders and all have a reading of 152 psi or more. Where is this water coming from? Do I have another cracked manifold? Or is my head or riser cracked?
 

Attachments

  • IMG_2852.jpeg
    IMG_2852.jpeg
    2.1 MB · Views: 8
  • IMG_2851.jpeg
    IMG_2851.jpeg
    1.7 MB · Views: 8

Scott Danforth

Grumpy Vintage Moderator still playing with boats
Staff member
Joined
Jul 23, 2011
Messages
47,297
welcome aboard

if you replaced the manifold, you need to replace the elbow as well.

also, your pictures need to have the gasket material removed if you are showing the mating surface. so remove the gasket, and use a flat-sanding board to clean the surface

additionally, if your boat is water-logged, or loaded too heavy, you could have a SWL to elbow distance less than 14" you may want to measure the SWL to elbow distance
 

Lou C

Supreme Mariner
Joined
Nov 10, 2002
Messages
11,802
You want to see that the sealing surfaces are not pitted and are flat and level when checked with a straight edge & feeler gauges to less than .003” thickness variation. Also clean out threads in the manifold so that the bolts get good clamping force when torqued. Follow the instructions put out by VP if using their gaskets.
 
Joined
Aug 8, 2020
Messages
11
You want to see that the sealing surfaces are not pitted and are flat and level when checked with a straight edge & feeler gauges to less than .003” thickness variation. Also clean out threads in the manifold so that the bolts get good clamping force when torqued. Follow the instructions put out by VP if using their gaskets.
So this was the mating surface of the riser last year when I had to bare metal before I installed on my brand new manifold with a bare metal surface. I did not know about the checks you have provided at the time but with your opinion would this have caused issues because it was pitted a bit?
 

Attachments

  • DD9713B7-82B2-4CAA-88E8-869DF8A4BC54.jpeg
    DD9713B7-82B2-4CAA-88E8-869DF8A4BC54.jpeg
    1 MB · Views: 5

Lou C

Supreme Mariner
Joined
Nov 10, 2002
Messages
11,802
yes that bottom section I circled in red.
vp elbow.jpg
circled in red area is pitted and uneven
you want it to look like this:
Exhaust install wiht headless bolts to line it all up.JPG
 

Scott Danforth

Grumpy Vintage Moderator still playing with boats
Staff member
Joined
Jul 23, 2011
Messages
47,297
looking at the elbow pic (riser is just a riser, that goes between the elbow and manifold), you need to machine off about 0.020" or more to clean up the surface

that is where your leak is coming from.
 
Joined
Aug 8, 2020
Messages
11
Ok thank you for all the replies. I am going to clean all surfaces and check with feeler gauges and I will post back to let you know! Just wanted to say thank you so much! 😁
 

Scott Danforth

Grumpy Vintage Moderator still playing with boats
Staff member
Joined
Jul 23, 2011
Messages
47,297
take it to a machine shop and have them machine .020" off the surface
 

Lou C

Supreme Mariner
Joined
Nov 10, 2002
Messages
11,802
see what the maker of the gaskets says. Some say yes some say no.
Barr told me yes, I used Permatex Aviation, 6 years later no leaks.
 
Joined
Aug 8, 2020
Messages
11
Well new one is on. Misfire still continues. Still have some water on plug 4. When I originally took everything off last year the restriction plate was different which is pictured. One that I installed does not have drilled holes. This would allow more water to flow through but would this make a difference? I have also attached video to help hear what is going on which I originally explained in the opening part of this thread.

Should I consider adding the 3inch spacer at the elbow. I have been a couple other threads the day when you snap the throttle there may not be enough exhaust pressure to keep some water out. I am wondering if this is my issue. I attached diagram.
 

Attachments

  • IMG_2873.mov
    47.6 MB · Views: 0
  • IMG_2874.jpeg
    IMG_2874.jpeg
    1.1 MB · Views: 3
  • IMG_2874.jpeg
    IMG_2874.jpeg
    1.1 MB · Views: 3
  • IMG_2875.png
    IMG_2875.png
    2.1 MB · Views: 3
Last edited:
Joined
Aug 8, 2020
Messages
11
Well if anyone is interested I’ll post my thoughts as far the problem and try to attach YouTube video. So I think I have a sticky valve problem on the 4th cylinder. I suspect the exhaust valve is staying open after the piston has reached TDC and on its way back down causing vacuum to be created to suck a little bit of water back in the cylinder which in turn caused the misfire. It makes sense. Reversion YouTube link. This video has to do with aggressive cams and overlap of the valves but definitely put me on the right path and got the wheels turning in my mind.

So to try the easy road I am going to run some seafoam through it when I take it out this weekend. If that doesn’t work I will pull valve cover and check rocker arm and tap on the exhaust valve.
 
Top