2000 Sea Ray 190 CC Hull Soft Spot

KJM

Lieutenant
Joined
Jul 31, 2016
Messages
1,265
Yet again thanks guys.

Post pictures and videos! We can't analyze anything with just text.

Fair point and well structured.
Please see below.
The damage with my thumb for scale is in the middle of the affected area.
The larger stress/spider cracking is about 10" forward of the damage (looks worse than I remember).
The smaller stress/spider cracking is about 8" rearward of the damage.

Regardless, I need to fix the damaged glass and gelcoat shown in the first pic so as per above forum comments I might drill an inspection / drain hole into the damage and see what I can see before repairing.

So again as per the above forum comments, I can expect to see wood or foam under the surface gelcoat and fibreglass in this area?

View attachment 388813.View attachment 388814View attachment 388815
I wouldn't drill from the outside. You won't tell a lot from a small drill hole anyway. As tpenfield says, try to get a good look from the inside, otherwise you will always worry whats really going on down there.


tpenfield

Moderator
Staff member
Joined
Jul 18, 2011
Messages
18,040
Also . . . Has this boat been in an area where temperatures get below freezing . . . 0˚ C ? (I know the OP is in New Zealand)

If a cuddy compartment had a significant amount of water in it at some point and was allowed to freeze it would create an outward bulge in the hull and possibly lead to the stress cracking that the pictures show.
 

KJM

Lieutenant
Joined
Jul 31, 2016
Messages
1,265
I wouldn't drill from the outside. You won't tell a lot from a small drill hole anyway. As tpenfield says, try to get a good look from the inside, otherwise you will always worry whats really going on down there.

Whatever you find down there, I would also put a fiberglass patch over that area on the inside to strengthen it up.
 

Atta726

Recruit
Joined
Sep 4, 2023
Messages
1
well, I think...
Soft spots in older Sea Ray boats are typically due to water intrusion causing rot in the core material or delamination of the fiberglass layers. To determine the extent and cause of the issue, consult a marine surveyor or fiberglass specialist. They will recommend the best repair method, which could involve section replacement or epoxy injection. Prompt action is crucial to maintain your boat's structural integrity.
 

drewm3i

Petty Officer 1st Class
Joined
Dec 31, 1969
Messages
288
The way I would determine if it's from an impact is to push on the hull with a lot of force. Does it give? You can also tap with a hammer. Hollow=bad.
 

Yannih

Cadet
Joined
Aug 28, 2023
Messages
18
Thanks tpenfield.
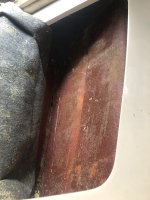
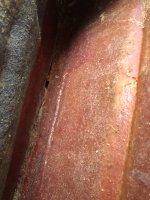
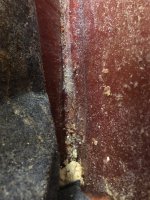
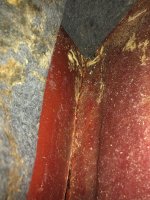
Took your advise, removed the cushions, stripped the carpet from the below storage compartment and...

It seems to my untrained eye that I might have had a bit of luck.
The damaged area is directly in-between the bulkheads of the accessible storage area.
All fibreglass and the small amount of foam I can see is dry and again to my untrained eye it appears to be impact damage.
All fibreglass side panelling seems to be in solid condition.
There is a considerable separation between the side wall and flooring, and minor separation between the side wall and bulkhead.
The flooring seems to have an upper and lower level of construction, and as far as I could see was hollow in-between.

So I'm thinking some closed cell expandable foam between the upper and lower flooring levels, and then considerable fibreglass added to strengthen the floor / sidewall separation / join.

Thoughts if this is correct or what should be done instead?

Questions.
I am assuming epoxy over polyester resin?
Chopped mat rather than woven mat?
What thickness of matting?
Why do I not see carbon fibre used much on boats as it's so much stronger than fibreglass?
As I cannot see through as to how much of a gap is in-between the fibreglass flooring levels, is there a process for using expanding foam and if too much is used will it swell the fibreglass walls?

Here are some pics from what I found...

IMG_11.jpgIMG_22.JPGIMG_33.jpgIMG_44.jpgIMG_55.jpg
 
Last edited:

Chris1956

Supreme Mariner
Joined
Mar 25, 2004
Messages
27,843
I would first fix that from the inside for strength and then the outside, for cometic purposes.

See if the hull will flex enough to close the gap in the interior structure. If so, you will want to glass up the interior, push the hull into place and brace it, until repairs are complete, and the resin is hard.

First you need to grind/sand the existing fiberglass until it is clean, dry and solid. Wipe it down with acetone to get all the dust.

I would use a couple of layers of heaving fiberglass roving cloth on the inside of the hull. Make the repair as thick (or nearly) as the original hull and overlap the repaired area by 50% or more. Polyester resin is fine for this.

Now you need to figure out if you need some wood support to prevent the glass from flexing. If so, engineer it and glass it in. Dimensional lumber is more rot resistant than plywood. Pressure treated lumber is fine, but you must dry it well, before using.

Before the resin sets, push the hull into place, and glass up the joints where it separated. Use the roving or heavy duty cloth. Putty any gaps.

After she cures, foam up any voids.

Once the inside is repaired, the outside damage should be cosmetic. Try to tint some marine polyester putty to match the hull and use sparingly to fill any cracks or holes. Carefully sand to blend as best as possible.

Check the joint where the hull meats the cap. Push on that area, directly above the damaged area to see if it has broken or separated there. Normally wood screws are used in that area. They can tear out. Replace with SS bolts and lock nuts if necessary.
 

tpenfield

Moderator
Staff member
Joined
Jul 18, 2011
Messages
18,040
No coring, no foam, etc. Right?

It is a little hard to tell from the pictures, but it looks like the cracked area may be a void (air pocket) in the lifting strake (the same area that shows the clipped gelcoat on the outside of the hull). This would most likely be a manufacturing defect when the hull was laid up in the mold. The factory workers overlooked rolling that area smooth with the resin roller, thus leaving the air pocket. A couple of the boats I've owned had a few air pockets in non-critical areas.

As Chris mentioned, fix from the inside, make pretty on the outside. See if you can determine the total length of the air pocket and open it up on the inside of the hull. I would use a combination of chopped strand mat (CSM) and biaxial cloth for strength on the inside. You want to build up about 5mm of thickness in that area.

As for the separation of hull and flooring . . . I don't see those areas in the photos in your post, but keep in mind that may not be a defect nor problem. Post some pictures of those area for further comment.
 

Yannih

Cadet
Joined
Aug 28, 2023
Messages
18
As for the separation of hull and flooring . . . I don't see those areas in the photos in your post, but keep in mind that may not be a defect nor problem. Post some pictures of those area for further comment.

Apologies.
All my comments relate to the storage area only.
So when I say flooring, I mean flooring of the storage locker...
 

drewm3i

Petty Officer 1st Class
Joined
Dec 31, 1969
Messages
288
So it looks like the area was flexing excessively because of a broken free structural member. You are in luck and this is repairable. I second the method that Chris1956 recommended.
 

Yannih

Cadet
Joined
Aug 28, 2023
Messages
18
Thankyou to all for their time, help and advise.
Especially those who have been keeping an eye on the thread and replying multiple times.
It is really appreciated and you guys have made a massive difference to repairing the structural integrity of my little boat.
I will now sort this with Chris's advise.

You all are truly champions!
 

Chris1956

Supreme Mariner
Joined
Mar 25, 2004
Messages
27,843
Just so you know. When they lay up the hull at the factory, if they do it right, it is real strong for the amount of material used. The factory layup of glass uses very large and long single pieces, which provide the strength.

Repairs, IMO, need to be much stronger, since the pieces of cloth are much shorter, hence my recommendation to make the repair as thick as the original glass, and overlap it at least 50% of the total area of the repair. The heavy roving is the strongest cloth I have found, and works real well on flat surfaces. It doesn't bend very well, however.
 

tpenfield

Moderator
Staff member
Joined
Jul 18, 2011
Messages
18,040
The hull is about 8-10mm thick in that area. Often the strakes have an extra layer of glass than the surrounding areas.
 

flashback

Captain
Joined
Jun 28, 2002
Messages
3,963
If you work with glass and resin enough you realize that the creation of a hull is truly an art form. The glass doesn't like hard corners or compound curves and a boat is all of that. The hired help sometimes is not up to the game unless a good teacher is on the job...
The strakes are a good example, the outside sharp edges are mostly gelcoat, the glass can't make those bends..
 

Yannih

Cadet
Joined
Aug 28, 2023
Messages
18
Well, the repair is now done (I also contacted a local fibreglass expert for any additional last minute advise before I sorted it).
I believe the job is done properly and the result is really strong with the hull being solid as a rock.
A little luck also went a long way to actually allow a DIY repair rather than major surgery by the experts.
Thanks again to all here for the patience and great advise.
We are now back in business!
I should have taken pic's of the repair before re-gluing the carpet back in but didn't think of it.
However, here's a pic of a happy solid boat...

IMG_4200.jpg
 

tank1949

Lieutenant Commander
Joined
Apr 4, 2013
Messages
1,892
Thanks tpenfield.
Took your advise, removed the cushions, stripped the carpet from the below storage compartment and...

It seems to my untrained eye that I might have had a bit of luck.
The damaged area is directly in-between the bulkheads of the accessible storage area.
All fibreglass and the small amount of foam I can see is dry and again to my untrained eye it appears to be impact damage.
All fibreglass side panelling seems to be in solid condition.
There is a considerable separation between the side wall and flooring, and minor separation between the side wall and bulkhead.
The flooring seems to have an upper and lower level of construction, and as far as I could see was hollow in-between.

So I'm thinking some closed cell expandable foam between the upper and lower flooring levels, and then considerable fibreglass added to strengthen the floor / sidewall separation / join.

Thoughts if this is correct or what should be done instead?

Questions.
I am assuming epoxy over polyester resin?
Chopped mat rather than woven mat?
What thickness of matting?
Why do I not see carbon fibre used much on boats as it's so much stronger than fibreglass?
As I cannot see through as to how much of a gap is in-between the fibreglass flooring levels, is there a process for using expanding foam and if too much is used will it swell the fibreglass walls?

Here are some pics from what I found...

View attachment 388895View attachment 388896View attachment 388897View attachment 388898View attachment 388899
Buy some resins and cloth and reinforce. Oh and grinding tools and respirator.
 
Top