1996 Four Winns Sundowner with 5.0 Cobra engine and drive

Lpgc

Petty Officer 1st Class
Joined
Jun 17, 2023
Messages
258
I measured the bore of number 2 cylinder, it's 4.040 (so the standard 4inch bore + the 40thou overbore as expected) but it has the up/dowm scratches.

I now need to try to hone cylinder 2 to see if I can get rid of the scratches, then after honing re-measure the bore to see if it's oversized. If it's still within size spec for the +40 pistons I could just replace the single piston, or if it's oversize bore I may need to replace all 8 pistons. I found out today that apparently I could buy 1 >8 pistons same spec as my pistons from Rock Auto and have them here in 3 days.

I will be stripping the engine down to a bare block tomorrow, then trying my hone tool on cylinder 2 and taking measurements of other cylinders/pistons to see what I need to buy from Rock Auto. If #2 cylinder is oversize after I've honed it I could still get the local engine builder to fit a sleeve in #2 and perhaps just buying 1 piston would still be an option.
 

ScottinAZ

Master Chief Petty Officer
Joined
Jun 25, 2009
Messages
831
I measured the bore of number 2 cylinder, it's 4.040 (so the standard 4inch bore + the 40thou overbore as expected) but it has the up/dowm scratches.

I now need to try to hone cylinder 2 to see if I can get rid of the scratches, then after honing re-measure the bore to see if it's oversized. If it's still within size spec for the +40 pistons I could just replace the single piston, or if it's oversize bore I may need to replace all 8 pistons. I found out today that apparently I could buy 1 >8 pistons same spec as my pistons from Rock Auto and have them here in 3 days.

I will be stripping the engine down to a bare block tomorrow, then trying my hone tool on cylinder 2 and taking measurements of other cylinders/pistons to see what I need to buy from Rock Auto. If #2 cylinder is oversize after I've honed it I could still get the local engine builder to fit a sleeve in #2 and perhaps just buying 1 piston would still be an option.
I for one wish you good luck, and hopefully you can get it cleaned up with a minimum of work. We wouldnt do that this side of the pond, but then again, we have Ford and Chevy engines available much more readily and cheaply than you have access to.
 

Lpgc

Petty Officer 1st Class
Joined
Jun 17, 2023
Messages
258
Where can I look up parts numbers for this boat engine and drive?

When I look for items like alternators, exhaust manifolds, gaskets, gimble bearings, etc, the seller usually lists a part number but I need a way to check if parts I'm looking at will fit my boat.

As said in one of my posts above I think I might have broken my alternator when trying to disconnect one of the wires, looking to buy a replacement but don't want to buy the wrong part.
 

ScottinAZ

Master Chief Petty Officer
Joined
Jun 25, 2009
Messages
831
not to crap on the site host, but Marine engine.com has had pretty good exploded diagrams for anything I have needed for searching for part numbers and such. The ones for Mercruiser are good, the ones for OMC/Volvo appear to be pretty good as well.
 

Lpgc

Petty Officer 1st Class
Joined
Jun 17, 2023
Messages
258
It's been a while since I last updated this thread.

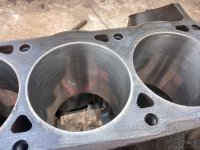
I stripped the engine down, honed all the cylinders (especially cyl 2 that had the bad scratches but a few other cylinders had minor scratches too). Used a calliper with a cheap comparative bore gauge to measure and record all the bore sizes (top / middle / bottom and front to rear / side to side), entered all my readings in an Excel spreadsheet that I set up to calculate bore size from the comparative readings. Measurements do point to cyl 2 now being a few thou over the +40 spec (+42), slightly out of round (wider front rear than side to side) and a slight taper narrowing toward the bottom... but I didn't use a torque plate and I'm told the bores will pull straighter when the heads are torqued on. The cylinders all look good after the honing, every trace of scratches removed and I got a good cross hatch pattern. Scrubbed all the bores with a nylon brush and soapy water, wiped them all several times with ATF, wiped them all with brake cleaner, then with new engine oil, a white rag wiped through the bores now stays clean (no grey on the rag).

This is a pic of cyl 2 part way through the honing, most of the scratches gone at this point but I continued to hone and got all the scratches out.

20230809_140039.jpg


Bought a new set of pistons from Rock Auto, ordered on a Friday and they arrived on the Wednesday... I think that's great service considering I'm on a different continent! Heated the little ends of conrods in the old pistons and used my press to push the pins out. With the rods still hot I reheated the little ends, new piston on the floor, fitted the rods to new pistons. Definitely need to concentrate and be set up ready for fitting the rods to new pistons, there's around a 2 second period from starting to slide the new pin through the piston and rod and the rod cooling / pin heating causing it to lock into position. When locked in position there's not much chance of being able to move it's position without damaging the new piston. I got better at removing rods from old pistons and reinstalling on pistons, took a long time to even remove the first rod but I didn't use enough heat. Also on the first go, 1 second into sliding the pin through the new piston and rod my mum turned up shouting Simon Simon! Sounded like she was going to tell me the house was on fire... I looked up, the new pin stuck half way in. I did a lot of cursing, mum walked off hehe! But I managed to re-heat it and use the press to push the pin through. There is a bit of a mark next to the 2nd ring land on that first piston, I'll need to inspect it again before installing that one. By the time I got to doing the 4th piston my procedure was working a lot smoother but I managed to get all pins close to centred on the rods.

Reinstalled the cam, crank and rear seal. Used a bit of sealant on the rear main bearing cap to prevent oil seeping under the cap and out of the back of the engine at the side of the single piece main seal.

I'm now gapping the new rings. Not sure what gaps to use, no instructions came with the rings or rods from Rock Auto and I can't find a way to contact Rock Auto or Sealed Power to ask their advice. The pistons are H654CP (hypereutectic with coating), the same pistons as the old ones. The rings are Sealed Power E251K with moly coated top ring. Google search results advise going for between 4thou and 4.5thou per inch of cylinder bore, which would mean 16thou to 18thou ring gap. Oil ring at least 15thou total. Can anyone here advise what ring gaps to use? I'd rather have gaps a little large than a little small. With the new rings I'm measuring 15thou near the tops of bores but only 12thou near the bottom of bores. I read that I should aim for 4>4.5thou per inch of gap at the narrowest part of a tapered bore, which seems to make sense, but that does mean I'll have 32 rings to file. I don't know if the previous engine builder assumed the rings were pre-gapped and didn't bother to check gaps - that in itself could be enough to account for the bore scratching.
 
Last edited:

Lpgc

Petty Officer 1st Class
Joined
Jun 17, 2023
Messages
258
It turned out that only the rings for cyl#1 were tight, all the others were above the general 4thou per inch ring gap advice, most cylinders had 18thou ring gap low in the cylinders to 20thou near the tops of cylinders - probably due to cylinders tapering toward the bottom by a couple of thou.

I have installed all the pistons (and obviously all the rings). But I have a nagging doubt that I didn't measure/gap one of the oil rings on #1 so I intend on removing that piston and rings to check all the ring gaps. Also I got bored of filing rings for #1 and ended up using an angle grinder to make the job quicker but made the mistake of taking too much of the 2nd ring making the gap way too large (like 25thou +)... So I used another new 2nd ring when installing #1 and left the too wide ring2 for the last piston I installed which was #2. Instead of fitting the too wide ring on #2 I refitted an old 2nd compression ring but I'm not happy with that either. So I'll be removing both #1 and number #2 pistons... I'll be checking the gaps on #1 and maybe increasing the gap on one of it's oil rings, and will be buying a new set of rings to fit just one of the 2nd rings on #2. I'm on holiday (vacation) from Sunday for 10 days so I'll order new rings 7 or 8 days into the holiday so arrival will coincide with my return.

At least as it stands the engine turns over easily by using a small lever on the rear crank (to flywheel) bolts with all pistons installed. But I know that re-using rings (for #2 ) is too much of a compromise even if it is just for the 2nd ring and continuing doubt about oil ring gap on #1 would be worse than simply removing and rechecking/adjusting gap while the bottom end is still in a state where doing such things is still easy.

I've ordered a new timing light and magnetic base dial gauge - I'll use the dial gauge to find true TDC and make sure timing marks (which I couldn't see before, maybe painted too thickly over) on the harmonic balancer match up perfectly to the pointer (which is currently bent but I'll make it point to the TDC mark on the balancer or add my own marks to the balancer if I can't see any after stripping paint).

Lots of other things (none boat related) to do tomorrow but one thing boat related I do intend on doing is checking the hydraulic trim. When I first bought the boat the outdrive was holding at full tilt on the hydraulics but the hydraulic trim didn't seem to work properly on the river... and when I came to pull the boat out of the water on the slipway (so lifted the leg fully on the hydraulics) it slowly came back down, I had to strap the leg up before I could tow the boat on the road on the trailer. With the engine out I have a better view of the hydraulic pump system and it seems that there's a slight leak from where one of the hydraulic lines connects to the pump. I hope to be able to tighten that (leaking) union to prevent the leak, and then I hope the hydraulic system will be fixed when I've added more ATF/PAS (what shall I refill the trim pump with?) fluid.

It won't stop there even when I've rebuilt and reinstalled the engine and fixed the trim! The bilge pump is broken, plastic pipe stub snapped off right at the pump, no worries for a few days on the river at a time but I'll want to fix that for use on the sea. The only gauges that work on the dash are speedo (usual marine lack of accuracy), trim maybe, rev counter maybe, echo sounder depth. The oil pressure gauge doesn't work at all.

For the purpose at least of rudimental engine testing and running in I'll want a working oil pressure gauge. The existing marine setup seems to have an oil pressure sender unit for the dash gauge and an open/closed sender for the oil pressure alarm. I don't know whether to try to utilise the existing pressure sender to wire to a separate electronic gauge (until I've fixed the dash gauge) or connect a purely mechanical oil pressure gauge in the engine bay... What are your thoughts? I'm not sure if these oil pressure senders are a standard spec (voltage or resistance according to oil pressure) or are designed to work with a certain dash gauge. For immediate purposes I would be happy with an adhoc electronic or mechanical gauge in the engine bay... But I do need a working oil pressure gauge particularly during run-in.

I'm wary of making this post too long but so far it's been mostly an update on progress with only a few questions, so I'll risk making this thread a bit longer and air a few more thoughts, So far I'm still in the process of rebuilding this engine, some drawbacks of the marine setup are coming to light - The block is '96, heads are '95 but the timing cover, water pump and inlet manifold are more like '73 cast iron spec. That kind of setup is limiting - If it were not for the marine spec stuff I could otherwise drop any 302 in and it work well with no concerns about raw water damaging the head gasket, inlet, water pump, etc. I could buy fully assembled (with valves etc) aluminium heads for £900 which might add (say) 100bhp at 5500rpm with the standard (marine) cam but I could only go that route without suffering corrosion problems if I switched to a closed cooling system for the engine. I could maybe buy a used marine heat exchanger from a 7.4L diesel V8 inboard engine for (say) £200 and adapt the simple plumbing to make it work with the 302. Then I could use any 302, wouldn't matter about what year (or material) the water pump or inlet was made from, could run a late spec multi-plane inlet. What are your thoughts on doing that? Not sure if my '95 block would work with an OEM '95 roller cam setup (the marine spec with 95 block uses flat hydraulic system)... not that I could run much more cam duration anyway (don't want to suffer reverse flow and suck water into cylinders) but the roller cam could give gains at higher rpm and wouldn't need it's own running in procedure that is at odds with best practice running in procedure for other engine components? As it stands I don't need to worry about running in a cam or bearings because I just reused existing (relatively new and in good condition) bearings, but if I were to build a new engine with new cam best practice as far as the cam was concerned would differ from best practice as far as the rings and bores were concerned. Heh, it building a new engine it would probably be better to fit an old cam first until the rings were seated, then fit the new cam.
 
Last edited:

Lpgc

Petty Officer 1st Class
Joined
Jun 17, 2023
Messages
258
I haven't updated this thread since August 2023, over 4 months, but I've continued to do a bit of work on the boat/engine when I've had time since August.

The engine is still in pieces as it was when I last posted. I didn't think there could be much of a problem with the heads because compression was OK on 7 of the 8 cylinders, so I originally intended on just checking the valves on the cylinder that had the low compression.. But I decided to at least remove all the valves and give them a bit of a lapping before putting the engine back together. Then I found that instead of the valves having the nice 45degree angle most of the mating areas were more of a curved shape, so I bought all new valves and took the new valves and the heads to a machine shop so they could cut the valve seats straight to match the valves. There was also slight lateral play between some of the valves and guides (more on the exhaust valves than intakes) so I asked the machine shop for their opinion and they advised I should have them fit new bronze guides, so I had them fit new guides. Also had the heads skimmed because there was a bit of pitting around the fire-ring area. I'm very happy with the condition of the heads now, newly cut seats, new valves, new guides, no lateral play and all good tolerances, valves nicely lapped in... but I have other things to do with the engine before I fit them.

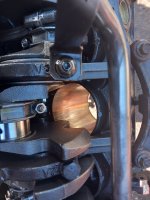
I've decided that although all the main and rod bearings looked OK I',m going to plastiguage them, I have the plastigauges but haven't got around to checking the bearings yet. The engine had a knock when I last used and I still haven't definitely identified the cause of the knock, the bearings could look OK but still have too much play and cause knock so it seems to make sense to plastigauge the bearings.

Bought a new bilge pump, yet to fit. The original bilge pump was already broken, the outlet stub had broken off, a bit easier to change the bilge pump while the engine is out.

When I last used the boat (I've only used it a few times since I've owned it and only on a local river) the trim/tilt didn't seem to be working properly, it didn't trim up when in forward gear and when I was getting the boat out of the water onto the trailer the leg had dropped to the bottom position by the time I'd got the boat to the top of the slipway. I noticed a slight weep from the joint between the trim pump and the right line (when looking towards the rear of the boat from the inside of the boat), I disconnected the pipe at that joint and found a broken O-ring, so I've bought a few supposedly correct O-rings to replace at least the O rings where the 2 pipes connect to the trim pump, yet to fit.

Can't remember if I mentioned it before but I have all new marine manifolds etc ready to fit for when I put the engine back in the boat.

I'll tag people who inputted on this thread between June and August because I don't know if they'd get forum alerts about new posts on this thread after 4 months of silence if I didn't... Hope people are still interested and it's OK to tag people like this? I've included a moderator in the tags so if it's not OK I'd rather the moderator edit this paragraph than delete the full post or especially the full thread! @ScottinAZ , @Lou C , @kenny nunez , @flashback , @Scott Danforth , @Bondo , @Horigan , @dubs283 , @alldodge

I have more pics which I'll post soon.
 
Last edited:

alldodge

Moderator
Staff member
Joined
Mar 8, 2009
Messages
42,054
Plastiqauge should identify if a bearing is causing the knock.
 

Lpgc

Petty Officer 1st Class
Joined
Jun 17, 2023
Messages
258
Plastiqauge should identify if a bearing is causing the knock.
Thanks, yes that's what I'm hoping... Or rather I mean I'm hoping all the bearings check OK when I use the Plastigauge.

Would you advise using plastigauge at more than one crank position on each bearing (e.g. take a reading, remove used plastigauge, turn crank 90 degrees, fit another plastigauge and take another reading) or is just one position OK? I know not to turn the crank with the plastigauge fitted.
 

Bondo

Moderator
Staff member
Joined
Apr 17, 2002
Messages
70,953
Thanks, yes that's what I'm hoping... Or rather I mean I'm hoping all the bearings check OK when I use the Plastigauge.

Would you advise using plastigauge at more than one crank position on each bearing (e.g. take a reading, remove used plastigauge, turn crank 90 degrees, fit another plastigauge and take another reading) or is just one position OK? I know not to turn the crank with the plastigauge fitted.
Ayuh,..... With a used motor, there's no such thing as measuring it in to many places,..... ;)
 

Lpgc

Petty Officer 1st Class
Joined
Jun 17, 2023
Messages
258
I had already assembled the bottom end / short motor before I decided to Plastigauge...

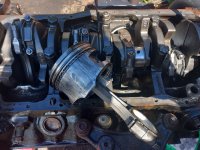
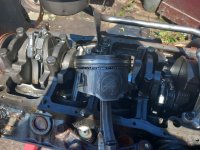
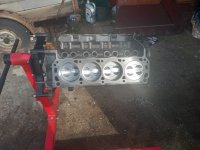
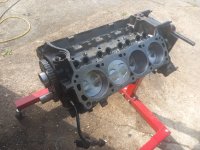
Pics of the bottom end with new pistons, cam and timing chain ftted.

20230906_150433.jpg

20230906_150454.jpg

I also fitted the timing cover and water pump.. So I hope the Plastigauge tests I intend to do on the main and rod bearings don't reveal a problem or I'll probably have to remove the crank again which will mean removing the water pump, timing cover and buying new gaskets.
 

Lpgc

Petty Officer 1st Class
Joined
Jun 17, 2023
Messages
258
I haven't done any work on the engine recently.

Today I fitted a new bilge pump (the old one had snapped where the hose connects to the pump).

Also today I changed an Oring on a tilt/trim hydraulic line, the pipe connection where one of the internal tilt/trim lines connects to the port side of the tilt trim pump. I had problems with the tilt trim not working properly when I used the boat, it didn't seem able to lift the leg when in forward gear with the engine running. When I was about to get the boat out of the water the hydraulics did lift the leg but by the time I'd got the boat to the top of the slipway the leg had fallen again and I had to strap the leg up for towing. After removing the engine I found this connection (where I changed the Oring at the pump) had a small weep and the line seemed a little loose, didn't need much force to rotate the line inside the fitting. I tried to tighten the fitting and got the pipe-nut very tight before it seemed to need as much force to rotate this line as it did to rotate the other line (other line didn't seem to have a leak and couldn't easily be turned by hand inside it's fitting). When I disconnected the problem line I found the Oring was broken but I don't know if I broke it by over tightening or if the broken O ring or slack connection was the cause of the tilt/trim problem. After changing the Oring (today) I didn't need to torque the pipe-nut up tight to make this fitting seem as tight as the other (good) fitting.

I have a few questions if readers don't mind answering - Do you think I'll have cured the tilt/trim problem by changing the Oring at the pipe connection at the pump? If not what do you think the problem might be (rams / pump / some other leak in the lines I haven't spotted)? Do I need to refit the leg before filling the system with new ATF/PAS fluid and bleeding/testing (could I damage the rams by working them over full range of movement without the leg fitted)?
 
Last edited:

alldodge

Moderator
Staff member
Joined
Mar 8, 2009
Messages
42,054
If leg drops any when raised by the pump and there is no oil leaking inside or outside the boat, then the leak is internal. Most likely cause is the trim rams and rebuilding them is easy
 

Lpgc

Petty Officer 1st Class
Joined
Jun 17, 2023
Messages
258
Thanks.

So it's possible that the rams have an internal leak (as opposed to the rams leaking fluid externally)?

Any thoughts on whether or not it's OK to bleed and test the trim/tilt without the leg fitted, or would that damage the rams?
 

alldodge

Moderator
Staff member
Joined
Mar 8, 2009
Messages
42,054
The rams are self bleeding. Raise and lower a few times and, and so long as the fluid stays up in the pump and does not foam, your good to go

The ram is a simple hydraulic cylinder and has internal seals to keep oil on each side without leaking. Over time seals wear out and they can start to leak
 

Lpgc

Petty Officer 1st Class
Joined
Jun 17, 2023
Messages
258
Thanks, that makes sense.

At first I was thinking if the rams had a leak it would be external (leaking from the end of the ram). But I think I see what you mean... if the internal seal is leaking fluid can get past it, there won't be an external leak but the position of the ram can still move?

If only one ram was leaking internally would the leg still fall? I'd guess it would because if the rams are piped in parallel (which they must be because the pump only has 2 pipes connected to it?) if there's an internal leak on one ram the fluid from the other ram could flow past the leak in the other?
 

Lpgc

Petty Officer 1st Class
Joined
Jun 17, 2023
Messages
258
Sorry to keep mentioning the rams...

I have the engine and drive-leg removed. If I test the rams now will it cause me any problems when I come to refit the leg (such as rams not both in the same position making it difficult to line them up with the leg)? Could I damage the rams during testing (over-extension etc)?

Had no time to work on the boat since my last post.

I'd guess that when the engine and leg are both re-installed it would be easier to fix problems with the rams than with the pump?

What spec fluid ATF / PAS should I use in the Cobra / Volvo SX tilt / trim system?
 

alldodge

Moderator
Staff member
Joined
Mar 8, 2009
Messages
42,054
I have the engine and drive-leg removed. If I test the rams now will it cause me any problems when I come to refit the leg (such as rams not both in the same position making it difficult to line them up with the leg)? Could I damage the rams during testing (over-extension etc)?
No, run in/out with no issues

Might have issues reattaching drive, but connect long side then push down until short side lines up

I'd guess that when the engine and leg are both re-installed it would be easier to fix problems with the rams than with the pump?
Don't fully understand the comment, but in most cases it's not good to fix issues with everything back together
 
Top