1994 Evinrude 50 HP Not Charging

Joined
Apr 17, 2021
Messages
8
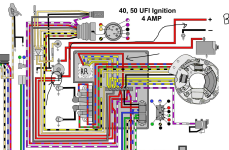
This "new-to-me engine" ran great all season but didn't charge the battery. Now time to troubleshoot it. Right away, I can see that the red wire from the rectifier is not connected to anything - see pic. The screw used to secure it to the black connection block is obviously not factory and there is no other wire behind it. This seems like the first place to start, at least to me.
Can someone offer direction on what wire needs to be connected to it, and where it comes from? I take it that it should go to the starter solenoid somehow... Thanks!IMG_8991.jpg
 

Crosbyman

Vice Admiral
Joined
Nov 5, 2006
Messages
5,929
usually stator yellows (2) feed the rectifier-regulator and the fat red RR output goes to the solenoid "B+ in post" from the battery so the charge current from the RR can return to the battery to charge it. got the wiring diagram ??

see example... does yout T&T work if u have T&T ???
1764170182677.png

see "example"
 

Attachments

  • 1764170001099.png
    1764170001099.png
    810.2 KB · Views: 3
Last edited:
Joined
Apr 17, 2021
Messages
8
usually stator yellows (2) feed the rectifier-regulator and the fat red RR output goes to the solenoid "B+ in post" from the battery so the charge current from the RR can return to the battery to charge it. got the wiring diagram ??

see example... does yout T&T work if u have T&T ???
View attachment 413391

see "example"
Ahhhh you are wise! It does have T&T and it does work. I just checked traced the red wire from the solenoid and it travels through a 20 amp fuse and goes to the terminal block, at the post just left of the thick red wire from the rectifier. From there it goes to the T&T wires. It would seem odd that the fix would be to simply move the thick red wire to the left so it connects to them all together. Before I move that wire over, I started the engine to check for DC voltage at the thick red wire coming out of the rectifier - the result - only 1.5V or so. So it would seem the stator or the rectifier... I did check the stator and the resistance readings seemed fine. Any thoughts on direction? Thank you.
 
Last edited:

saltchuckmatt

Captain
Joined
Jul 19, 2019
Messages
3,045
Typically if the red wire does not go out to the battery, it fries the rectifier. (Dead heading)
 

Crosbyman

Vice Admiral
Joined
Nov 5, 2006
Messages
5,929
in regards to 1.5v on the red ............ measure the AC signal across the yellows from the STATOR
while running
btw some of those strips have small interconnect links to brigde over to the next bolt so check if you have one . or one missing

if you have just a rectifier (4 way bridge diodes) they are a dime a dozen on Amazon
 
Joined
Apr 17, 2021
Messages
8
in regards to 1.5v on the red ............ measure the AC signal across the yellows from the STATOR
while running
btw some of those strips have small interconnect links to brigde over to the next bolt so check if you have one . or one missing

if you have just a rectifier (4 way bridge diodes) they are a dime a dozen on Amazon
Test Complete - (relatively) steady 25 V AC across the 2 yellow leads (Wires 1&2 in the pic). For the test, I left them connected to the terminal block.
IMG_8991 2.jpg
 

Crosbyman

Vice Admiral
Joined
Nov 5, 2006
Messages
5,929
check RR part for OEM# .. 25VAC may turn out as a high DC if not regulated !!

check for proper grounding of RR........... and proper continuity between rr and strip post... red wire from RR looks frayed ???
 
Last edited:
Joined
Apr 17, 2021
Messages
8
check RR part for OEM# .. 25VAC may turn out as a high DC if only rectified !!

check for proper grounding of RR........... and proper continuity between rr and strip post... red wire from RR looks frayed ???
RR Part # 584476. Grounding appears to be solid. The red wire appears in good condition.
RR grounding wire travels from the base of the RR to the assembly mounting bold to the left.
Pic 1 shows the RR mount.

IMG_8994.jpg

Pic 2 shows the wire terminating on the left side of the RR, secured to the assembly.

IMG_8995.jpg
 

Crosbyman

Vice Admiral
Joined
Nov 5, 2006
Messages
5,929
carefully inspect crimps which sometimes lok OK but oxydize... measure ohms continuity to eliminate if all OK looks like the RR is defective if AC
up to you to change or not.

link output to battery via solenoid B+ post from the battery
 
Joined
Apr 17, 2021
Messages
8
carefully inspect crimps which sometimes lok OK but oxydize... measure ohms continuity to eliminate if all OK looks like the RR is defective if AC
up to you to change or not.

link output to battery via solenoid B+ post from the battery
Will do. Thank you for your time and insight today.
 
Joined
Apr 17, 2021
Messages
8
Update: New RR has arrived. The Yellow/Yellow/Grey leads seem to be a simple match to replace. The new RR has Red & Brown leads (battery & ground(?), and the old RR has a Red and Purple. The Red is an obvious match to replace. Does the new Brown replace the old Purple?
IMG_9041.jpg
 

Crosbyman

Vice Admiral
Joined
Nov 5, 2006
Messages
5,929
chat replied...
For a 1994 Evinrude/Johnson (OMC) outboard, the brown wire on the rectifier/regulator is the tachometer signal wire.

Evinrude / Johnson color code (1990s):

  • Yellow / yellow wires → AC from stator
  • Red → +12 V DC output to battery
  • Black → Ground
  • BrownTachometer signal (goes to tach “S” or “PULSE” terminal)

How it works

The regulator takes one of the stator pulse outputs and sends a conditioned signal through the brown wire to drive the tachometer.
If the brown wire is disconnected, the motor will still charge normally, but your tach will not work.

purple... is typically a power source key ON see typical wire dode.
1765027879842.png
 
Last edited:

racerone

Supreme Mariner
Joined
Dec 28, 2013
Messages
39,225
There is a wee part missing on the terminal strip !----Item #4------Called terminal strip jumper.-----Simple to me.
 

Crosbyman

Vice Admiral
Joined
Nov 5, 2006
Messages
5,929
post#5..?
btw some of those strips have small interconnect links to brigde over to the next bolt so check if you have one . or one missing
 

racerone

Supreme Mariner
Joined
Dec 28, 2013
Messages
39,225
The picture in post #1 does NOT show the jumper.----The parts page shows the jumper is needed.
 
Joined
Apr 17, 2021
Messages
8
I can see the jumper is missing - you are absolutely correct. Clearly, someone has been "into" this terminal block before me, causing me to wonder if the wires in each of the slots are in the spaces that they were intended to be from new. If they aren't, then putting in a jumper may cause some unintended negative side effects. What I find perplexing is the old RR had the lead intended for the tach connected to the purple wire, and it was both purple leads crimped to one connector (appearing to be factory done).
More insight would be appreciated!IMG_9042.jpg
 
Last edited:

Crosbyman

Vice Admiral
Joined
Nov 5, 2006
Messages
5,929
one thing is certain.. the RR output red must accomplish its role of charging the battery so link up the RR red to what ever you find working its way back to the battery and that is usually the main B+ IN post on the solenoid where
a fused distribution wire also piggy backs on the same B+ common post for power distribution... usually towards the KEY B post .

you may have another piggy backed wire sending raw B+ to the T&T relays and at the fuse output a b+ supply is sent to the T&T switches to activate UP or DOWN relays

At KEY ON that power will exit the kev on the A post either as a purple or red-purple to feed the ignition or accessories.

after you have wired that up , check for a decent charging voltage at the battery posts and you can worry about the tach feed wire if you have a tach. if not wrap it up.
 
Last edited:

racerone

Supreme Mariner
Joined
Dec 28, 2013
Messages
39,225
The " jumper " connects all the reds togerher.-----One red feeds 12 volts to ignition switch,----One red is 12 volts + to charge the battery.------The third red wire feeds power trim / tilt on this motor.---Usually the little cover for the terminal strip has the wiring explained.
 
Top