1989 Evinrude 88SPL (E88MSLCER) Cooling

drobertsobx

Seaman
Joined
Nov 1, 2008
Messages
74
Hi, Just installed a new kill switch and ignition switch and cam roller (was missing when I bought it).
So today was the first start. It would not start where the prev owner had the throttle set.
In fact to get it to run I had to run the screw within 1/2 of the threads (Separate issue I am assuming).
Entire pump was replaced last week.
Using muffs, water streaming from the tell tale it has a weird brass fitting that has a larger hole than anything I have run with that has the plastic fittings, so it wasn't what I would call a strong stream but it was steady... and did get hot water at last check, not sure if it is supposed to or not.

Finally got 1000 RPMS and was using a thermal to monitor temps...
I was leery the thermostats might be salt crusted as it was left in the water by the prev owner.

Good thing I did... within about 1 minute the temp was at 165F (I was assuming it would run in the 140's) both heads then quickly went to 210F, (I heard the alarm at the same instant) and I quickly shut her down by disconnecting the kill switch connector at the power pack.

I monitored the heads after shut down and the maxed out at 217F

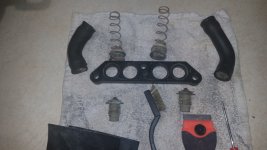
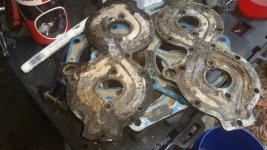
I pulled the thermostat head (No small task 1/64th turn at a time with a wrench on the 2 side ones lol), the thermostat gaskets were no where to be seen (Only anomaly in the unit) but it doesn't look close to as corroded as I assumed they would be. (pic)
Grommets were not swollen bypasses seemed to move freely. In the pic the only thing I cleaned was the black plastic spacer.

I then connected a hose to the starboard side of the head (Outlet?) and back flushed, whole lot of calcium or salt? (White color) and debris came out the port side head (Outlet?).

I alternated back and forth until the water was clear on both back flushes. T
his also seems to fill the system down to the water pump as the hole drains on the lower unit ran steady also.


I have ordered a new thermostat kit and new hoses and snap clamps.

I read on the forum about the crossflow system and overheating possibly warping or swelling that...

So I am wondering if the back flush proves that system is working?

Do I dare run it with housing off just to check for flow through the motor?


Any other recommendations would be appreciated.

I have no idea if it ever overheated with prev owner I asked and of course he said no, but with no cam sleeve I don't think it had run recently he said about 16 months...

It does appear by the lost parts that he was tinkering and gave up when he could not get the lower unit off (didn't know about the pin under the carbs) so my guess is, it may have and he figured a new pump would solve it.
 

Attachments

  • 20230623_174634.jpg
    20230623_174634.jpg
    4.6 MB · Views: 3

drobertsobx

Seaman
Joined
Nov 1, 2008
Messages
74
I just saw I wasn't clear on the kill, I left the kill switch in kill mode and unplugged it at the power pack, then plugged it back in to kill it.
 

havoc_squad

Senior Chief Petty Officer
Joined
Mar 5, 2011
Messages
738
Since this is a new to you outboard.

#1. Compression check on all cylinders. Post the numbers. They should all be with 10% of each other and above 110 PSI. Some low quality gauges read low. No point in throwing money at it if you got 60PSI on one and the others are fine. If the head gasket looks good where the cylinder with low compression is at, it's probably broken ring or cylinder wall damage. That means expensive rebuilding with machine shop work.

#2. Impeller assembly change if compression test doesn't identify a cylinder with issues, don't care if the previous owner said they changed it right before you bought it.

#3. If you have overheating issues on a new to you outboard, the heads and head covers should come off for inspection of the cooling channels along with the thermostat housing. This is to verify the water diverters and the cooling channels in the heads are not impeding water flow on the cylinder heads and engine block cooling jackets.
 

drobertsobx

Seaman
Joined
Nov 1, 2008
Messages
74
I did the water pump myself, replaced the entire unit not just the impeller last week.

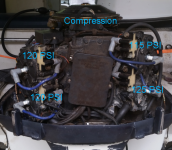
I did a compression test last week while I was waiting for parts. Results in picture. Port both 120 starboard 115 top 125 bottom.

as stated I removed the thermostat housing and back flushed both sides until the water ran clear. The hose end with valve I am using is just the perfect size to press onto the pipe ends that would empty into the housing.

Hose on starboard side had water run out from the port side and visa versa, full pipes not just a trickle or anything. I had asked if this could verify the cross flow as functional.
 

Attachments

  • Compression.png
    Compression.png
    532 KB · Views: 4

racerone

Supreme Mariner
Joined
Dec 28, 2013
Messages
37,823
The design of this motor is called " crossflow "----But it has nothing to do with water flow in the engine block.
 

tphoyt

Lieutenant
Joined
Jun 10, 2010
Messages
1,261
Cross flow is fuel and exhaust related.
There is bound be many threads on here somewhere.
 

racerone

Supreme Mariner
Joined
Dec 28, 2013
Messages
37,823
Agreed.-----There you go----Nothing to do with the water flow !----The deflectors guide water around the water jackets.----
 

drobertsobx

Seaman
Joined
Nov 1, 2008
Messages
74
from the thread: Could still be water deflectors on one side. Pull the hoses comming off the heads and run the engine on a flusher.....observe the waterflow comming out of the heads... no or little waterflow indicates swollen deflectors

OK I just started the motor, without the thermostat housing and hoses removed... Had water gushing from pipes on both heads. I ran only long enough to confirm water flow... still having ignition issues, key won't turn it off... but it looks like the pump is working and water is flowing???
 

havoc_squad

Senior Chief Petty Officer
Joined
Mar 5, 2011
Messages
738
from the thread: Could still be water deflectors on one side. Pull the hoses comming off the heads and run the engine on a flusher.....observe the waterflow comming out of the heads... no or little waterflow indicates swollen deflectors

OK I just started the motor, without the thermostat housing and hoses removed... Had water gushing from pipes on both heads. I ran only long enough to confirm water flow... still having ignition issues, key won't turn it off... but it looks like the pump is working and water is flowing???
If the ignition shuts off when you ground the yellow/black kill circuit wire from the power pack to ground it is an issue in your wiring harness or ignition key that is in the boat.

If the engine keeps running after grounding kill circuit wire to ground, you have a bad power pack.
 

drobertsobx

Seaman
Joined
Nov 1, 2008
Messages
74

havoc_squad

Just now reading your post... Sorry keep ending up with a reply to me second times the charm I guess it replied to your post.

OK I have been fiddling with the Ignition switch all day...

Yellow black wire continuity from dash to motor plug end good.

m to M good continuity to ground in off position/ run switches to no continuity

m to kill switch lead 1
second lead to Yellow black from switch (double spade connect)

all continuity checks show everything working as intended Grounded or Open

Ignition switch off yellow black at the motor power pack connection good continuity to ground.
Run it is open

turn switch on wait for beep let run 30 seconds switch to off motor continues to run until I adjust idle to stall.

doesn't seem to want to ground out and stop.

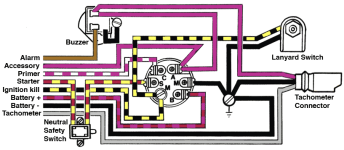
I'm using this schematic

So looks like the power pack? assuming I wired correctly
 

Attachments

  • overallSwitch.png
    overallSwitch.png
    27.5 KB · Views: 0
Last edited:

drobertsobx

Seaman
Joined
Nov 1, 2008
Messages
74
If the ignition shuts off when you ground the yellow/black kill circuit wire from the power pack to ground it is an issue in your wiring harness or ignition key that is in the boat.

If the engine keeps running after grounding kill circuit wire to ground, you have a bad power pack.

havoc_squad

Just now reading your post...

OK I have been fiddling with the Ignition switch all day...

Yellow black wire continuity from dash to motor plug end good.

m to M good continuity to ground in off position/ run switches to no continuity

m to kill switch lead 1
second lead to Yellow black from switch (double spade connect)

all continuity checks show everything working as intended Grounded or Open

Ignition switch off yellow black at the motor power pack connection good continuity to ground.
Run it is open

turn switch on wait for beep let run 30 seconds switch to off motor continues to run until I adjust idle to stall.

doesn't seem to want to ground out and stop.

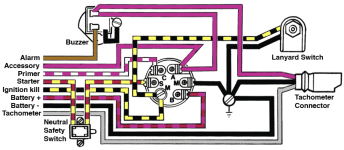
I'm using this schematic

So looks like the power pack? assuming I wired correctly
 

Attachments

  • overallSwitch.png
    overallSwitch.png
    27.5 KB · Views: 3

havoc_squad

Senior Chief Petty Officer
Joined
Mar 5, 2011
Messages
738
While the engine running.

If you took a jumper and plugged in the black/yellow wire bullet connector tied to the power pack and you short it to ground, if the ignition does not shut off when held to ground, you have a bad power pack.

There is no further need to investigate the kill circuit for doing this.

What you DO need to check after identifying the power pack as defective, is make 100% sure there is no voltage present on the black/yellow wire on the wiring harness when turning the ignition key to any position.

You've already done most of the tests of the ignition kill switch wire anyways.

If voltage is sent to the black/yellow kill circuit wire, it will fry a power pack. It may not spark at all or it could not shut off spark. All it takes is one time to touch 12 volts on that kill circuit wire to cook it.
 

drobertsobx

Seaman
Joined
Nov 1, 2008
Messages
74
While the engine running.

If you took a jumper and plugged in the black/yellow wire bullet connector tied to the power pack and you short it to ground, if the ignition does not shut off when held to ground, you have a bad power pack.

There is no further need to investigate the kill circuit for doing this.

What you DO need to check after identifying the power pack as defective, is make 100% sure there is no voltage present on the black/yellow wire on the wiring harness when turning the ignition key to any position.

You've already done most of the tests of the ignition kill switch wire anyways.

If voltage is sent to the black/yellow kill circuit wire, it will fry a power pack. It may not spark at all or it could not shut off spark. All it takes is one time to touch 12 volts on that kill circuit wire to cook it.
Thank you very much for your help on this.

I am starting to suspect his (prev owner) tinkering on the ignition switch did just that, power to the Yellow/Black-Ground... I can't say for certain but with mag glasses on it looks like a burn on the m connector screw from the hot red next door. Just a little flash burn, but I assume that is all it would take with the yellow/black - m being common to fry the power pack.

I will try a direct ground from the power pack tomorrow.
(at the limit of what my heart can take in the heat now)
I think it will be easy enough to go right to the starter ground just below it.

I think I have a meter pin that will plug into the pack. If the lead is long enough easy as pie.
 

drobertsobx

Seaman
Joined
Nov 1, 2008
Messages
74
While the engine running.

If you took a jumper and plugged in the black/yellow wire bullet connector tied to the power pack and you short it to ground, if the ignition does not shut off when held to ground, you have a bad power pack.

There is no further need to investigate the kill circuit for doing this.

What you DO need to check after identifying the power pack as defective, is make 100% sure there is no voltage present on the black/yellow wire on the wiring harness when turning the ignition key to any position.

You've already done most of the tests of the ignition kill switch wire anyways.

If voltage is sent to the black/yellow kill circuit wire, it will fry a power pack. It may not spark at all or it could not shut off spark. All it takes is one time to touch 12 volts on that kill circuit wire to cook it.
Got one more quick question...
The double purple wires that run from the switch to the buzzer...
Can I add another ring terminal and wire to this circuit and run it to an LED light to serve as a visual cue to an overheat issue (Old age loosing hearing and sight lol)
I tried catching voltage on this circuit but the buzzer just isn't long enough for my meter to pick up anything more than a couple Mv reading...

Just wondering if it is a good 12v source for the alarm that can handle a couple milliamps to light an LED.
 

drobertsobx

Seaman
Joined
Nov 1, 2008
Messages
74
Got one more quick question...
The double purple wires that run from the switch to the buzzer...
Can I add another ring terminal and wire to this circuit and run it to an LED light to serve as a visual cue to an overheat issue (Old age loosing hearing and sight lol)
I tried catching voltage on this circuit but the buzzer just isn't long enough for my meter to pick up anything more than a couple Mv reading...

Just wondering if it is a good 12v source for the alarm that can handle a couple milliamps to light an LED.
in case anyone else needed the answer...
I discovered the Overheat thermistors operate as a grounding signal.
At the ignition switch the buzzer has power when in run or start via purple wires.
The brown wire completes a ground on the buzzer via the overheat senders on the brown wire at the remote on the buzzer.
 

drobertsobx

Seaman
Joined
Nov 1, 2008
Messages
74
Well, I was finally able to get back to the overheat issue... Pulled the heads and the head covers... It was shocking to say the least, the head covers were completely caked with salt.
The heads seem to have clear passages, everything checked for warpage nothing found.
Am I safe to assume that the issue is the clogged covers?
Are there other checks I should do?
I also installed both new thermostats, and all hoses including the telltale and replaced the large telltale exit with the factory original.
I have ordered new gaskets and diverters, though the diverters did not look bad, figured might as well do it now while it's apart.
 

Attachments

  • 20230720_140003.jpg
    20230720_140003.jpg
    5.5 MB · Views: 6

Crosbyman

Vice Admiral
Joined
Nov 5, 2006
Messages
5,441
wire brush the water jackets , soak cyl head in warm 30% vinigar & decrud
several products can descale ...the innards ...see utubes
 

drobertsobx

Seaman
Joined
Nov 1, 2008
Messages
74
wire brush the water jackets , soak cyl head in warm 30% vinigar & decrud
several products can descale ...the innards ...see utubes
Sorry forgot to mention I ordered a gallon of Rydlyme for the descaling... I was going to soak everything for 4 hours after brushing everything I could reach with brushes, 50/50 mix.
Then brush and perhaps soak again if they don't look clean.

The heads don't show any signs of salt caking just a weird, real dark brown thin layer.

I saw video's of this product being used with a pump to run through the entire system, looked like it did a good job.
 

drobertsobx

Seaman
Joined
Nov 1, 2008
Messages
74
in case anyone else needed the answer...
I discovered the Overheat thermistors operate as a grounding signal.
At the ignition switch the buzzer has power when in run or start via purple wires.
The brown wire completes a ground on the buzzer via the overheat senders on the brown wire at the remote on the buzzer.
The red Led light I put in series with the horn worked perfectly while testing the new thermostats for leaks. I did not hear the alarm but immediately saw the light on the dash from the engine.
 
Top