1988 bayliner capri 15 footer deck and foam replacement

Eaglewings05

Cadet
Joined
Mar 27, 2010
Messages
24
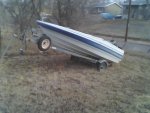
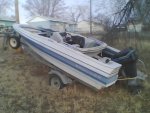
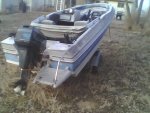
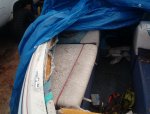
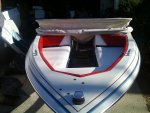
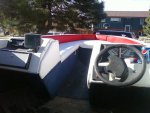
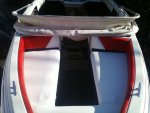
Well, here goes. I just started here at iboats and am very new to boating..(bought first boat three weeks ago). I have a 1988 Bayliner capri 1500 with a Force 50 hp outboard. paid 425. Now realizing I got hosed pretty good. I had to replace the lower unit on the outboard, the emergency kill switch, battery, all the upholstry, buy line, anchors, fenders, pfd's, replace all the fuel line, clean out both fuel tanks because the fuel turned to varnish, rewire the entire trailer, replace all bulbs on the trailer, replace the broken spare tire mount, replace the bilge pump, rewire both bow and stern lights, and now....and now I get to replace all the deck and foam.....because the previous owner was a MORON!!! So now I am reluctantly joining the ranks of all you experts and boat enthusiasts in what is turning out to be a nearly complete boat rebuild.

The bad news.....

I took the boat to a certified scale and the boat, motor and trailer weigh in at a fabulous 1540 pounds. From everything I could find online the trailer (1988 Escort single axle) weighs 305 pounds ( add 30 pounds for the spare as I am not sure it was included in this number). The 50 hp Force outboard weighs 152 lbs without oil ( so add 5 pounds to be safe). NADA says the boat, outboard, and trailer should weigh 975 pounds. That means the boat should weigh roughly 485 pounds. Seems logical. Unfortunately that means I apparenly have an extra 560 pounds sloshing and sitting inside my boat.

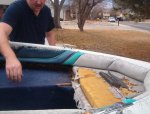
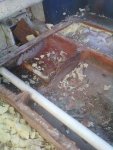
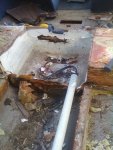
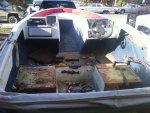
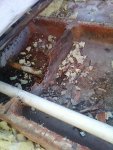
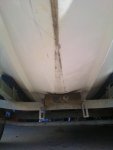
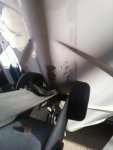
I cut an inspection hole in the floorboard in front off the tunnel that encases the battery and is the platform for the seats and take a wild guess.... yep standing water. Stringer to stringer, keel to deck, bow to front of tunnel. I know wome of you are thinking "what about the drain holes?" Yes it was there....plugged with a piece of old tarp!!!! So after cleaning thast out it all started to drain...right into the battery compartment. The drain from the battery compartment was also plugged with an old piece of tarp...now I was getting angry. I cleared that blockage and water rushed in from the stern side of the boat. Shenanigans you say?!!? I wish. So after cutting another inspection hole behind the battery tunnel, you guessed it more water all the way to the deck ( minus what drained into the battery compartment). After futher exploration, I found not the usual old tarp fouling the drain to the bilge but that the drain had been glassed over!!! No wonder the bilge pump are looked so clean!! after opening that all up, low and behold water started pouring out the drain hole like a fountain in Vegas!!!!


Apparently someone had been into this deck before because I don't think even Bayliner would have done that! I also found interior grade lumber, both plywood and 1x4 and 2x4 slats running between the stringers. None of which had any glass or resin any where on them. Talk about cause for ulcers!!!

The good news....

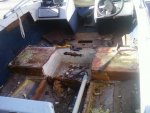
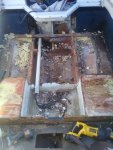
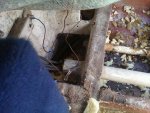
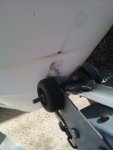
I cut away some more of the deck to inspect the stringers...drilled a couple of small inspection holes...and you wont believe it but they are totally dry!!!! Yeah no stringer replacement in my future!!! Drill two small holes in the transom and woohoo dry as a bone there as well. The complete rebuild just got a little easier.


The reason I am posting this is to request guidance and tips from anyone that has ever done one of these little boats before. I couuld really use some pictures of a cleaned out hull in order to gauge how far across the deck goes and whether or not I have to cut the battery tunnel out and glass it back in after the deck is redone. Also, how much foam dies it take to replace the waterlogged mess that is in there now? And how much resin and glass mat did it take to do the deck?


By the way, I am so lucky I am not at the bottom of Lake Pueblo Reservoir since right after I got the motor fixed and the electrical done, my faher, nephew, and I took it out to test it for fishing purposes. This boat has a 4 person limit with a 1000 pound limit for persons, gear, and motor. The three of us all weight about 240 and we had our fishing gear, cooler and all the safety stuff, and two 20 pound anchors. We all thought the boat was little but should still have done more that 15 mph across the lake. Now I know why it wouldn't! I'm still supprised the damn thing didn't sink at the dock with all that extra weight!!!

anyone that has any info on this particular boat please le me know. I'd really appreciate it. I will be posting pictures this weekend of the boat with its mostly finished upholstry and newly discovered issues. I will continue to post pictures oof the progress as the project continues.

Thanks for taking the time to read my post/whine/project commencement.
 

Eaglewings05

Cadet
Joined
Mar 27, 2010
Messages
24
Re: 1988 bayliner capri 15 footer deck and foam replacement

Here are some pictures of when I went to pick up the boat and its condition when I bought it.
 

Attachments

  • phone pictures 017.jpg
    phone pictures 017.jpg
    88.5 KB · Views: 0
  • phone pictures 018.jpg
    phone pictures 018.jpg
    102.6 KB · Views: 0
  • phone pictures 019.jpg
    phone pictures 019.jpg
    80 KB · Views: 0
  • phone pictures 020.jpg
    phone pictures 020.jpg
    102.6 KB · Views: 0

Eaglewings05

Cadet
Joined
Mar 27, 2010
Messages
24
Re: 1988 bayliner capri 15 footer deck and foam replacement

Here are a couple more pics that I found. The first four show how the previous owner stored the boat for what I discovered to be the last 6 YEARS!! The second two are when I started doing the upholstry.
 

Attachments

  • 016.jpg
    016.jpg
    147.8 KB · Views: 0
  • 017.jpg
    017.jpg
    144 KB · Views: 0

tschmidty

Chief Petty Officer
Joined
Mar 24, 2010
Messages
462
Re: 1988 bayliner capri 15 footer deck and foam replacement

Well at the end of the day you'll have a boat that will be solid as it gets if you do it right. When you get into the deck it should be pretty straight forward how far across it goes, just don't cut into the hull! The foam you can calculate by the square foot. I'd be curious if anyone knows a good source for cheap closed cell foam.

But keep at it, you'll see people that have done a lot more than you. Always inspiring. You'll get it back on the water sooner than you think if you keep at it.
 

ezmobee

Supreme Mariner
Joined
Mar 26, 2007
Messages
23,767
Re: 1988 bayliner capri 15 footer deck and foam replacement

That galvanized trailer looks pretty nice. Probably worth the $425. But you know what that means....that mean the boat was FREE! And as they say often on here......a free boat is the most expensive boat you can own :D

Seriously though, lots of people on here undertaking similar projects. You'll have a sharp little runabout when you're done. Good luck with it.
 

kenny26

Petty Officer 2nd Class
Joined
Sep 16, 2009
Messages
111
Re: 1988 bayliner capri 15 footer deck and foam replacement

Well, here's my advice.

My Force 50 blew up on my 3rd time on the water and i had to repower so square away your power first, maybe get it checked by a mechanic.

Also, i'm assuming your boat, like mine, didn't have a standard tach, so you need to be careful about over-revving the engine depending on how you are propped. A tach should be a mandatory addition IMHO.

Not sure how far you've dug into the hull, but with mine, my stringers were rotten right where the bulk heads attached and the transom was 90% solid except it was rotten where the stringers attached to the transom. So verify the lack of rot before you put money into materials and you're past the point of no return so to speak.

You didn't get too bad a deal IMO, if the motor, stringers and transom are sound. You need to look at it that you could have paid 7 or 8K for a boat and still gotten a rotten deck/stringer/transom. You got a free boat that can be sound for under 2K if the motor is sound.

I'm nearing the end of my project (still need to update my pictures), but the deck, stringers, transom, and bow seating are in the boat and all i need to do is put on the cap, mount the new outboard, carpet the deck, and do some cosmetic stuff. I'm pretty happy with how my boat is turning out, but i've got way more money into the restoration than what i paid for the boat itself, and I've been working on it pretty steady since october.

Good news is there isn't any problem you can encounter that hasn't already been encounterd by the folks here on the forum. Good luck, and I hope you jump in, but do so with your eyes and wallet open :D

I highly recommend a book called "Runabout Renovation" by jim anderson. You can order it online for $15 bucks. Its written by someone who restored boats for a living an it really is a good resource for the general info, the rest you can find here.

As for your deck question. At the stern of the boat my deck went all the way to the vertical part of the hull, but as you moved about 2 feet forward of the stern it narrowed down under the seat boxes. Be careful when cutting out the rear of the deck because at the edges its sitting on top of the hull.
The best thing to do is get an angle grinder with a flap disk and clean up just clean up where you think the joint is until you can see the transition between deck wood and the fiberglass of the hull. The other thing you can do it just take a circular saw set to barely cut through the deck and run it around the circumference of the deck so you can gauge how much decking is left from below it.
 

Eaglewings05

Cadet
Joined
Mar 27, 2010
Messages
24
Re: 1988 bayliner capri 15 footer deck and foam replacement

Ok folks...time for an update. The rear deack is out with just some monor touch up needed. The bulkheads in between the stringers all need replaced...no surprise there. The foam was all totally saturated so I'm glad I decided to rip into the deck. The seat and battery box is coming totally out and getting redesigned. While in the midst of tearing out the floor the last two side panels are out and awaiting reupholstery. Tomorrow the battery and seat box, the front portion of the deck, and all the foam in the bow seats are coming out. Also plan to clean up the few pieces in the rear so all the grinding and prep can be done for the new deck and foam.

Below are the recent pictures of the work done to date. Also there are the pictures of the upholstery that was all redone from the consoles forward ( before the extent of the boats condition was truly known)
 

Attachments

  • SSPX0055.jpg
    SSPX0055.jpg
    129.9 KB · Views: 1
  • SSPX0057.jpg
    SSPX0057.jpg
    136 KB · Views: 0
  • SSPX0058.jpg
    SSPX0058.jpg
    139.9 KB · Views: 1
  • SSPX0056.jpg
    SSPX0056.jpg
    124.6 KB · Views: 0

Eaglewings05

Cadet
Joined
Mar 27, 2010
Messages
24
Re: 1988 bayliner capri 15 footer deck and foam replacement

More pictures
note the totally rotted bulkheads with the total lack of glass and resin
 

Attachments

  • SSPX0045.jpg
    SSPX0045.jpg
    149.8 KB · Views: 6
  • SSPX0046.jpg
    SSPX0046.jpg
    144.9 KB · Views: 6
  • SSPX0047.jpg
    SSPX0047.jpg
    146.6 KB · Views: 6
  • SSPX0048.jpg
    SSPX0048.jpg
    137.7 KB · Views: 5

Eaglewings05

Cadet
Joined
Mar 27, 2010
Messages
24
Re: 1988 bayliner capri 15 footer deck and foam replacement

still more pictures
 

Attachments

  • SSPX0050.jpg
    SSPX0050.jpg
    145.8 KB · Views: 3
  • SSPX0059.jpg
    SSPX0059.jpg
    140.8 KB · Views: 3
  • SSPX0061.jpg
    SSPX0061.jpg
    148.4 KB · Views: 3
  • SSPX0060.jpg
    SSPX0060.jpg
    144.5 KB · Views: 3
  • SSPX0062.jpg
    SSPX0062.jpg
    87.8 KB · Views: 1

Eaglewings05

Cadet
Joined
Mar 27, 2010
Messages
24
Re: 1988 bayliner capri 15 footer deck and foam replacement

the last picture above and the remaining pictures show some areas on the keel that definitely need some attention. There are no leaks here but while the boat is in the air and all the supplies are out it would be a crime not to take care of the obvious issues here. As I do not have the money for a fancy keel guard, I'm going to build this area up slightly to be able to accomodate for future beaching events. However, unlike the PO I do not intend to beach in any rocky areas. You will also notice a nice mark down the starboard side where the PO kissed a dock at a pretty decent speed. The gouge is about 6 feet in length and will get repaired along with everything else.
 

Attachments

  • SSPX0063.jpg
    SSPX0063.jpg
    83.2 KB · Views: 0
  • SSPX0064.jpg
    SSPX0064.jpg
    123.7 KB · Views: 0
  • SSPX0065.jpg
    SSPX0065.jpg
    105.6 KB · Views: 0
  • SSPX0066.jpg
    SSPX0066.jpg
    121.1 KB · Views: 0

86RajunCajun

Petty Officer 1st Class
Joined
Apr 23, 2008
Messages
218
Re: 1988 bayliner capri 15 footer deck and foam replacement

Yessir you have a mess to take care of there. That boat is begging to be re born.

Couple grand and shell be good as new to you! Welcome to the backbreaking, totally exhausting and absolutely gratifying world of boat restoration. Have fun!

Good Luck!
RC
 

Eaglewings05

Cadet
Joined
Mar 27, 2010
Messages
24
Re: 1988 bayliner capri 15 footer deck and foam replacement

I sure hope it won't take a couple grand. I went and priced all my materials today. The resin is 35 bucks a gallon, the glass mat and cloth are each 6 bucks a square yard, and the 1/2 pw is 18 bucks a sheet. the carpet is 4 bucks a square yard. All in all, with this small of a boat, I'm figuring about 300 bucks and a few lost weekends. Here's to wishfull thinking!!
 

86RajunCajun

Petty Officer 1st Class
Joined
Apr 23, 2008
Messages
218
Re: 1988 bayliner capri 15 footer deck and foam replacement

If your doing a full gut down to the hull, and plan on redoing the transom, stringers, deck and interior, youll be way over 300$. Youll prolly need about 7-10 gallons of resin and 15-20 yeards or mat and some type of cloth/biax.

Lookin to be in the thousand range easy unless you just fix the structure and dont do any interior work. Seats and things are pretty pricey.
The amount i was talking was to redo the entire boat, structure, electrical, interior, and paint. By the pics you posted, these are what the boat needs done.

There are about 10 parts of restoration denial to go through :) Search it:D

Good luck buddy!
RC
 

erikpn

Petty Officer 1st Class
Joined
Aug 23, 2009
Messages
325
Re: 1988 bayliner capri 15 footer deck and foam replacement

RC is right. No way it'll cost 300 bucks. I did a deck on an aluminum starcraft and thought it'd cost around 100 bucks. 40 dollars for wood, 60 bucks for epoxy, borrow some tools and call it done? No way.

Another 50 bucks in gluvit, 20 dollars in rivets, 20 in riveting tool, 20 in drill bits, 40 in rollers/brushes, 10 in washers, 15 in screws, 30 on shop vac, 20 on jigsaw, 10 on saw blades, 10 on lights, 5 on zip ties, 20 on acetone, 10 on goof off, 10 on rags, 50 in sandpaper, 10 on steel wool, 20 in mineral spirits, 5 on sandpaper block, etc etc..... and I still have more receipts of random stuff to go through. Ended up closer to 1,000 after I decided to do the vinyl, new seats and a paintjob too.
 

Eaglewings05

Cadet
Joined
Mar 27, 2010
Messages
24
Re: 1988 bayliner capri 15 footer deck and foam replacement

Here is the good part. I am doing all the reupholstery myself. The pictires show both the original condition of the boat when I got it and there are some of the new upholstery in the bow and around the consoles which took me about three days. The stringers and transom are good and look as though someone else aready replaced them. It looks as though a completely different person did the bulkheads and the deck (almost like the boat changed hands mid restoration). My buddy has a paint shop and owes me a favor and is going to shoot the hull for me after all the repairs are done. All of the wiring is in top shape, there was only one issue and it was just the fuse holder. So, all that is left is the resin, cloth, plywood and carpet. I already have the acetone for cleaning and all the tools, (i.e. grinders, shopvac, sabersaw, jigsaw, dremmel, sanding discs, cutoff discs, stainless screws, drills, respirator, goggles, all the good stuff).

I did as much homework on this as I could to make sure that I did not get into this project for more than I could sell the boat for in the future and still get my money back and a little more for my trouble.

However, this project has provided me with the perfect name for my boat. With my military history and my new found affection for the boating passtime, there could not be a better name than "FREEDOM ISN'T FREE"

wish me luck
 

Eaglewings05

Cadet
Joined
Mar 27, 2010
Messages
24
Re: 1988 bayliner capri 15 footer deck and foam replacement

Update:

While removing the foam and bulkeads between the stringers, I have noticed that the bulkheads were notched into the stringers.:mad: AT these intersections, there was a lot of seepage and the stringers are bad in those areas only.:) I am going to go ahead and replace both stringersjust to be safe. Now I have some questions. Were the stringers in these boats supposed to be plywood or solid lumber i.e. 1x6? Are the bulkheads supposed to be notched into them? Do the bulkheads have to go all the way to the keel or can they be made to form an arch thus eliminating the need for the PVC pipe that served as a drain through the bulkhead? Does the area where the bilge pump is located have to be isolated by a bulkhead or can the bulkhead be made in an arch like the rest, thus allowing any water to flow freely to the pump? Also, can the bilge area be enlarged if the gas tanks are properly supported? And finally, why does there have to be so much darn grinding???:eek:


Also just as a side note, the person that recommended using a spade bid with the point groud off to remove the foam was a genius!!


Anyone that could answer my questions would be of great assistance at this point. Thanks again to all the people in this forum your advice and experience has been invaluable through this project.
 

Eaglewings05

Cadet
Joined
Mar 27, 2010
Messages
24
Re: 1988 bayliner capri 15 footer deck and foam replacement NEED HELP PLEASE

Re: 1988 bayliner capri 15 footer deck and foam replacement NEED HELP PLEASE

If anyone could answer the questions in the other thread for the 88 bayliner capri deck and foam replacement as quick as possible I am at a stand still at the moment waiting for the answers (except there is always more grinding that can be done:()
 

Eaglewings05

Cadet
Joined
Mar 27, 2010
Messages
24
Re: 1988 bayliner capri 15 footer deck and foam replacement

Still waiting on a reponse to my questions if anyone is still reading this thread.

On a good note, almost done with grinding!!:D
 

BobsGlasstream

Commander
Joined
Sep 11, 2009
Messages
2,128
Re: 1988 bayliner capri 15 footer deck and foam replacement

Eaglewings05,
Most folks use 3/4 plywood ( marine, pressure treated or a good grade Exterior) to rebuild and most OEM's used ply too, only 1/2".
If you have a drain hole it's not really isolated. My boat had small sub-decks in it and the bulkheads only went down to them. My bulkheads were not notched into the stringers. I glassed all my stringers in and then added the bulkheads, making sure the ends of the bulkheads were sealed.
As for the grinding, You need to get to fresh glass to get a mechanical bond with the new glass.
Have fun
Bob
 

alben

Recruit
Joined
Jul 18, 2010
Messages
1
Re: 1988 bayliner capri 15 footer deck and foam replacement

I have that exact boat/motor/trailer package since it was new (1988) and I love it. The boat is small enough and light enough that it pulls easily with almost any vehicle. When I first got the boat I pulled it with a 4 cylinder 1981 Buick Skylark. Now I pull it with a Trailblazer, and you don't even know it is back there.

I have only had a couple of minor issues with the 50 HP Force motor. I had one of the ignition coils go out and I had the lower unit actually loosen up from the midsection while in use.

The galvanized trailer is great and is an exact fit for the boat. Only issue I have with the trailer is that the axle seems to be undersized and I wear out the insides of the trailer tires due to a slight bend in the axle when the trailer is loaded.

One thing I noticed is different, based on your photos of the dash, what is the right gauge? I only have the speedo gauge that is on the left.
 
Top