1979 40hp lower unit stuck

slowleak

Petty Officer 1st Class
Joined
Feb 21, 2011
Messages
201
I picked up a cheap boat, a 14ft Starcraft SF14 this morning for almost nothing, the boat is a '92, the motor on it is a 1979 Mercury 40hp.
The reason it was for sale is that the owner somehow managed to tow it about 30 miles with the lower unit dragging the ground, needless to say its lower unit is junk. Its torn apart bad enough to see the gears have been ground down in the pavement.

The boat however came with a blown up 1981 40hp with what is likely a good lower unit.
I pulled the lower, or what's left of it off the motor on the boat. It came right off.
However, the parts motor is another story. It won't drop down at all and appears stuck in the splines.
The motor is junk otherwise, when I carried it to the truck from his garage it was dropping pieces out of the power head, including three rod bolts, part of the center bearing support, and half of one piston rod. I can't see though where they came out of the block but it rattles like a can or marbles when moved around.
Both are 20" motors.
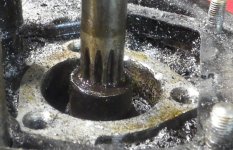
Not caring about the parts motor, I stripped off its carbs, wiring, and switchbox, removed most of the bracket, and cut a window in the mid to see what's up with the splines. I cut and removed the upper shift shaft, and finally cut the steering pin and removed all of the bracket. The splines are stuck. I even heated the bottom of the crank up till it was red but they won't budge.
I'm starting to think the next step may be to cut the crank in half and grind the end of the crank off the splines with a cutoff wheel?

Any better suggestions?

The motor on the boat has a smaller center pin on the end of the driveshaft, something I've not run into on my other motors before, and most of the lower units I see for sale for these don't have that? Did some have it and some not?
I'm wondering if that's where this thing is stuck or rusted hold of?
 

Chris1956

Supreme Mariner
Joined
Mar 25, 2004
Messages
27,945
Have you tried hanging the motor prop up and putting some penetrating oil into the spline area, after it cools from your torch? That tends to suck the oil into the part that is cooling.

Some gearcases have the preload pin, most do not.
 

slowleak

Petty Officer 1st Class
Joined
Feb 21, 2011
Messages
201
Its been hanging from a chain upside down all day, I even have a winch pulling it downward but I haven't gotten any movement at all.
I'm thinking its gonna be a fight to get apart but I don't think I'm losing anything if I cut up the power head to carve it off the splines.
The top of the crank is seized, the lower turns when in neutral, so something real bad happened inside, if the rod and bolts trickling out the side weren't hint enough I suppose. What's odd is I don't see where the block is broken but there's a huge dent in the starter, deep enough to lock that up too,
I can turn the lower with pliers through the hole I drilled so chances are its fine. The guy didn't seem to remember where it came from or how he got it, but I don't think he owned the boat or the parts motor very long.
No matter what happens, its a $200 boat with a new battery and working trolling motor but I think the 40hp on it may be a decent motor. Its showing 161/168 psi of compression and it looks like new other than the road rash on the lower unit.
 

Chris1956

Supreme Mariner
Joined
Mar 25, 2004
Messages
27,945
I guess you could crack off the midsection. That would allow you to see into the spline area. You could try a blunt chistle on an air hammer on the crank and driveshaft and see if that can work the crank loose from the driveshaft. Alternate with heat and Penetrating oil?
 

slowleak

Petty Officer 1st Class
Joined
Feb 21, 2011
Messages
201
The mid section is gone, I cut it off and now have a v block clamped to the driveshaft and I tried using hydraulics to pry between the block and the rim of the crank but I took it up to 8,500 psi and nothing moved.
I had the crank cherry red with the torch, and even then it won't budge. I poured penetrating oil on it as is cooled but no change.
I'm thinking that its got that center pin and that's where it stuck. If so, that means that pin extends nearly to the middle of the lower rod journal. The shaft that came from the good motor shows wear marks about 3" down from the end of the smaller pin.
I found the hole in the block its on the bottom, and the lower rod and piston are what's completely gone, my guess is it got so hot when what ever happened it may have welded the shaft in place, or at least that pin.
How many have the pin? If the pin don't survive, is that an issue or should I just cut it off flush and forget about it?
I've not seen one of these before, at least not one that's over 1" long. The center pin on the good motor's shaft is as long as the engagment area of the splines them self, but that pin area is pretty rough, like it was rusting in there. But it wasn't stuck. Both motors had a rubber grommet pushed up against the crank end of the shaft, but the parts motor that won't come apart had a tin cover and the end of the crank as well.
I don't see any rubber seals though, just the open end of the crank and the splines going into it. With the plate removed, I can see the bottom crank bearing.
IMGP0137B.JPG

Don't mind the shrapnel, its what's left of the mid section. The splines are easier to get at with the mid section removed. (in about 5 pieces with 6 saw cuts).
At this point the exhaust tube and plate are still good but the next step seem to be cutting the top of the power head off, aiming for around the top of the lower rod journal. The band saw will do that nicely, then l'll likey have to cut the power head in half leaving just the stump of the crank attached with the lower bearing attached. It all depends on how deep the shaft is inserted into the bottom of the crank, I'd hate to go this far and cut off part of the driveshaft by accident.
 

jimmbo

Supreme Mariner
Joined
May 24, 2004
Messages
13,463
If you have a Dremel you could try cutting several Slots in the Crank Shaft, then use a Chisel on them, along with a bit more Heat. Just don't cut into the Drive Shaft. You could also try Chilling the Drive Shaft with some CO2, whilst Heating the Crank Shaft. Removing the lower Crank Shaft Bearing and Housing, would provide Access to the end of the Crank Shaft
 

slowleak

Petty Officer 1st Class
Joined
Feb 21, 2011
Messages
201
I started to tear down the rest of the power head to get at the crank, rather than just doing a through and through cut. I stripped down the power head, cut away the exhaust plate on the bottom, and dropped the pan over the lower unit.
Now the flywheel won't budge. Its already pulled the threads out of two bolt holes with no sign of movement. I have a Snap On balancer puller and grade 8 puller bolts but it won't budge. I stripped it down to the bare hub and would like to save the electronics if possible so I've not gone for the big red wrench yet but how are you supposed to remove these flywheels?
I don't ever remember having an issue with these, and I could have sworn I had this one off before. Its the type of flywheel with the sheetmetal top and iron hub without the large puller threads most larger motors have.
I have ran the new set of bolts through the hub, with two nuts on the back but it's not moving, I ran the forcing screw tight with an impact, and tried tapping on the top but there's no movement at all.
When I removed the exhaust cover I could see that both pistons are still in place and they don't look damaged, not even scored, but the both rods are in pieces and the crank is in two pieces. I have the bits of 1.5 rods laying on the table where I'm working on this thing, the all fell out the bottom hole into the pan when I flipped it over. The odd thing is the motor doesn't look all that bad wear wise. From what I see of the cylinders and pistons through the exhaust port it don't look like it died of lack of oil there. But who knows what all went on with it heat wise. If they couldn't do a water pump, it likely got run without water and cooked, but I really don't even see signs of heat other than where I've been working the splines with a torch.
 

slowleak

Petty Officer 1st Class
Joined
Feb 21, 2011
Messages
201
I spent some more time on it last night, I gave up on trying to get the flywheel hub off the crank for now so I removed the alternator coils and ignition pickup coils, unbolted the front plate and removed the rear of the block freeing up the crankshaft (pieces). The center support is missing 8 leaves off the reed plate, two of them were hammered into the top of the top piston, as was a piece of one rod. That piece was too big to get through a port so I have no clue how it got ahead of the piston. The crank is severed in two places, first in the middle of the reed plate or center support, and again in the middle of the bottom journal. Both rods are completely shattered, with nothing attached to the piston pins at all. The lower main bearing is destroyed, with most of the rollers split in half. The pistons themselves are not too bad all things considered, they're junk but they're damaged mostly by what got hammered into the tops of them.
The top piston had been slamming the top of the cylinder for a long time and that area looks like a ploughed farm field. The lower cylinder has a few big chunks buried in the top but both cylinders are clean. The motor was full of black oil and residue, it was not dry and didn't look overheated.
Later today I plan to carve the remains of the crank off the driveshaft.
I'm thinking that this driveshaft doesn't have the pilot pin in the middle since the distance on the other lower unit off the good motor would put that pin all the way though the crank weight if measured from the bottom of the splines. There's not that much room on this one. I did measure the overall diameter and the number of splines and both look the same but the end of the crank on the parts motor is smaller than that on the good motor which is a few years older.
 

racerone

Supreme Mariner
Joined
Dec 28, 2013
Messages
38,062
The spline on the driveshaft may have suffered from this torture.-----Broken crankshaft was fairly common on these 2 cylinder motors.
 

Chris1956

Supreme Mariner
Joined
Mar 25, 2004
Messages
27,945
Mercury has a combo lifting eye and flywheel puller. It has pipe threads which mate with the flywheel, and a bolt thread in the center that pushes down on the crankshaft. Here is Amazon source.

Zinger for Mercury Mariner Outboard Lift,Flywheel Puller Removal Tool 91-849154T1,Lift Ring 91-90455-1​


slowleak

Petty Officer 1st Class
Joined
Feb 21, 2011
Messages
201
Mercury has a combo lifting eye and flywheel puller. It has pipe threads which mate with the flywheel, and a bolt thread in the center that pushes down on the crankshaft. Here is Amazon source.

Zinger for Mercury Mariner Outboard Lift,Flywheel Puller Removal Tool 91-849154T1,Lift Ring 91-90455-1​

I have that puller, but this motor doesn't have those threads. Its an iron hub with 8 bolts holding the flywheel to it with a thicker steel plate and starter cup on each side of the sheet metal top of the flywheel. The outer cast iron ring and gear are riveted to it.
The other motor has a solid iron flywheel and has those puller threads.
I also noticed that this motor has no number plate on the bracket like the one on the boat.
I can see the keyway with the nut and washer off, the key doesn't appear to be sheared.
 

slowleak

Petty Officer 1st Class
Joined
Feb 21, 2011
Messages
201
The spline on the driveshaft may have suffered from this torture.-----Broken crankshaft was fairly common on these 2 cylinder motors.
Was it all two cylinders or just this model in a particular period?
My uncle had a Mercury 400, 40hp that he ran for years, I think that one was a '71 model. My cousin still runs that motor yet today.
It looks like basically the same motor as this one minus the decals and oil injection, which was apparently removed from this one since I don't see anything different here in the pump supply. The '79 motor doesn't say 'Oil Injected'. I'm thinking that maybe that decal is a clue to this motor's demise. If someone got hold of it used and assumed it didn't need oil, it may well have gone without, although I don't see any signs of oil starvation in the cylinders or pistons. The rod bearings are not discolored, nor are what's left of the broken rod journals.
No matter what, this thing had to make one hell of a bang when it went. It had to be knocking something terrible with as beat up as the top of the one cylinder is.
The inside of this motor is also black with sludge and oil, its as dirty as an old diesel engine inside. Everything is black and coated with oil. I don't think I've ever seen a 2 stroke this dirty inside. I can't tell if its ground up metal or they were running diesel drain oil for lube.
 

slowleak

Petty Officer 1st Class
Joined
Feb 21, 2011
Messages
201
Success!
After an hour of carving with a cut off wheel the crank end is free of the driveshaft.
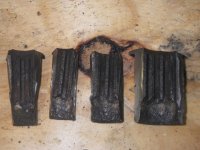
I had to cut it in pieces and then chisel each piece off the shaft. It was basically welded to it.
I was expecting it to be badly rusted but the shaft is super clean. The inside splines are rough but not brown with rust of scaly.
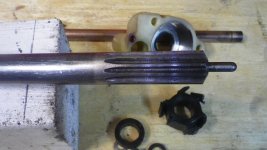
The pin on the end doesn't go into anything? The splines end into a 1 1/16" open cavity in the rear most crank counterweight. The cavity where the pin goes is rough cast and I could see where the pin had been bottomed out against the top of that hole.
The bad part is this won't fit into the other motor. The 1979 motor's crankshaft has no cavity above the splined pocket. The end of that shaft was machined flat with no pin.
The water pump on that motor is also different, with a larger diameter pump than what this one had. The water tube on the '79 separates down low, this one has a tube that runs full length from the water pump, where its inserted from the inside of the pump upward, all the way up to the bottom plate on the motor where it engages a hole with an Oring inside.
This also has two plastic pieces that were not in the '79, its got a collar with a ramp and metal guide on it around the shifter and its got another collar that fits up into the mid housing where the annode bolt comes through.
It does match up to the mid on the 79 though.
I'm thinking about just cutting that small guide pin off and using it. I don't see where that pin does anything?
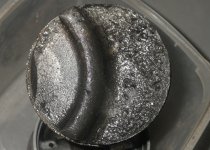
Here's a few pics including the hammered piston and bits of the mid that got cut away to get this apart.


IMGP0146b.jpgIMGP0152.JPGIMGP0149.JPG IMGP0150.JPG
 

tphoyt

Lieutenant
Joined
Jun 10, 2010
Messages
1,322
What a way go!
Maybe it’s just me but I would have some concerns about all the heat that went into that shaft. I hope everything works out for you.
Best wishes.
 

slowleak

Petty Officer 1st Class
Joined
Feb 21, 2011
Messages
201
My guess is that the thing was likely a tight fit from the start, then a bearing meltdown heated things up and maybe even sort of shrunk fit the iron over the steel shaft.
The shaft is hard, a hacksaw doesn't even scratch it.
Its also only 40hp so its not likely to matter much. If 10,000 psi of puller force didn't break the shaft off I think its likely fairly strong yet.

I ordered an impeller, there's no local dealer here for Mercury and none within a hour had one in stock.

What years did this engine family span? I was under the impression that all thge 40hp 2 stroke twins used the same lower unit although there were difference gear ratios on the higher hp motors.
 

merc850

Commander
Joined
Jul 7, 2010
Messages
2,046
That pin is a bearing pre-load to keep the tapered bearing in the lower unit tensioned, if you cut it off everything goes to hell.
 

jimmbo

Supreme Mariner
Joined
May 24, 2004
Messages
13,463
The 33.3 cubic in twin was introduced in 1970 as the Mercury 400, by 1972, it was renamed the 402. In 1979 it was renamed the Mercury 40, and in 1984 was changed to a 35hp, likely due to 'Prop Rating'. It was made for a few more years. It did share gearcase housing size with the 44 and the 49.6 cubic inch Motors, though the Gear Ratios were the same for the 44 inch motors, and a bit different for the 49 inch motors.
It was not a Direct Descendant of the 1969 Mercury 350, as that 32 inch block used conventional Crossflow charging, while the 33 inch block used Merc's Direct Charge system.
 

slowleak

Petty Officer 1st Class
Joined
Feb 21, 2011
Messages
201
That pin is a bearing pre-load to keep the tapered bearing in the lower unit tensioned, if you cut it off everything goes to hell.
That sort of makes sense but isn't that lower bearing shimmed?
How does this work on the older motor that has no pin and no cavity or clearance for one?
On the parts motor, the area beyond the splines in the crankshaft is open roughly an inch beyond the splines. the cavity nearly goes clean through the lower counterweight.
On the 1979 motor, there is no cavity, the splines end at the bottom of the hole. On both motors the splines begin roughly 1/2" into the crank, and end at 1 1/4" beyond that. The shaft on the '79 has no pin, and doesn't show the machining marks that the newer parts motor shaft does.
The older motor has an O ring groove about 1.2" from the end of the shaft that likely is meant to engage the un-splined area in the crankshaft.
The end of the older shaft is rough machined with a bevel edge all around. The newer motor has no bevel and the end beyond the splines is conical before the pin begins. The overall depth of the crank hole is over 1" deeper on the parts motor.
The splines also end making it impossible for the shaft to be pushed into the crank far enough for the small pin to bottom in the top of the hole.
I think being bottomed like they were and the lack of a seal likely contributed to how well the two were stuck together.
I've never had an older one of these apart so I can't say how they compare parts wise.

I did finally get the flywheel hub off, I used a 12" bearing separator and an 80 ton shop press. It gave way and popped off at around 73 tons. The tapered area on the crank was spot clean, not discolored or rusted.
It took so much force to pop the two apart the press was flattening the end of the crank and the brass soft steel block I put in between. When it popped free, the rest of the top counter weight pretty much exploded as it bounced off the lower beam of the press. I pulled the flywheel off the good motor just to check and it popped right off with a regular puller.
Both flywheels are identical.

The serial number of the good motor is 5275889, its the only number I see, there are no tags or numbers anywhere on the parts motor but the decals match 1983.

What's really a shame is that this motor came from an area with no saltwater and it looked fantastic condition wise, someone just killed it long before it saw any real use.
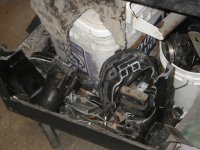
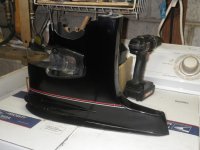
Here's what remains of the mid section after I cut the thing apart to salvage the lower unit:
IMGP0155b.JPG
 

merc850

Commander
Joined
Jul 7, 2010
Messages
2,046
I have 7 old Merc's and I've never had anywhere near the problems you've had; what an ordeal!
The driveshaft with the pin forces the tapered bearing together - the one without uses a ball bearing like the older ones. The O ring on the shaft is there to prevent water from entering the crank splines; greasing the splines every season helps.
 

Chris1956

Supreme Mariner
Joined
Mar 25, 2004
Messages
27,945
My '77 1500 had a tapered pinon bearing w/o a pin. Is it a show stopper for the OP?
 
Top