1978 Islander 22 I/O

66Holiday924

Chief Petty Officer
Thread starter
Joined
Aug 21, 2017
Messages
632
Cabin Bulkhead Work:

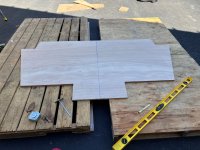
I started work on my cabin bulkhead. I had to start by making a template. I used the method of taping carboard strips together to outline the cavity. Creating the template this way was very effective, I'd say about 95% effective... Once again, the HVAC tape proved to be a good ally for this task.

The base bulkhead material is 3/4 marine ply, however I am not done yet. It will be about an inch thick when it's complete.

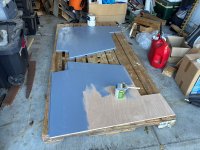
I cut the ply with the template, and painted it with two layers each of the tractor primer and topcoat paint.
 

Attachments

  • 20261003_145215589_iOS.jpg
    3 MB · Views: 5
  • 20261003_150720478_iOS.jpg
    20261003_150720478_iOS.jpg
    2.4 MB · Views: 2
  • 20261003_152602303_iOS.jpg
    3 MB · Views: 4
  • 20261003_155843286_iOS.jpg
    3 MB · Views: 4
  • 20261003_161132617_iOS.jpg
    2.8 MB · Views: 3
  • 20261003_163611830_iOS.jpg
    3 MB · Views: 3
  • 20261003_165120837_iOS.jpg
    3 MB · Views: 3
  • 20261003_172356127_iOS.jpg
    20261003_172356127_iOS.jpg
    2.3 MB · Views: 2
  • 20261003_172550739_iOS.jpg
    3 MB · Views: 3
  • 20261003_200230902_iOS.jpg
    20261003_200230902_iOS.jpg
    2.1 MB · Views: 2
  • 20261007_211233221_iOS.jpg
    2.4 MB · Views: 3

66Holiday924

Chief Petty Officer
Thread starter
Joined
Aug 21, 2017
Messages
632
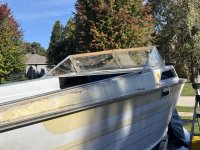
I purchased a windshield for the boat about two years ago. I wanted one of the old windshields with panes that flip up. I've fished on boats that have them and it makes such a big difference to be able to get that breeze through on a hot summer day.

It was one of those things that involved trolling marketplace and a fair amount of driving, but I found one up in Green Bay, WI and I'm just now getting to the point that it needs to be dry-fit.

Setting it on the boat I can see that it will be a perfect fit, but I will have to tailor some of my trim, and I will need to have a piece fabricated for it to fit properly.

This windshield is meant to be mounted to an arched surface; my boat's surface is flat. So, I will need to have some sort of bezel made for it. You can see what I'm talking about if you look at the pictures.
 

Attachments

  • 20261008_153904894_iOS.jpg
    20261008_153904894_iOS.jpg
    2.8 MB · Views: 5
  • 20261008_153913332_iOS.jpg
    2.5 MB · Views: 3
  • 20261008_153928547_iOS.jpg
    2.6 MB · Views: 3
  • 20261008_154909825_iOS.jpg
    2.9 MB · Views: 3
  • 20261008_172704438_iOS.jpg
    20261008_172704438_iOS.jpg
    2.4 MB · Views: 5

redneck joe

Supreme Mariner
Joined
Mar 18, 2009
Messages
16,766
can you drag the marketplace for some used teak? Not too hard to make wood work.
 

redneck joe

Supreme Mariner
Joined
Mar 18, 2009
Messages
16,766
oh and totally agree on getting wind when you want it.
Actually, I have a pile of teak... I might use it on some of the aesthetic details later.
Then just use some plastic washers for spacers and use the teak for the trim to hide? Like using quarter round when you put down a new floor.
 

66Holiday924

Chief Petty Officer
Thread starter
Joined
Aug 21, 2017
Messages
632
oh and totally agree on getting wind when you want it.

Then just use some plastic washers for spacers and use the teak for the trim to hide? Like using quarter round when you put down a new floor.
It's a valid option but I like the idea of having a piece fabricated. Teak is beautiful, but I'm not a fan of the maintenance that comes with it.

The fabricator is already working on the piece.
 

66Holiday924

Chief Petty Officer
Thread starter
Joined
Aug 21, 2017
Messages
632
Here are a few pictures of my windshield with the newly fabricated piece attached. This new piece is going to make installation simple, drill and install a few 1/4" bolts. I need to track down some glazing and replace.
 

Attachments

  • 20261112_150129307_iOS.jpg
    3 MB · Views: 7
  • 20261112_150133443_iOS.jpg
    2.9 MB · Views: 7
  • 20261112_150145253_iOS.jpg
    2.9 MB · Views: 8

66Holiday924

Chief Petty Officer
Thread starter
Joined
Aug 21, 2017
Messages
632
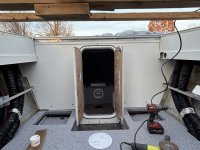
I've begun the process of installing my cabin bulkhead.

I cut it in half to get it in. Actually, I had to cut in half and then trimmed a little on one side to get it dry-fit.

The worry for this approach is getting the two sides to line up exactly the way they were, when the bulkhead was dry-fit, outside of the boat to trace the cabin door. In other words, you can see there is an inconsistent gap between the two halves when it is dry fit, installed the way it's going to fit in the boat. So, this inconsistent gap has to be recreated outside of the boat when I trace the cut-out for the door, which must be perfect. To do this, I used brackets.

I installed brackets down the centerline while the panels were dry-fit. Then I removed the brackets, removed the panels and reassembled it all outside the boat, with the brackets using the exact screw holes that they were installed with inside the boat, recreating the exact position of the panels as when they were dry-fit. Then I traced the door cut-out, cut the panels for the door, and reinstalled it all in the boat.

I door was ordered custom and it was not cheap... to say the least...

This is definitely not the finished bulkhead, but it feels like a serious milestone to have the beginnings of it in.

Also, I marked my flooring so it can be cut in two pieces, because I don't want it running continuously under the bulkhead. For this flooring I want it in two pieces, easy to change when it's junk.
 

Attachments

  • 20261118_192520106_iOS.jpg
    3 MB · Views: 1
  • 20261118_192821435_iOS.jpg
    2.8 MB · Views: 1
  • 20261118_194538689_iOS.jpg
    3 MB · Views: 1
  • 20261118_200626612_iOS.jpg
    3 MB · Views: 1
  • 20261118_201519112_iOS.jpg
    3 MB · Views: 1
  • 20261118_210611177_iOS.jpg
    2.9 MB · Views: 1
  • 20261118_214720247_iOS.jpg
    20261118_214720247_iOS.jpg
    3 MB · Views: 1
Last edited:
Top