1978 Islander 22 I/O

66Holiday924

Chief Petty Officer
Joined
Aug 21, 2017
Messages
584
The weather has been rainy, so it's been slow moving but I am making some progress.

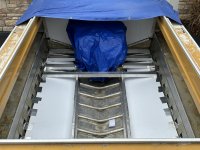
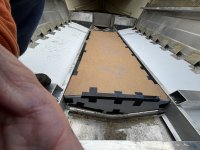
I decided that I am going to copy what I did with my Holiday for floatation. First, I span the ribs with corrugated polypropylene sheets. This creates a void for water to move freely, under the sheeting and what will be my foam. The flow allows for easy drainage and hopefully a dryer bilge. It also prevents my floatation foam from being constantly submerged and becoming rotted and waterlogged. After the corrugated sheeting is in, my next step is aluminum floor support framing.

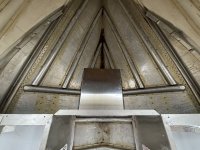
The aluminum floor framing will serve two purposes. One, provide ample support for my coosa decking (coosa is tough but flimsy) and two it will raise my floor 2". The framing I'm using is 2X3. I've been talking to a fabricator and raising the deck 2" is going to give me room for about a 40-gallon belly tank. Once the tank is installed, I can cut my coosa decking. I'm just going to dry fit everything for now. I'm going to have to wait until next Spring or Summer when the weather is right to install my pour-in floatation foam.

other than that I reinstalled my cabin bench framing. I added coosa panels to the bench supports. The coosa panels are what will be the bottom of the new bulkhead. I figure the by adding the coosa now it'll make building and installing the bulkhead easier later, plus that part of the bulkhead extends down into the bilge and having that part be coosa means it will not rot.

Check out the commercial drain grate I picked up. I plan on installing a washdown system and I want the boat to have some pretty serious drainage to handle hosing down the deck should we hook a bleeder.
 

Attachments

  • 20241118_185117330_iOS.jpg
    8.6 MB · Views: 5
  • 20241118_190252662_iOS.jpg
    5.7 MB · Views: 5
  • 20241118_190945476_iOS.jpg
    5.6 MB · Views: 4
  • 20241118_190954679_iOS.jpg
    20241118_190954679_iOS.jpg
    1.8 MB · Views: 6
  • 20241118_190959559_iOS.jpg
    20241118_190959559_iOS.jpg
    1.8 MB · Views: 6
  • 20241118_191014237_iOS.jpg
    20241118_191014237_iOS.jpg
    1.6 MB · Views: 6
  • 20241120_191538020_iOS.jpg
    7.5 MB · Views: 5
  • 20241120_213348282_iOS.jpg
    4.3 MB · Views: 5
  • 20241120_213413264_iOS.jpg
    4.4 MB · Views: 5

SHSU

Lieutenant Junior+Starmada Splash Of The Year 2019
Joined
Mar 8, 2017
Messages
1,741
Winter is always slow for progress. Like the grate. Going to have a catch pan under it in case you wash something you don't want down there?

SHSU
 

66Holiday924

Chief Petty Officer
Joined
Aug 21, 2017
Messages
584
Winter is always slow for progress. Like the grate. Going to have a catch pan under it in case you wash something you don't want down there?
Yeah, it's getting to the point that I'm going to have to shut it down for the winter pretty soon.

I'm not planning on putting anything under the grates, no pan, no floatation foam, nothing. It'll be open air to the bottom of the boat. The grates will be in-between two ribs, so should something fall in, that shouldn't it'll either be small enough to wash down and end up under the engine, or not and be stuck between the ribs, under the grate. I think the grating almost ensures that the object would be small enough that it would be something that rinses down into the bilge and ends up under the engine. I thought about having a pan or something under them. I don't think it's necessary. It would probably just be something to have fish slime accumulate on and stink. Pans are something that can always, easily be added later if I want.
 

66Holiday924

Chief Petty Officer
Joined
Aug 21, 2017
Messages
584
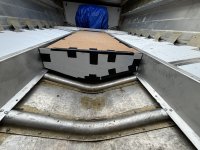
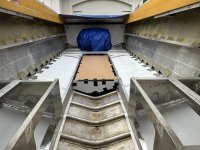
I got the rest of my corrugated polypropylene sheeting in. I used the HVAC tape to tape it down. I'm happy with the tape on applications like this. It adheres very well and being HVAC tape it has a huge temperature range.

The plates in front of the cabin are for my batteries, two batteries, each side. That'll be 150-300lbs to add to the front of the boat.

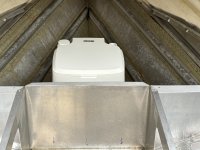
The plate in the cabin is for the port a potty.
 

Attachments

  • 20241122_211954510_iOS.jpg
    4.7 MB · Views: 7
  • 20241124_174616983_iOS.jpg
    4.2 MB · Views: 6
  • 20241124_174624508_iOS.jpg
    4.9 MB · Views: 8
  • 20241124_174733046_iOS.jpg
    20241124_174733046_iOS.jpg
    2.5 MB · Views: 5
  • 20241125_173808926_iOS.jpg
    5.2 MB · Views: 5
  • 20241125_173824898_iOS.jpg
    20241125_173824898_iOS.jpg
    2.6 MB · Views: 5

SHSU

Lieutenant Junior+Starmada Splash Of The Year 2019
Joined
Mar 8, 2017
Messages
1,741
I wish I had a portapotty. I just have the side... lol

SHSU
 

66Holiday924

Chief Petty Officer
Joined
Aug 21, 2017
Messages
584
I wish I had a portapotty. I just have the side... lol
I have daughters so it's a must for me. I totally plan to continue using a pee jug for men and asking them to please not take a $hit on my boat. This is probably a good moment for an FYI, public service announcement: Nobody wants you to take a $hit on their boat. Please avoid if you can.

In my search for a port-a-potty I found an attachment for pee jugs that allows women to use. How's that for a stocking stuffer!
 

SHSU

Lieutenant Junior+Starmada Splash Of The Year 2019
Joined
Mar 8, 2017
Messages
1,741
When my daughter comes fishing, she always has to go. So she gets dunked. When the water and temp are cold she doesn't have to use the bathroom and go over the side anymore. I think she likes to play in the water more then she does fishing... lol

SHSU
 

66Holiday924

Chief Petty Officer
Joined
Aug 21, 2017
Messages
584
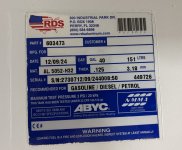
I was advised to make a mock-up of the custom fuel tank I have been discussing with the fabricator RDS, through Tank & Barrel. They are very responsive if you call them. They can build just about any tank you want too. My tank is a basic belly tank, but the dimensions change forward to aft due to the placement of the stringers. Up front it's taller and skinnier and in the back it's wider and shorter. My tank should fit in the void perfectly and it's about 40 gallons. I'm going to have the fabricator paint it with the anti-fouling paint too.

Something interesting I learned in this process is that they want the tank to be able to move slightly, about 1/4".

I also got my Port-a-Potty and dry fit it. It seems like this is going to be a good fit. I basically chose the highest rated port-a-potty on Amazon.
 

Attachments

  • 20241127_133107114_iOS.jpg
    5.2 MB · Views: 6
  • 20241127_140921261_iOS.jpg
    4.5 MB · Views: 5
  • 20241127_142318094_iOS.jpg
    4.3 MB · Views: 5
  • 20241127_150409161_iOS.jpg
    3.7 MB · Views: 5
  • 20241127_151025980_iOS.jpg
    20241127_151025980_iOS.jpg
    2.7 MB · Views: 5
  • 20241127_151056841_iOS.jpg
    20241127_151056841_iOS.jpg
    3.2 MB · Views: 5
  • 20241127_151136543_iOS.jpg
    20241127_151136543_iOS.jpg
    3 MB · Views: 5
  • 20241126_214612022_iOS.jpg
    4.9 MB · Views: 1
  • 20241127_171342196_iOS.jpg
    20241127_171342196_iOS.jpg
    2 MB · Views: 5
  • 20241127_171400340_iOS.jpg
    20241127_171400340_iOS.jpg
    1.8 MB · Views: 4

SHSU

Lieutenant Junior+Starmada Splash Of The Year 2019
Joined
Mar 8, 2017
Messages
1,741
Looks nice, couple questions:

Where is fill located and how you connecting it? Is the pipe going to be above the deck? How big?
How are you feeding gas out/vent: is it from top with pipe down or a tap at the bottom?
Do you have clearance for the fuel sender on top without running into the deck?
With 40 gallon tank are they going to put in a baffle or two?

Just some things that I ran into when I had to plan and get my tank built.

SHSU
 

66Holiday924

Chief Petty Officer
Joined
Aug 21, 2017
Messages
584
Where is fill located and how you connecting it? Is the pipe going to be above the deck? How big?
The fill will be 2" off of the front end of the tank and it will stick up a total of 2" off of the tank. I am raising my deck 2" to accommodate, so it and the fill hose can be run under the deck. It is going to be run as directly and almost exactly how the original tank hose was run, a 90 degree to the port side, run the hose under the decking, up behind my side panel, to the new fill fitting on the gunnel.
How are you feeding gas out/vent: is it from top with pipe down or a tap at the bottom?
The engine feed is 1.25" off of the back of the tank. It sticks up about 1.5", makes a 90 aft towards the engine. The vent is up forward on the tank 2" aft of the fill fitting. I haven't 100% decided where I'm going to run it to. I'm thinking next to my natural ventilation that I had plates cut for, on the lopsided side, but I want it to be symmetric with the other side, and the other side obviously won't need a fuel vent. Ironically, that part of the plate is covering the old fuel tank vent hole...
Do you have clearance for the fuel sender on top without running into the deck?
Yes, the fuel fill is by far the tallest fitting. The sender is the shortest.
With 40 gallon tank are they going to put in a baffle or two?
They designed it with two baffles.

I basically just figured out the dimensions. The fabricator makes thousands of boat fuel tanks per month for manufactures, and hundreds custom, like mine. I placed my fittings according to their recommendations. I never said a word about baffles, their engineering department did that, and they are shown on the drawing they gave me.

My dimensions allow for 1/2" void above the tank to the top of my stringers. Then I'm adding the 2" to that with the aluminum tubing. The fabricator says they can get the total height of the fittings down to 2". Then the law states that you must have access to the fittings. So, when I install my deck hatches for access that will give me some "headroom" too, probably about 1/2". it might be a little tight where I have to run my fuel fill line over my port stringer because the hose will be a little wider than 2". I might need to gouge out a little material from the underside of the decking or take a little out of the stringer. No problem, I'm planning on 3/4" coosa decking.

In my research, and confirmed by the builder, rubber is corrosive to aluminum, so I was advised against using it as chaffing on the bottom of the tank. Instead, neoprene strips were recommended.

Also, I will have to be wary of the fuel line when I install my seating on the port side.
 
Last edited:

SHSU

Lieutenant Junior+Starmada Splash Of The Year 2019
Joined
Mar 8, 2017
Messages
1,741
Awesome, so you thought about all of this already. Very cool. Excited to see how the tank comes out.

While common on you hull, that was one of the mods I made on my SS16 was to have a under deck tank manufactured. Very happy with how it turned out.

SHSU
 

66Holiday924

Chief Petty Officer
Joined
Aug 21, 2017
Messages
584
Well, two steps forward and one step back... The Islander is at a fabricator shop. I'm having a new piece of trim that goes across the top of the stern sheet made, mounts for my boat buckles added to the trailer, and new skin cut for the transom cap and gunnels.

Starcrafts from this era had an excessive number of large holes cut into the gunnels and transom cap to allow for natural ventilation vents. As I posted a couple months ago, I'm going to go with side vents. So, to clean up the gunnels and transom cap I'm simply going to go over top of what's there with new skin, purely for aesthetics, thin stuff.

Meanwhile, while my boat is in the shop, RDS has been working on my custom tank and that was delivered yesterday. I couldn't be happier with the fit! What a great company to work with too! I haven't had that level of customer service in a long time. They were very patient with me, explained questions thoroughly, offered their expert opinions and went out of their way to make sure it was going to work out for me.

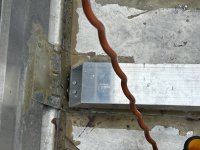
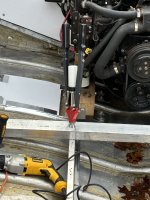
So, two steps forward, and like I said, one GIANT step backward. My teak engine mounts are starting to split... That's a pretty unforeseen, hard kick in the nuts. I guess, come Spring I'm going to have to pull the engine again, and rebuild them. This time, I'm going with the Marine-Grade Ply. I wanted the timbers because for my design I needed to screw into it from all sides. However, I ended up modifying the design to go through the sides with through bolts. So that's what I'm thinking right now, engine mounts to the face of laminated ply and through bolts with large plates sandwiching from the sides, to the brackets that they mount to the boat. I'm going to miss the durability of the teak. I'll have to seal the hell out of the ply mounts I build.
 

Attachments

  • 20241220_182608164_iOS.jpg
    4.7 MB · Views: 7
  • 20241220_180833038_iOS.jpg
    3.6 MB · Views: 8
  • 20241220_180923359_iOS.jpg
    4.3 MB · Views: 7
  • Fuel Tank.jpg
    Fuel Tank.jpg
    2.1 MB · Views: 3

SHSU

Lieutenant Junior+Starmada Splash Of The Year 2019
Joined
Mar 8, 2017
Messages
1,741
Tank looks really good. How you securing it to the stringers or you using the lifting eyes?

How bad is the splitting on the teak?

SHSU
 

Watermann

Starmada Splash of the Year 2014
Joined
Jan 12, 2013
Messages
13,794
Most times belly tanks are held down with rubber or neoprene padding, the tank should not be used to support the deck. My SS belly tank has hold downs on the sides and on each end.
UQTdIVqyAiaEIID8pgwAAAAAAPAgZcCmgh11cDI
 

66Holiday924

Chief Petty Officer
Joined
Aug 21, 2017
Messages
584
"Most times belly tanks are held down with rubber or neoprene padding, the tank should not be used to support the deck. My SS belly tank has hold downs on the sides and on each end."
UQTdIVqyAiaEIID8pgwAAAAAAPAgZcCmgh11cDI
Tank looks really good. How you securing it to the stringers or you using the lifting eyes?
What @Watermann said. It's not going to rigidly connect to the boat. RDS explained that they typically like the tank to be able to move a little bit, about .25" or so. So, it's going to be boxed in just like Watermann's picture. I'm going to put aluminum strips across the top of the stringers (just like Watermann has), and I have the aluminum that goes across the forward and aft faces of the tank. Neoprene strips are used as chaffing anywhere the tank makes contact with the boat. Apparently, there is something found in rubber that is extremely corrosive to aluminum, so neoprene is used.
How bad is the splitting on the teak?

SHSU
You can see it in one of the pictures I posted if you zoom in. Both timbers have cracking. What a PITA! I'm not trusting that. This is meant to be a Great Lakes boat. I don't even want to imagine what happens if I lose an engine mount on Lake Michigan...

Since I changed the lags that mount the stringer mount to the boat, to thru-bolts, I don't need timbers. I'm going to mount the engine down into the face of the layered ply then use thru-bolt with large plates on the sides. It's basically how they did it on these boats that had stringer mount 6-cylinders. I'll still have the coosa on the bottom of my stringer mounts. The top will be ply. I'll have to seal the hell out of them. I might have a c bracket made to bend over top of them, and wrap down the sides. then caulk it with 4200 or something. They ply will work.
 
Last edited:

SHSU

Lieutenant Junior+Starmada Splash Of The Year 2019
Joined
Mar 8, 2017
Messages
1,741
Gotcha, I had hard points installed on mine and secured direct to stringers.

Looked back on the pictures but didn't see any splitting. I agree though about not wanting anything to happen when out on the Great Lakes. I would love to have a boat big enough to take off shore.

SHSU
 
Top