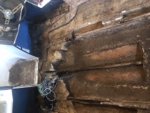
1978 Ebbtide trihull restoration

caseywitherow

Seaman Apprentice
Joined
Aug 28, 2020
Messages
35
Hello iboat community!

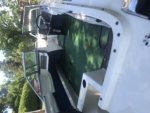
I recently purchased a 1978 Ebbtide from Facebook Marketplace that I knew would need some work based off of the pictures, but I figured why the hell not. I picked it up with a 115hp Mercury and a trailer all over f which were titled, which is s HUGE in Ohio since you can’t register power boats without a title.

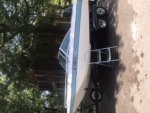
I have never worked on a boat before, but have experience with restoring cars, so I figured this boat restoration thing would be something new. Reading through some of these posts have been very encouraging. And so begins my journey into my first boat restoration. I plan on keeping up with this and would love advice along the way. Here is a before pic, and I’ll load more when I figure out how to do so. I keep getting an error.
 

Attachments

  • photo338798.jpg
    photo338798.jpg
    908.5 KB · Views: 14

tpenfield

Moderator
Staff member
Joined
Jul 18, 2011
Messages
18,040
:welcome: to iBoats . . .

Reduce the size of pictures down to 1024 x 768 (or less) for upload & posting.

First things to do with the boat is get all of the junk, debris, dirt off and out of it so you can see what you are dealing with. In all likelihood, the structure of the boat (stringers, bulkheads, transom, floor, etc.) are rotted. So, you may end up in the 'cut & gut' crowd.
 

caseywitherow

Seaman Apprentice
Joined
Aug 28, 2020
Messages
35
She’s cute on the outside....but beauty is only skin deep. She’s a total guy and re-do. I had a very productive weekend this weekend. We got the motor pulled and mounted on a cart we had built. The rub rail, windshield and ladder all removed.

Next up is to build supports for the hull and then cap removal. I’ll post progress pics as they come along.

Thanks tpenfield on the resizing tips!
 

Attachments

  • photo338884.jpg
    photo338884.jpg
    26.6 KB · Views: 16
  • photo338885.jpg
    photo338885.jpg
    29.3 KB · Views: 16
  • photo338886.jpg
    photo338886.jpg
    30.1 KB · Views: 15

gm280

Supreme Mariner
Joined
Jun 26, 2011
Messages
14,604
Here is my 2 cents worth.

Before doing anything else, take tons of pictures from every angle you can possibly think of. Top, bottom, sides, transom, bow, inside and any other side you can think of. Then, and this is even more important then you may ever think, take measurements from the transom to the bow along a center line about every foot or so and plot that on a sketch type program for future needs.

I realize that sounds odd, but once you remove the "CAP" the sides will splay out! And unless you have all those measurement, the "CAP" will never ever fit back on again. So those measurement are the sizes you have to keep the sides at while refurbishing the stringers, bulkheads, and transom and everything else. It is that important. The hull has to be totally supported to recap in the future!

You will be amazed how many times you will refer to the pictures and the measurements.

Next, and this too is very important, buy the proper PPE to protect yourself as you work on a fiberglass boat. Most on these boat forum re-builders use a Tyvek full suit with gloves and a good quality 3M type respirator that uses replaceable filters and even ear protection too. And of course safety goggles/glasses. Fiberglass dust gets into everything, and I do mean everything. It is the most pervasive dust you will ever work around. So you have to protect any exposed body parts at all cost. You will thanks us later on that one!

If you still want to do this, the proper grinding/sanding type equipment is the next area to cover. Just let us know... And also welcome aboard too...
 

caseywitherow

Seaman Apprentice
Joined
Aug 28, 2020
Messages
35
Thanks for the forewarning gm280 about taking tons of pictures and measurements. I had read that the hull needs to be supported before taking the cap off, but didn’t think about marking down measurements and recording them. The devil is truly in the details! When taking the measurements youre saying measure from the center line to the side every foot, correct? Or do I need to be measuring from bow to stern? Do I measure to the edge of the cap? Do you have an example of a set of measurements from a past project you’ve done that you wouldn’t mind sharing?

My plan is to cradle the hull similar to what I saw on a Glastron rebuild vlog. He supported his with 2x6’s and ran vertical “fingers” about every 18”. I attached a pic of what I’m planning on doing. Good idea, or is there a better approach?

I bought a Tyvek suit and a 3M 6502ql respirator with P100 combo filters. The Tyvek suit is a disposable type, so I’m not sure how durable it will be. I didn’t have $150 in my budget this month to get the heavy duty kind, but if it doesn’t hold up I’ll upgrade for sure.

I really appreciate your time giving me advice. This is a whole family project, with my 10 YO son getting deeply involved, safely of course. Dad will be doing all of the dusty grinding.
 

Attachments

  • photo338904.jpg
    photo338904.jpg
    19 KB · Views: 5

gm280

Supreme Mariner
Joined
Jun 26, 2011
Messages
14,604
In your picture, if you don't have any trailer work to do, then you can use your trailer as the cradle. Most boaters usually have trailer work also and they make a separate cradle to hold the side in position. So you have to decide about that. But that is the right idea.

As for measurements, the reason I stated measuring from a center line was because some times the sides are not symmetrical from the center and therefore you will have different measurements from the center to either side. And yes I went from the transom towards the front and measured every foot along. Really doesn't take very long to do that. But well worth it to make sure the sides stay in place so the cap will fit on again. When you measure, if the cap is still on, you can either measure to the edge of the cap, or just to the inside of the hull side below the cap. Which ever is the easiest to do.

Yeah those tyvek disposable suits are the usual type everyone uses. I wouldn't buy anything most expensive...unless you just want that type. It will get ragged looking, but all you are trying to do is cover against the fiberglass dust. And it will get hot grinding the hull...

Post your progress and we will guide you through your project...
 

GSPLures

Chief Petty Officer
Joined
Sep 3, 2019
Messages
564
I really appreciate your time giving me advice. This is a whole family project, with my 10 YO son getting deeply involved, safely of course. Dad will be doing all of the dusty grinding.

I'm glad to see your doing the restoration with your son. I am restoring my boat with my 7yo. He is getting very impatient because I wont let him help with the grinding and fiberglass either but he is more excited about the progress than I am.
 

caseywitherow

Seaman Apprentice
Joined
Aug 28, 2020
Messages
35
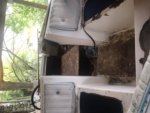
I haven’t had much time to work on the boa the past couple of weeks but I took measurements as gm280 had mentioned above, but we may need to do it again to confirm. I had my son helping me, and am not feeling 100% that we didn’t bump our center string at some point along the way. I used my oscillating tool for the first time this week. That thing is COOL! I found that the area where the motor mounts is heavily epoxied to the transom, so I have started to carefully cut between the transom and motor mount well (if that’s what it’s called?) I goofed up ind cut through a corner of the motor mount well that I’ll need to patch (oops!).

Are there any tricks to getting the hull to separate the cap along the transom? Every other place seems completely free but the back end.
 

Attachments

  • photo339673.jpg
    photo339673.jpg
    26.4 KB · Views: 9
  • photo339674.jpg
    photo339674.jpg
    28.9 KB · Views: 9

Baylinerchuck

Commander
Joined
Jul 29, 2016
Messages
2,726
I keep my resolution in photos 1600 x 1200. This will increase the size and keep the pics from being so grainy and pixelated.

The problem getting the cap separated could be from where the splash well connects to the hull.
 

caseywitherow

Seaman Apprentice
Joined
Aug 28, 2020
Messages
35
Thanks for the advice about the resolution Baylinerchuck. Any advice on the best way to get in between the splash well and the hull? Are they typically attached completely together or are they usually just tabbed in? The transom is completely rotted out so I was hoping to trim the inner transom fiberglass skin around the splash well to separate it, but it’s fighting me a bit.
 

Baylinerchuck

Commander
Joined
Jul 29, 2016
Messages
2,726
I’m sorry, I don’t know what to tell you there. I did not need to de-cap either of my boats when I restored them. If you can post a few more pictures you might get some additional ideas from others as they chime in. It would be helpful to see that area.
 

kcassells

Fleet Admiral
Joined
Oct 16, 2012
Messages
8,720
Put up a few pics of the area, close and a little away for perspective.
 

caseywitherow

Seaman Apprentice
Joined
Aug 28, 2020
Messages
35
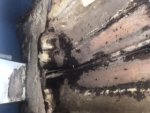
Here is the underside of the splash well where it attaches to the transom. I haven’t had much time to work on it the last few weeks, but the next big step is getting this thing separated. The staff lash well/ transom area is giving me the fits. I’ve trimmed all around the underside of the splash well where it meets the transom and up top by where the outboard mounts. Is it possible that the transom and splash well are completely epoxied together? Do I need to just keep pecking away at it? I accidentally cut through the splash well with a bit of overzealous cutting, and don’t want to do it again.

Also, once separated what is the best method to lift the cap. I was planning on sliding 2x4’s between the cap and hull and lifting those. I just don’t want to crack the thing.
 

Attachments

  • photo339937.jpg
    photo339937.jpg
    1.1 MB · Views: 4

Baylinerchuck

Commander
Joined
Jul 29, 2016
Messages
2,726
Yes, you have the right method to lift the cap. Whatever lumber you use, just make sure it stays as straight as possible.

it has to be bonded back there somewhere. Like you said, keep pecking away at it. It’s hard to arm chair quarterback when we can’t really crawl in there with you.
 

CreekRiver

Recruit
Joined
Sep 15, 2020
Messages
1
Hey guys I want to chime in here and ask if it’s possible that the whole night harbor water and for some reason retain water rather than draining out of the bilge pump or the drain at the stern? I’m looking at purchasing a refurbishment project which is a 78 Mark Twain but it has water in the hull from a recent hurricane. Any advice on how I can remove that water?
 

caseywitherow

Seaman Apprentice
Joined
Aug 28, 2020
Messages
35
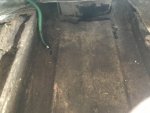
I’ll keep pecking away at it and keep you posted on progress. One thing that has continued to baffle me is the design of the bulge box and the center hull area. The floor was replaced by the previous owner and they did a total hack job. The center stringer was replaced with unglassed wood and SCREWED IN to place to a piece of wood that was glued to this area. I’m trying to figure out if the original design of the hull included the flat section you see here or if this was part of the hack job. The picture was taken at the bow pointing towards the bilge box.

The bulge box has three holes in the bottom of it which I assume are for drainage, but I can’t find any information as to where the foam would have stopped or if there is supposed to be Glassed wood that keeps this area separate From the foam. With this thing being hacked away at in the past, I can’t figure out what’s legit and what’s part of the hack? I tried contacting Ebbtide, but no such luck.

I know nothing about boat hull design so if this is a stupid question I apologize. Just trying to learn as much as I can as a go so I don’t make any major mistakes when rebuilding.
 

Attachments

  • photo339941.jpg
    photo339941.jpg
    80.5 KB · Views: 7

gm280

Supreme Mariner
Joined
Jun 26, 2011
Messages
14,604
There is no "stupid" question when working on a rotted boat, especially if you've never done such refurbishing before. So ask your questions. We will do our best to answer them... No .need to apologize for your questions. Everyone had to start somewhere.

If it is any consolation, EVERY fiberglass boat that has rotted wood, looks the same when you start gutting them out. You get to see just how the manufacturer built their boats and most of the time, that isn't pretty or very well built. But as you gut out all the rot and start grinding the old fiberglass out, you will see how your boat will be rebuilt tons better then the original builders did.

So remove all the rot and post those pictures and we will guide you to get this back into the water better then it ever was...
 

Baylinerchuck

Commander
Joined
Jul 29, 2016
Messages
2,726
Keep taking tons of photos as you remove the wood. You’ll want to remove it all, but document what you removed, and if you can save pieces, you’ll have patterns to put back what was taken out.

I can’t really make heads or tails out of your photo. It looks to me like that piece of plywood is factory to flatten out the area above the center of the hull. Many boats have this in storage areas like ski lockers, anchor storage, etc. My boat had this in the area of the fuel tank to support the tank.
 

caseywitherow

Seaman Apprentice
Joined
Aug 28, 2020
Messages
35
That makes sense on the plywood there for storage. The floor I ripped out was a replacement floor that the wood was completely rotted away and the fiberglass skin was all that remained. Walking on it was like walking on a giant inflatable funhouse. I’m just wondering how I should build it back, do a run the stringer over top of it or maybe build it back exactly as it was intended. That’ll be later down the road though.

I’m going to celebrate a small victory. I was able to get the cap and hull detached, finally! The next big task will be lifting it off. I’m doing the work under my second story deck so I plan on taking advantage of that and running straps up through my deck and lifting it from above. The straps will be connected to a basic wooden frame under the cap to keep it as straight and level as possible.

It’s beer:30!
 

gm280

Supreme Mariner
Joined
Jun 26, 2011
Messages
14,604
STOP!!!! Before removing the "cap", you need to take tons of pictures and measurements across the boat hull so that when you finish repairing the rot, the cap will fit back on. And the only way to do that is measure the beam of the hull from the transom to the bow about ever foot or so, and plot that on paper or computer program. It is that important. Otherwise anything you do to the hull with the cap off can splay out the sides and the cap will never ever fit back on again. A lot of boaters make side supports before de-capping the top just for that very reason. JMHO
 
Top