


Sea Star Streaker
Cadet
- Joined
- Sep 4, 2020
- Messages
- 17
Hello iBoaters,
Long time reader, first time poster. The purpose of this post is to show and inform on the restoration of a 1977 sea star streaker.
I have owned the boat for about two years. I had bought it in poor condition for a couple hundred dollars and felt I had already got my money’s worth and that it was not worth a restoration since the floor was very rotten and the transom was also completely rotten.
I changed my mind and decided to restore it after reading the following post on another sea star restoration: https://forums.iboats.com/forum/boat...eastar-rebuild
After finding out that my boat most likely had hollow strings with the exception of one, I decided that it may be worth the restoration.
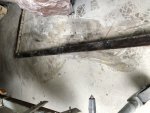
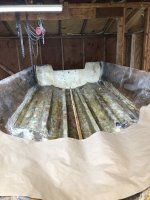
After removing the floor, which was easy since it was so rotten, I discovered that my boat does have hollow stringers! With the exception of the keel stringer that has a wood core. The hollow strings only have a small wooden strip (that will need to be replaced) at the top.
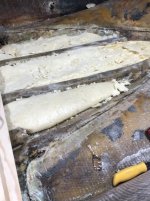
However, the good news ends their. There are some major cracks in the hollow stringers along with some holes (see pictures). My plan is to grind /sand down the bad spots and put two layers of woven roving over the bad spots, maybe even the whole stringers? I am undecided as of now.
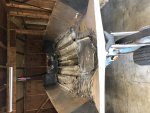
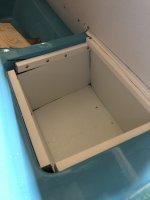
It was also discovered that the floor forward of the console was rotted out, along with all the flotation foam being completely water logged. In order to put new foam in and completely replace the floor I will have to de-cap the boat since the deck is covering that part of the floor. I understand I will have to support the hull since it will not have a cap, or floor for support.
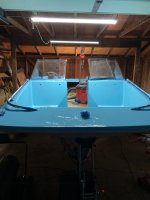
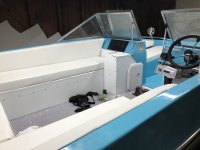
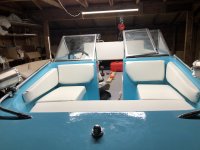
Feel free to look at the pictures below of what the boat looked like before and where I am currently at. Also, feel free to add any question, concerns or, opinions!
Thanks for reading!
Long time reader, first time poster. The purpose of this post is to show and inform on the restoration of a 1977 sea star streaker.
I have owned the boat for about two years. I had bought it in poor condition for a couple hundred dollars and felt I had already got my money’s worth and that it was not worth a restoration since the floor was very rotten and the transom was also completely rotten.
I changed my mind and decided to restore it after reading the following post on another sea star restoration: https://forums.iboats.com/forum/boat...eastar-rebuild
After finding out that my boat most likely had hollow strings with the exception of one, I decided that it may be worth the restoration.
After removing the floor, which was easy since it was so rotten, I discovered that my boat does have hollow stringers! With the exception of the keel stringer that has a wood core. The hollow strings only have a small wooden strip (that will need to be replaced) at the top.
However, the good news ends their. There are some major cracks in the hollow stringers along with some holes (see pictures). My plan is to grind /sand down the bad spots and put two layers of woven roving over the bad spots, maybe even the whole stringers? I am undecided as of now.
It was also discovered that the floor forward of the console was rotted out, along with all the flotation foam being completely water logged. In order to put new foam in and completely replace the floor I will have to de-cap the boat since the deck is covering that part of the floor. I understand I will have to support the hull since it will not have a cap, or floor for support.
Feel free to look at the pictures below of what the boat looked like before and where I am currently at. Also, feel free to add any question, concerns or, opinions!
Thanks for reading!
Attachments
-
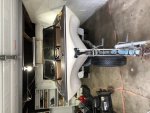 photo339236.jpg285.5 KB · Views: 15
 -
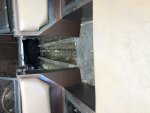 photo339238.jpg272.2 KB · Views: 14
 -
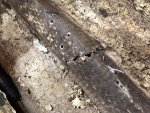 photo339240.jpg481.5 KB · Views: 12
 -
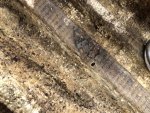 photo339241.jpg463 KB · Views: 12
 -
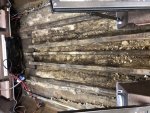 photo339242.jpg498.5 KB · Views: 12
 -
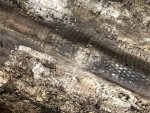 photo339243.jpg536.1 KB · Views: 12
 -
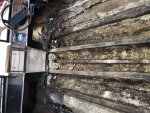 photo339244.jpg501.5 KB · Views: 12
 -
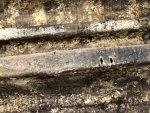 photo339245.jpg479.5 KB · Views: 12
 -
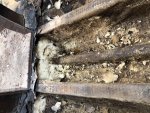 photo339246.jpg495.9 KB · Views: 14


.jpeg")
.jpeg")
.jpeg")
