1976 4hp Johnson 4R76M Lower Piston Seized.

cprodave

Petty Officer 1st Class
Joined
Jul 1, 2012
Messages
301
No Title

racerone, thanks a lot, the impact driver worked on the 3 screws on Support 0303278.

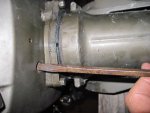
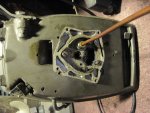
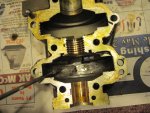
Now I am a bit unsure how to remove/lift the Powerhead from the driveshaft. At the rear underside of the Motor Cover I(see photo) removed 2 screws 0310277 (again an impact driver was necessary) but the powerhead will not lift off. Is this because of gasket adhesive applied to Powerhead Gasket 0314850? If so, what is best way to remove/break the gasket? If gasket/adhesive is not the problem, what am I overlooking? Thanks again for help...
 

Attachments

  • photo264657.JPG
    photo264657.JPG
    95.6 KB · Views: 0

F_R

Supreme Mariner
Joined
Jul 7, 2006
Messages
28,226
You have to remove it at the 4 bolts holding the lower pan to the swivel tube.
 

cprodave

Petty Officer 1st Class
Joined
Jul 1, 2012
Messages
301
No Title

F_R, thanks--I removed the 4 bolts holding the lower pan to the swivel tube. Although this didn't free-up the powerhead, I saw 4 additional screws that looked promising. So I removed them (with impact driver again) and this freed-up what I would call an exhaust tube- (this part is #8 in iBoats diagram for Exhaust Housing, although the part is not listed by p/n). But the powerhead is still fastened to the lower pan. I put the screws back into the lower pan (so I wouldn't mix/lose them) and took the attached photo.

What is next step?
 

Attachments

  • photo264735.JPG
    photo264735.JPG
    131.4 KB · Views: 0

jakedaawg

Rear Admiral
Joined
Jun 26, 2012
Messages
4,275
Has the lower been removed yet? I see cap screws in post #21 photo that I believe need to come out.

Disclaimer: I only work on stuff that 1985 and later so take with a grain, or several, of salt. I am just bored.
 

cprodave

Petty Officer 1st Class
Joined
Jul 1, 2012
Messages
301
No Title

Jakedaawg, thanks for input, yes the lower had been removed. However I took a second look at things today and "by jiggling" the powerhead did come loose from the Lower Cover (pan).. .see photo. So I made a lot of progress on disassembly. Now I am ready to "split" the 2 halves of the Crankcase (part #1 in the Cylinder & Crankcase diagram on iBoats website). I have loosened the 5 screws that hold the 2 halves together.

Questions: 1) there lis a Pin (#8 in the diagram) in addition to the 5 screws--see photo with screwdriver pointing to the Pin. Should this Pin be tapped out of position before (or after) removing the 5 screws, or should the Pin be left in-place? or does it not matter? If to be tapped-out, can it be tapped-out either direction? The Pin doesn't appear to be tapered.

2) Any other tips before I separate the 2 halves of crankcase? I am unsure if I should try to salvage this gasket. Powerhead Gasket Sets (around 8 gaskets in the Set) seem to be Out Of Stock everywhere, and cost of individual gaskets really "Adds up" if I need more than 1 or 2 Gaskets. . Also I understand that there are around 22 Needle Bearings that I will have to put back in-place...

Thanks again for ongoing advise.
 

Attachments

  • photo264783.JPG
    photo264783.JPG
    136.1 KB · Views: 0

gm280

Supreme Mariner
Joined
Jun 26, 2011
Messages
14,605
Jakedaawg, thanks for input, yes the lower had been removed. However I took a second look at things today and "by jiggling" the powerhead did come loose from the Lower Cover (pan).. .see photo. So I made a lot of progress on disassembly. Now I am ready to "split" the 2 halves of the Crankcase (part #1 in the Cylinder & Crankcase diagram on iBoats website). I have loosened the 5 screws that hold the 2 halves together.

Questions: 1) there lis a Pin (#8 in the diagram) in addition to the 5 screws--see photo with screwdriver pointing to the Pin. Should this Pin be tapped out of position before (or after) removing the 5 screws, or should the Pin be left in-place? or does it not matter? If to be tapped-out, can it be tapped-out either direction? The Pin doesn't appear to be tapered.

2) Any other tips before I separate the 2 halves of crankcase? I am unsure if I should try to salvage this gasket. Powerhead Gasket Sets (around 8 gaskets in the Set) seem to be Out Of Stock everywhere, and cost of individual gaskets really "Adds up" if I need more than 1 or 2 Gaskets. . Also I understand that there are around 22 Needle Bearings that I will have to put back in-place...

Thanks again for ongoing advise.

cprodave, those "pins" are tapered pins to help align the two halves back together again. You will probably have to tap them out from the smaller end if you can get to them before the case will split apart. I had to do that myself with mine. Take a small punch and tap them out. They shouldn't be that hard to tap out. But don't loose them because you will need then to reassembly again.

Also, when you do get the case split, make sure you mark things so they go back to their original places, bearing especially. A little time doing that now will save you a lot of headaches later on. Pictures along the way helps as well. You can never have too many pictures. I was amazed how many times I reverted to pictures when I was reassembling my engine. JMHO
 

cprodave

Petty Officer 1st Class
Joined
Jul 1, 2012
Messages
301
GM280, thanks for the input --I will do as you advise and keep the forum updated on progress. I agree about taking a lot of pictures--I have taken around 15 thus far so I can back-up in reverse order on Reassembly (assuming damage from Broken Rod isn't too severe).
 

racerone

Supreme Mariner
Joined
Dec 28, 2013
Messages
39,281
It is best to remove the reed plate FIRST !!---There are more screws in there.
 

cprodave

Petty Officer 1st Class
Joined
Jul 1, 2012
Messages
301
No Title

recerone, yes I took off the Reed Plate next and was able to complete the disassembly and conclude the problem is a broken Rod. (see picture). Good news is that the cylinder and piston have no damage whatsoever. Bad news is that the rod went through part of the Crankcase (see other picture). Am I correct in assuming that I need a new crankcase/Cylinder Block too? Please advise. Thanks
 

Attachments

  • photo264877.JPG
    photo264877.JPG
    102.8 KB · Views: 0
  • photo264878.JPG
    photo264878.JPG
    142.6 KB · Views: 0

gm280

Supreme Mariner
Joined
Jun 26, 2011
Messages
14,605
recerone, yes I took off the Reed Plate next and was able to complete the disassembly and conclude the problem is a broken Rod. (see picture). Good news is that the cylinder and piston have no damage whatsoever. Bad news is that the rod went through part of the Crankcase (see other picture). Am I correct in assuming that I need a new crankcase/Cylinder Block too? Please advise. Thanks

May not be feasible to rebuilt it now, unless you have contacts for all the parts. :noidea:
 

cprodave

Petty Officer 1st Class
Joined
Jul 1, 2012
Messages
301
Pretty sure I can get all the parts (ConnectingRod, Cylinder/Crankcase and a Diaphram--unsure of this part's name) for around $125. So for $325 (the $200 I originally paid plus $125 to repair) I will have a working motor. Alternative it to part-out to try to recover my $200 (this would take a while).

Biggest question I have is--why did the rod break in the first place? Would be good to know this so that after I rebuild the motor it doesn't break a rod again.

Any inputs on this question?

Thanks
 

cprodave

Petty Officer 1st Class
Joined
Jul 1, 2012
Messages
301
Hi All, I have located some parts at reasonable cost, although the CylinderBlock/Crankcase I have found might need machined in order to address some scoring on walls of 1 cylinder. Meanwhile my original Cylinder Block is undamanged on the Cylinders half, but damaged on the Lower Crankcase Half.

Is it possible to "mix and match", i.e. use my original CylinderBlock half combined with the to-be-purchased Lower Crankcase half? This would save me the time/expense of getting the to-be-purchased CylinderBlock machined.
 
Top