1973 starcraft ss restore in progress

crankbait cowboy

Chief Petty Officer
Joined
Mar 25, 2013
Messages
574
No Title

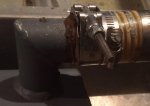
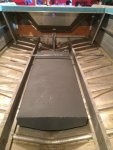
well its been far to long away from the project , and to long a story to explain, but the good news is I am starting to get back at it. for starters I got a couple questions for you fellow tin men. my next phase I believe is to get the fuel cell mounted and I have 2 questions to pose. pic 1 is the nipple for fill hose and am wondering if that tight 90 degree elbow is going to give me filling problems ( glugging or slow ) the tank does have an air vent and I have been told may be a problem and others have said no problem. my 2nd question and second pic is what you all think of my proposed location. I think I need the fittings back by splashwell as they will be higher than the deck, but am wondering about weight , ( motor , 2 people in rear possibly and batteries ) thoughts and suggestions greatly appreciated
 

Attachments

  • photo250288.jpg
    photo250288.jpg
    86.5 KB · Views: 2
  • photo250289.jpg
    photo250289.jpg
    178.8 KB · Views: 2

crankbait cowboy

Chief Petty Officer
Joined
Mar 25, 2013
Messages
574
plan is to get tank where I want it , then move on to floatation under deck
 
Last edited:

GA_Boater

Honorary Moderator Emeritus
Joined
May 24, 2011
Messages
49,038
Hey CC - Good to see you are still working on her.

How many gallons is the tank? Gas weighs about 7 lbs. per gallon.

The elbow might mean you can't run a nozzle wide open, but it should be OK at a lesser fill rate.
 

crankbait cowboy

Chief Petty Officer
Joined
Mar 25, 2013
Messages
574
30 gl ,and hoping since it extends 5 ft forward will be enough to keep all the weight out of the far rearend I gotta assume these tinnys are awfully light in the front, outside of an anchor its really tough to add much weight up there
 

Watermann

Starmada Splash of the Year 2014
Joined
Jan 12, 2013
Messages
13,787
The only possible problem I can see with the filler and being in the rear is when you fill the tank up on the trailer the tank will be full and when the boat sits on the the water with a stern heavy angle gas will move up into the vent and filler blocking the vent or spilling out. How much higher are the fittings than the top of the deck supports? What I was thinking is if you could put the fittings forward enough to where they would be under the front open bow area where you could raise the deck up there above the fittings.
 

GA_Boater

Honorary Moderator Emeritus
Joined
May 24, 2011
Messages
49,038
Flipping and moving the tank forward could do it, like WM says. The other thing is to move the batteries forward to off set the weight. Really though 210# + tank weight shouldn't cause that much of a problem since it is spread out over 5 feet.

On a long, shallow tank, the vent tube should be a long one that runs from front to back. It shouldn't allow gas to come out of the vent.
 

oldhaven

Chief Petty Officer
Joined
Aug 30, 2015
Messages
576
.

On a long, shallow tank, the vent tube should be a long one that runs from front to back. It shouldn't allow gas to come out of the vent.

When running a vent line don't allow any dips that can collect fuel and block the vent. This can cause the tank to burp fuel out the filler in sudden gush. Any fuel in the vent should drain back into the tank, Don't ask how I know this, but I had to throw away some clothes because of the gasoline smell.
 

crankbait cowboy

Chief Petty Officer
Joined
Mar 25, 2013
Messages
574
All good input guys and much appreciated, have given thought to moving it forward, but if I flipped it around , my engine feed line would be in front and concerned about starving engine of fuel when front end up , don't I need my pickup in rear of tank? A 1/2 full tank and front end up makes me think no fuel at pickup.
 

Watermann

Starmada Splash of the Year 2014
Joined
Jan 12, 2013
Messages
13,787
It could have a problem grabbing the last 2 or 3 gallons but in a 30 gallon tank that's only about 10% of the capacity so the gauge would be sniffing E by then.
 

crankbait cowboy

Chief Petty Officer
Joined
Mar 25, 2013
Messages
574
No Title

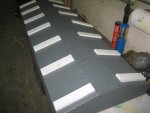
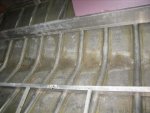
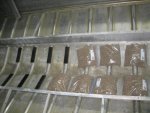
far to long away from my own project, but looking into others on here has got me ready to get going again. I am starting to work on installing the below deck belly tank, and looking for any thoughts as to my process from the mob, that has gone before me. plan is to 5200 the white plastic strips to tank ( butter em up real good, and have no cracks or crevises to hold moisture)after touching up with self etch primer ( a few scratches and such ) and those white plastic pieces ( actually 1/4 inch boards from hockey rink) line up with the ribs in pic 2 that will have 3/8 inch thick neoprene adhesive to ribs. the neoprene I landed on by following other here, and the plastic I am looking to get tank a bit farther off ribs and should get real good airflow. sound like a decent plan or am I doing something I shouldn't be? thanks
 

Attachments

  • photo258264.jpg
    photo258264.jpg
    91.6 KB · Views: 0
  • photo258265.jpg
    photo258265.jpg
    100 KB · Views: 0

Watermann

Starmada Splash of the Year 2014
Joined
Jan 12, 2013
Messages
13,787
The only thing about plastic pieces is they would worry me about staying in place, being another thing to fail or worry about is just in my nature I guess. The neoprene would insulate the tank from vibration and abrasion just fine as that's what the tank manufacturers supply to the boat makers for their tanks. I also used neoprene on the tank hold downs on top which is another thing to consider with the added height of he plastic.
 

crankbait cowboy

Chief Petty Officer
Joined
Mar 25, 2013
Messages
574
Good points h20, and that's why I am throwing it out there before I get after it, I got room on top for the extra plastic , and plan was to use neoprene on for and aft supports ( to keep from moving ahead or back and also on top as you suggest , got me thinking is the plastic over kill and a problem if let's loose? I am hearing what your saying, my thought was I got room ( height wise) why not raise it up for air flow and since I am in rear get it away from potential moisture.
 

GA_Boater

Honorary Moderator Emeritus
Joined
May 24, 2011
Messages
49,038
Welcome back and hope you had a good Birthday, CC.

How thick are the pads? You might be able to poke a countersunk hole near the ends and pop rivet them to the ribs. That will stop them from moving around.
 

crankbait cowboy

Chief Petty Officer
Joined
Mar 25, 2013
Messages
574
White pads to ribs ( riveted with countersink) then neoprene to pads ( adhesive) then tank onto neoprene . That's another idea I like , and I am so undecided, so sure appreciate any and all input. So far I got.
Just neoprene ( no plastic pads)
and plastic riveted to ribs then rubber then tank
Can I get a consensus, or other possibilities from ya all?🤠🤠
 

crankbait cowboy

Chief Petty Officer
Joined
Mar 25, 2013
Messages
574
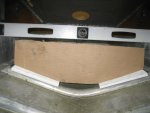
well, gotta thank you guys for getting the wheels turning and possibly saving me some headache down the road. I liked boaters idea, so went out and mocked it up, realize there is no 3/8 neoprene at bottom or top yet ( just ordered it) . after doing so I measured gap between cardboard tank mockup and my level across stringers . I come up with about 1/2 inch ( as cardboard is not straight cut) long story short , 2 pieces of 3/8 neoprene is gonna be to tight for deck to fit correct, which brings me to h20 suggesting just that, and making me double check what I thought was plenty of room. plan now is neoprene directly on ribs ( no plastic strips) and also all four sides and top hold down. what do you fellas think? IMG_0542.JPG
 
Last edited:

crankbait cowboy

Chief Petty Officer
Joined
Mar 25, 2013
Messages
574
No Title

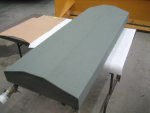
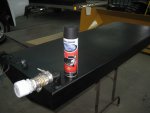
also sprayed tank with some rustoleum self etch primer, then 2 coats of rustoleum truck bed liner for some added protection. a note on the bed liner , my first can would not work at all ( just sprayed air) took it back and second needed to be held upside down to work , which aint as easy as it sounds . but I got it covered with some extra drips and runs ( but as my buddy says " it aint a piano" ) and protection not beauty was what I was looking for, now I must wait for my adhesive and neoprene to move on
 

Attachments

  • photo258309.jpg
    photo258309.jpg
    63.8 KB · Views: 0
  • photo258310.jpg
    photo258310.jpg
    89.1 KB · Views: 0

Watermann

Starmada Splash of the Year 2014
Joined
Jan 12, 2013
Messages
13,787
I think it's a good idea and you have to allow for some tank expansion but no more wiggle room than is necessary, in other words it can't be super tight or too loose Then the deck will have some downward give when walked on and the tank can't ever be in contact with the decking. I'm thinking your filler and vent are not going to be below deck so you won't have that set of issues to deal with. Just a couple things to think about I didn't see discussed yet. I used the 3/8" neoprene on my Chief's ribs too but the SS had the flat tank with a whole bunch of room for thinner 1/4" neoprene and every fraction of an inch helped me out on that tank set up.

I used that rusto bed liner on my trailer steps, it should work out for you just fine. The tank I ordered from Moeller was coated in a thick tough coal tar epoxy.

For got to ask if you pressure tested the tank? I can't remember if you did.
 

crankbait cowboy

Chief Petty Officer
Joined
Mar 25, 2013
Messages
574
I am with ya h20, I also was concerned with too tight a fit to deck, ( being told need some room for expansion ) you are correct , my fittings will be under splashwell as they are too tall to fit under decking , and I am planning 3/8 neoprene on ribs , and plenty of room on sides for it and of course ends I will determine where, so room there also , and thinking can go down to 1/4 on top if needed. sound like I am on right track?
yes , I have pressure tested tank earlier, first time it did not hold air and I found the seal around sending unit leaking air so resealed that and retested, and held 3 psi for days
 
Last edited:

crankbait cowboy

Chief Petty Officer
Joined
Mar 25, 2013
Messages
574
No Title

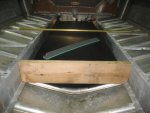
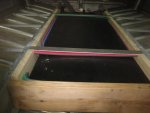
the pics show my tank install plans, and just got it cut and mocked up for now, as I am looking for any feedback that may let me know I am going about something wrong, I have seen it done different ways on this forum and after review of many great projects I have landed on the following. I used 3m 90 adhesive to attach 3/8 neoprene to ribs after cleaning both surfaces up with acetone, then used ziplocs full of fertilizer to put a little weight on the neoprene. ( they are adhered tightly ) then cut 2x6 to fit both ends and down the sides and planed it down so I could fit some neoprene along both sides between wood and tank ( the rubber comes from the admiral's workout mat, she aint using it anyway) I beveled the tops of side boards ( so they match up with slightly angled stringers) and planed a 1/4 inch off the side boards to get a fit for neoprene, and some aluminum top straps with neoprene underneath to strap tank down. plan is to give all the lumber 3 coats of the spar varnish or clark craft 2 part epoxy I used on the decking , use stainless steel wood screws to connect the 4 sides and also screw with stainless the side boards to stringers. this way the wood frame is in place permanent and if I ever have to remove the tank, its just to take off the floor door and remove the 2 straps and I could lift it out. when all done I think the tank will be 1/2 inch under the decking ( see gold hockey stick ) any of you, see any issues or concerns, and thanks for checking it out ( ps , in order to get tank not overhanging on ends of ribs, my fittings are NOT below splashwell, and my thoughts are a bit of a false ( raised) floor in the storage area I have planned back there.
 

Attachments

  • photo259217.jpg
    photo259217.jpg
    87.8 KB · Views: 1
  • photo259218.jpg
    photo259218.jpg
    87.1 KB · Views: 1
  • photo259219.jpg
    photo259219.jpg
    93.5 KB · Views: 1

Watermann

Starmada Splash of the Year 2014
Joined
Jan 12, 2013
Messages
13,787
Have to say cc I'm not a big fan of SPF dimensional lumber in boat work and below deck especially. To me the preferred material is AL sheet, brackets and angle with rivets and never worry about it's longevity or shifting. I know lumber is easier to work with, is strong and probably will last a long time if sealed.
 
Top