1973 4hp Evinrude

film495

Petty Officer 1st Class
Joined
Apr 8, 2009
Messages
285
I messed with that pin a bit and it is not worth the time as far as I can tell. I ordered a replacement, and plan to just squeeze it in a vice to crack it off. I pounded it with a hammer about has hard as I could and it laughed at me. It is particularly odd becuase I can hold the clutch hub, and it wiggles back and forth a bit on the shaft, so - the pin is not frozen in the shaft there is some play to it, but it does not move when pounded vigorously with a hammer and punch. I'm sure I've mushroomed the end of the pin and made it worse not better.
 

film495

Petty Officer 1st Class
Joined
Apr 8, 2009
Messages
285
cracked that thing right off. pin was shape of an S with both ends crooked and mushroomed. that thing was never coming out, and well sometimes expedience matters. I think I probably didn't damage the shaft or housing or anything, probably. but, sometimes you have to be willing to break something, in order to fix something ... lol

I thought about the weedless drive from the 71 4hp, but I thinkt the lower unit attaches different, 4 bolts vs. two and the 73 has a different type of hub, so my guess the parts don't swap, but I didn't look at it internally, the pinion gear and such would never line up, but don't really know.

I found the hub piece on e-bay and now I'm dissasembled, and back to figuring out what seals and such to get. With it apart, I might as well do them all, and then I'm gonna figure out how to pressure test the sucker.
 

film495

Petty Officer 1st Class
Joined
Apr 8, 2009
Messages
285
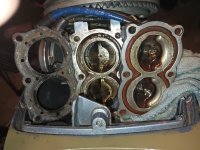
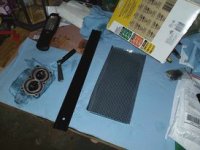
Pulled the head and exhaust cover, to look at the water passages. Looks like the head is just one big water channel. If I figured out the flow correctly, up from the pump through a passage on the left side in the middle of the cylinders, there's a passage at the top, that is drilled at the top of a channel on the exhaust side, that is a straight shot. I put the red little tip of the hose that is on a can of canned air and it went right through. The channel on the exhaust side, follows the top/back and there is another small passage at the end of that channel that I assume dumps into the exhaust.. And I think that is the loop, but there must be more passages, no? Is that it?

As far as I can tell, for the water passages anyway, I don't think the orientation of the spark plugs left or right would affect that. They were to the left, so - I'll just leave them that way.

Oh, and with the overheating, the blue electrical tape I wrapped around that plug wire, was to put a marker there, cause I knew it would probably overheat, and I wanted to see if it would melt that electrical tape as a benchmark, and it did not. The wire itself, the housing looked to me like heat stress, also known as melting, but it seems to make a just fine spark.

I didn't see anything in here that to me looked like a problem. This motor will probably really like new gaskets and a functioning water pump. I think it will be very happy.

Oh, the exhaust cover was missing a bolt. The threads seem fine, it just wasn't installed. If that a standard size thing I can just get at a hardware store? Does it have to be any particular hardness bolt or anything?

4hpHeadGasket.jpg
 
Last edited:

racerone

Supreme Mariner
Joined
Dec 28, 2013
Messages
38,089
The head is warped.----So refinish it with emery paper and a piece of glass.----Head gasket may have been leaking.
 

film495

Petty Officer 1st Class
Joined
Apr 8, 2009
Messages
285
The head is warped.----So refinish it with emery paper and a piece of glass.----Head gasket may have been leaking.

never did this before. had the tools from other projects, but never flatted a cylinder head before. it is about .025 in the very middle going corner to corner with a straight edge, and both ways, so - it warped with some symetry at least, so - warped a good bit.

I have a 71 4hp parts motor that does run., I guess if this doesn't work out, I can probably steal the head off that guy.
 

Attachments

  • Cylinder Head.jpg
    Cylinder Head.jpg
    13.3 KB · Views: 3

film495

Petty Officer 1st Class
Joined
Apr 8, 2009
Messages
285
That head will be warped too.-----They all are after 40 years !
I think the touched up one should work OK. Funny, I was trying to figure out where to get another bolt for the exhaust plate, and that other motor is my answer.
 

film495

Petty Officer 1st Class
Joined
Apr 8, 2009
Messages
285
picked up sealers to do the lower unit seals and water pump.

Permatex 80062 High Tack Gasket Sealant
Permatex 22071 Water Pump and Thermostat RTV Silicone Gasket

this stuff should work fine, no? there may be better, but I'm not looking for perfect, just working.

oh, there was no plate in the water pump. On this one it appears to me, the housing is the plate, but not sure. Service manual talks about this standard drive and the weedless drive, and I think the weedless has a plate and this one does not, if I'm looking at it correctly.
 

racerone

Supreme Mariner
Joined
Dec 28, 2013
Messages
38,089
The 2 HP lower unit has no plate , yes they used the 2 HP lower unit in 73.-----But there is a kit to convert that simple pump to a more expensive set-up.
 

film495

Petty Officer 1st Class
Joined
Apr 8, 2009
Messages
285
The 2 HP lower unit has no plate , yes they used the 2 HP lower unit in 73.-----But there is a kit to convert that simple pump to a more expensive set-up.
I have parts coming, so I'll see how it works and if I can get the motor to work. Might be a good idea next time I do the pump on it.

I haven't found anything too out of the ordinary on this, other than the reminder that getting old exhaust gasket off the plate and motor is kind of a hassle ... lol
 

film495

Petty Officer 1st Class
Joined
Apr 8, 2009
Messages
285
put parts in. got it started. seemed to pump water for a few seconds then quit pumping. I didn't let the sealant cure, so I think it sucked the seal right out and then started sucking air. I took the lower end off and spun the shaft with the bottom in a bucket, and pretty quickly it was for sure that seal was not working correctly. If I sumbergetd it above the seal, pumped water, below the seal, no water pumping.

I redid it, and we'll let it sit this time, and try again in a day or so.

I thought it might run different, but it was still hard to start - and seemed not to have any interest in idling down, so - if this water pump works out, next stop is likely having a go at the carb. or I could just pull the one off the 71 4hp parts motor. I'm thinking I may rob the steering bushings off that one too while I'm at it.

impeller I ordered was way too bit. haven't had time to go back and figure out how I ended up with the wrong one. look back at parts diagram and check m order. the impeller in it seemed decent, so - for testing - good enough.

edit - went back and checked order. yea, I just messed that up, not even sure where the part number for what I got came from. little details.
 
Last edited:

Nordin

Commander
Joined
Jun 12, 2010
Messages
2,573
As tphoyt says the impeller is not self priming. The impeller housing need to be at least 3-4 in under the water line.
 

film495

Petty Officer 1st Class
Joined
Apr 8, 2009
Messages
285
As tphoyt says the impeller is not self priming. The impeller housing need to be at least 3-4 in under the water line.
nice tip. this motor has been tricky too, cuase it doesn't want to idle down, so it just shoots the water out of the bucket. I added a board on top to splash the wave, but I think I gotta lift my tank up a good 6 inches and get the motor all the way down in.

I got a set of muffs, but it fits very loosely. I actually tried it by adding a bit of duct tape, and it seemed like that might work for a small motor, but the motor wasn't pumping water, so - it was a failed test. but, worth trying again - but, what your saying is that won't work, or will the positive pressure from the hose, drive some water up and prime it?
 

film495

Petty Officer 1st Class
Joined
Apr 8, 2009
Messages
285
The 2 HP lower unit has no plate , yes they used the 2 HP lower unit in 73.-----But there is a kit to convert that simple pump to a more expensive set-up.
ummm. does this more expensive set up pump any better? the incredible simplicity of that pump as is- is impressive, but I find the irony of a 4hp that overheats, and has overheated probably a lot, has a 2hp water pump. Sounds like a mistake, but maybe it works good. I still don't get the head cooling, it's just open and must flow randomly through the holes in the head gasket. It looked to me, like 1/2 the incoming water would just quickly exit to the exhaust channel flow, but maybe that is by design, must have been.
 

racerone

Supreme Mariner
Joined
Dec 28, 2013
Messages
38,089
Did you install a factory impeller ?----Water must be 6-8" above the impeller in a test bucket.
 

Crosbyman

Vice Admiral
Joined
Nov 5, 2006
Messages
5,529
ummm. does this more expensive set up pump any better? the incredible simplicity of that pump as is- is impressive, but I find the irony of a 4hp that overheats, and has overheated probably a lot, has a 2hp water pump. Sounds like a mistake, but maybe it works good. I still don't get the head cooling, it's just open and must flow randomly through the holes in the head gasket. It looked to me, like 1/2 the incoming water would just quickly exit to the exhaust channel flow, but maybe that is by design, must have been.
millions were made and still run perfectly. nothing realy wrong with the design.

if colling flow is a problem on your 4hp then there is blockage somewhere and needs to be found.

pull the PH if you have to and flush all passages with a cleaning agent...or just soak passages with hot vinegar but event vinegar will not flush out a broken impeller vane.

btw in a bucket they may run HOT due to propeller created air turbulence in the bucket water.
 

film495

Petty Officer 1st Class
Joined
Apr 8, 2009
Messages
285
no, I put the existing one back in and ordered a spare. The exisitng one seemed totally fine. I thought I got one, but ordered the wrong part, so for testing this one is good enough.

it seemed to pump water yesterday and then suck the sealer out of the water pump, and started sucking air through that seam. I redid the pump seal again yesterday around 5pm and will probably try it again around 5pm today, and let the sealer cure the full 24 hours before trying it this time.

I got the motor a bit deeper in the storage tub, so 2-3 inches above the cavitation plate. Should work.
 

Crosbyman

Vice Admiral
Joined
Nov 5, 2006
Messages
5,529
maybe I am wrong but I do not think you need so much sealer on the impeller housing and in any case where would air enter the pump if it is under water ??
these are as simple as they get engine wise.
 

film495

Petty Officer 1st Class
Joined
Apr 8, 2009
Messages
285
it would have worked, but I managed to plug the outlet to the water tube with the sealant. It was just plugged in there solid, like if I tried to plug it on purpose I could not have done that well. guess I need to use less and follow the directions better.

I'll try it again, I did order a new impeller and was thinking maybe I'd wait for the new one to arrive before giving it a go again.

bucket set up seemed to work much better. motor started and seemed to run fine. overheated it again, less - but it was pretty hot after 20-30 seconds. probably will reduce that to 15 seconds, just don't like how hot it gets, but I was sure it was going to pump water.

oh - I already had the head and exhaust open, and checked all the passages. I may have to do that again, now that there's possible chunks of sealant in there, but for now I'll worry about getting the pump to work and hope for the best.
 
Top