1972 Chrysler 120 HD HELP with Ignition/Timing/"Sputter"

boostup

Cadet
Joined
Sep 25, 2010
Messages
15
We need yalls help baddd !!!... Frank if you're out there help us !!!


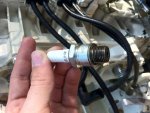
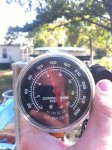
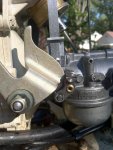
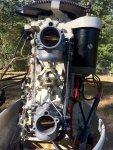
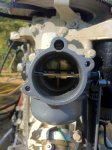
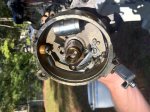
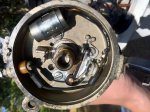
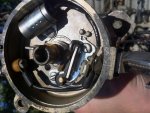
Hey our previous post we had posted we were doing well till some J-Hole "helped" us and totally messed us up worse.. now it's Pinging when we accelerate PERIOD.. we have the distributor, rotor button, wires, cap, belt and everything all in our hands.. im about to post pics now but, please help us set it and explain if the timing needs to be done in water/out of water load/no load warm/cold please !! help we need to start from square 1... we just did a compression test it read 150 after 5 cranks with the compression tester release button NOT pushed.. we also pushed it and did the same test over again it jumped to 120 with the button in... with a single crank, the compression jumped to only 95 that's just turn the motor by hand slowly... so we don't quite think it's compression if im wrong, let me know, we also took the carbs apart bought ALLL new pieces new float, new carb rebuild kit with needle and seat and the turns on the idle set screw are at 1 1/2 screws from lightly seated... next the plugs are the NGK ones we've found that are "supposed to be" for this motor and (the flat no gapped ones)... and we had it to the point to where we couldnt push it to WOT but, now we cant get it to stop pinging... the gas is 89 octane and 50:1 ratio with marine grade oil...

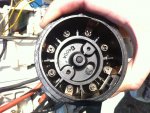
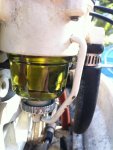
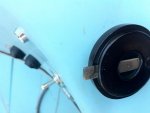
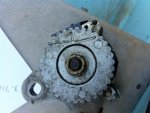
Does anyone know where we can find the distributor cap or rotor ?? and are the points in the cap replaceable ? j/w... please help !!!! From dead start to full end directions would help.. if u'd rather talk on the phone, we'll pay the long distance fees please help !!!!!!!!
 

Attachments

  • Picture 002.jpg
    Picture 002.jpg
    145.4 KB · Views: 0
  • Picture 003.jpg
    Picture 003.jpg
    144.1 KB · Views: 0
  • Picture 008.jpg
    Picture 008.jpg
    144.4 KB · Views: 0
  • Picture 009.jpg
    Picture 009.jpg
    145.4 KB · Views: 0
  • Picture 014.jpg
    Picture 014.jpg
    144.3 KB · Views: 0

boostup

Cadet
Joined
Sep 25, 2010
Messages
15
Re: 1972 Chrysler 120 HD HELP with Ignition/Timing/"Sputter"

More pics..
 

Attachments

  • Picture 016.jpg
    Picture 016.jpg
    148.3 KB · Views: 0
  • Picture 018.jpg
    Picture 018.jpg
    152.3 KB · Views: 0
  • Picture 020.jpg
    Picture 020.jpg
    141.2 KB · Views: 0
  • Picture 024.jpg
    Picture 024.jpg
    147.6 KB · Views: 0
  • Picture 026.jpg
    Picture 026.jpg
    146.2 KB · Views: 0

boostup

Cadet
Joined
Sep 25, 2010
Messages
15
Re: 1972 Chrysler 120 HD HELP with Ignition/Timing/"Sputter"

More pics...
 

Attachments

  • Picture 028.jpg
    Picture 028.jpg
    147.5 KB · Views: 0
  • Picture 029.jpg
    Picture 029.jpg
    139.6 KB · Views: 0
  • Picture 032.jpg
    Picture 032.jpg
    146.8 KB · Views: 0
  • Picture 034.jpg
    Picture 034.jpg
    147.1 KB · Views: 0
  • Picture 036.jpg
    Picture 036.jpg
    147.5 KB · Views: 0

boostup

Cadet
Joined
Sep 25, 2010
Messages
15
Re: 1972 Chrysler 120 HD HELP with Ignition/Timing/"Sputter"

The last 2... by the way.. the T on the distributor does it point towards a "certian point" on the flywheel ??

Please use the "quote" feature on the forum so as we can easily destinquish who's talking about what and what exactly to adjust haha thanks !!!
 

Attachments

  • Picture 038.jpg
    Picture 038.jpg
    185 KB · Views: 0
  • Picture 040.jpg
    Picture 040.jpg
    147.1 KB · Views: 0

DeafMonkey

Cadet
Joined
Sep 27, 2010
Messages
7
Re: 1972 Chrysler 120 HD HELP with Ignition/Timing/"Sputter"

Gonna start pulling info off the forums and putting it here. That way we have one place to find the answers instead of trying to remember where they were.


"The distributor is first adjusted to top dead center. With the flywheel at top dead center, the pulley on the distributor should have the curved groove matching the curve of the flywheel with the center straight line pointing straight at the flywheel. To change pulley position loosen the two 9/16 head bolts and loosen the distributor so the belt can be moved. After setting the pulley, pull out the distributor ONLY until the belt will deflect about 3/16 inch when pushed in the center with an .010 feeler gauge and tighten the bolts. Timing belt too loose and timing will flutter a bit. Too tight and the engine will bind going into and coming out of gear. Now the distributor matches the flywheel position.

Timing can be done static on these engines by turning the flywheel by hand with the ignition on. Be sure all the plugs are out and grounded so the damn thing doesn't fire and put you in the nine finger club.

The distributor is held in position by two black plastic pieces joined by a threaded rod. You loosen the locknut and turn the threaded rod to open or close the gap between the plastic pieces, thereby retarding or advancing timing.

Once you have set the cam and roller on the throttle, when the engine is correctly set-up and idling, the marks on the cam will NOT touch the roller but will be slightly below it." -Frank Acampora Jan 07 on Carb tuning and timing-
 

DeafMonkey

Cadet
Joined
Sep 27, 2010
Messages
7
Re: 1972 Chrysler 120 HD HELP with Ignition/Timing/"Sputter"

In order for these engines to idle correctly and acheive full rated RPM, it is necessary to sync the carbs and timing. Follow these steps:

1. Disconnect the ball link to the carb cam at the timing tower. Disconnecting at the cam risks bending the cam. Move the cam away from the carb roller.
2. Loosen the screw(s) on the aluminum tie bar and let all carbs close completely, then tighten again.
3. Set the cam so that the scribed line is pointing directly at the black roller on the carb lever. If the cam has two closely spaced lines, set the black roller directly between them.
4. The black roller is held with an offset screw and nut. Loosen the nut and turn the screw until the black roller JUST touches the cam. Tighten the nut and re-attach the ball link maintaining the scribed line at the roller.
5. Adjust the ball link so that at full throttle the bottom carb butterfly opens substantially horizontally. Adjust the aluminum tie bar so all carb butterflies open equally at full throttle. They need not be perfect but should be rather close to horizontal for best performance.
6. Adjust timing to 30 degrees before top dead center at full throttle.
7. Adjust idle speed to 700-750 RPM in the water in forward gear. Do this with the screw on the bottom of the timing tower. Loosen the locknut and adjust. Screwing in increases idle speed. Do this in small increments and let the engine rev and adjust itself before the next adjustment. A little goes a long way here. When correct, tighten the nut. Note that the scribed line on the roller will now be (usually) below the black roller a bit.
8. NOW we adjust the mixture on the carbs. Set all low speed needles to about 1 1/4 turns out from lightly seated. Do not force as this will damage either the needles or the seats.
8A. With the engine idling in neutral, turn each the needles in equally about 1/8 turn at a time. Give the engine a couple of seconds between each adjustment to stabilize. Adjust until the engine either "sags" or stalls. Note this setting.
8B. Now go the opposite direction. Adjust until the engine runs rough, burbles, or stalls. Note this setting.
8C. Set all needles to the average between the two settings: That is, for example, if it stalled at 3/4 turn out and burbled at 1 1/4 out then set all needles to 1 turn out.
8D. Readjust idle speed to 700-750 RPM.
9. Take the boat out on the water and do a "hole shot"--Full throttle acceleration from a stop. If the engine "sags" then recovers and picks-up it is too lean. Open the needles about 1/16 turn at a time until the engine accelerates with no hesitation.
If the engine sputters or coughs or burbles, then clears itself and accelerates, it is too rich. Close the needles about 1/16 turn at a time until the engine accelerates smoothly.


10. I can NOT stress this enough! NEVER set the low speed needles less that 3/4 turns out no matter how poor the idle or acceleration. To do so will run the engine too lean and detonation and melted pistons at or near full throttle operation will result." -Frank Acampora Aug10 Carb synch post-
 

Frank Acampora

Supreme Mariner
Joined
Jan 19, 2007
Messages
12,004
Re: 1972 Chrysler 120 HD HELP with Ignition/Timing/"Sputter"

Your distributor cap, while serviceable has seen better days. The center button is worn. It is held in by a spring and possibly can be replaced--I have never done it. The cap is dirty and needs cleaning, it also appears that the plastic is deteriorating a bit around the edges. While there are 8 terminals, the 4 with the copper strips do not function, but do make the cap marine grade and explosion proof. they ground against the distributor body. This is correct. For a new and very pricey cap, contact franzmarine@aol.com. You can not buy a rotor; you must buy the whole rotor/shaft assembly for mega-bucks. Better to try and find a good used one.

The distributor has a couple of problems: The rotor should be epoxied to the shaft to prevent any movement on it. The felt pad should be between the two posts on the opposite side of the points and should wipe against the cam. (It should not have too much lubricant or it will foul the points) If not already set, the points should be cleaned with fine sandpaper (not emery--it is conductive) and set to .010 open on a lobe high point.

The distributor pulley should be set with the engine at TDC. The "T"--the curved line should match the curve of the flywheel and the straight line should point directly at it. The belt should not be too tight or too loose: Too tight and the engine will bind when shifting into and out of gear. Too loose and the timing will vary. The belt should deflect about 1/8 to 3/16 inch in the center when a .010 feeler gauge is pressed against it like a finger and bends.

In one photo, that engine appears to have regular points and coil ignition. They don't run too well and if you can find the parts relatively inexpensively, converting to electronic ignition requires only the Motorola CD box and coil. You can still use the existing distributor with the existing points used to signal the box to fire, or you can convert to electric eye electronic distributor. Either will improve running immensely.

Perhaps the engine was retro-fit because points and coil ignition had the square, orange voltage rectifier while your engine has the Motorola regulator/rectifier as a '72 should. Or, did I see incorrectly? I did not see the finned aluminum Motorola CD box with coil attached in a vertical position.

Timing marks appear correct but the flywheel has seen better days too! All those chips and missing pieces around the top rope flange can't be good.

Notice in the photo of the fuel pump that below the pump there is the stainless steel throttle cable quick-connect. It is all the way out on the threaded portion of the cables and the center part is not protruding at all. This is incorrect if the engine is in neutral in this photo. The center slug is spring loaded and the quick-connect should be threaded onto the cable so that in neutral the center slug protrudes about 3/16-1/4 inch out the back. This allows the engine to shift BEFORE the throttles start to open. It also limits the fast idle/warm-up speed to about 1500-2000 RPM.
 

DeafMonkey

Cadet
Joined
Sep 27, 2010
Messages
7
Re: 1972 Chrysler 120 HD HELP with Ignition/Timing/"Sputter"

Thanks alot Frank. And by the way... did you invent these motors or what? You seem to know everything there is to know about them.

I do have another question tho. Did you see those worn terminals inside the Dist Cap? Can those being like that cause this pinging/fluttering issue that we're having? Also can you replace those terminals (if so how?) or do I have to buy a new cap? And what about that rotor button?.... did you see how it's kind of chipped/worn? What did you think about that?
 

Frank Acampora

Supreme Mariner
Joined
Jan 19, 2007
Messages
12,004
Re: 1972 Chrysler 120 HD HELP with Ignition/Timing/"Sputter"

As I said, the center button is worn. It is held in by a tapered spring and should be able to be replaced BUT I have never done so. As long as it is adequately contacting the rotor, it should be OK though.

Terminals are molded into the cap if you want to replace them you must buy a new cap. They didn't look too bad to me and neither did the end of the rotor. I don't think that was the cause of the pinging. That would either be timing too far advanced or carbs set too lean. Although, it COULD be due to deposits inside the head. It might pay to pull the head and check for EXCESSIVE carbon deposits that would glow and pre-ignite under heavy acceleration.

I know! I know! Someone is going to recommend using Seafoam to decarb the engine. I don't like it. I hesitate because on these old engines it sometimes does more harm than good. Safer to pull the head and clean by hand.
 
Top