1970 Starchief conversion to center console

BajaRon

Petty Officer 3rd Class
Joined
Aug 23, 2015
Messages
85
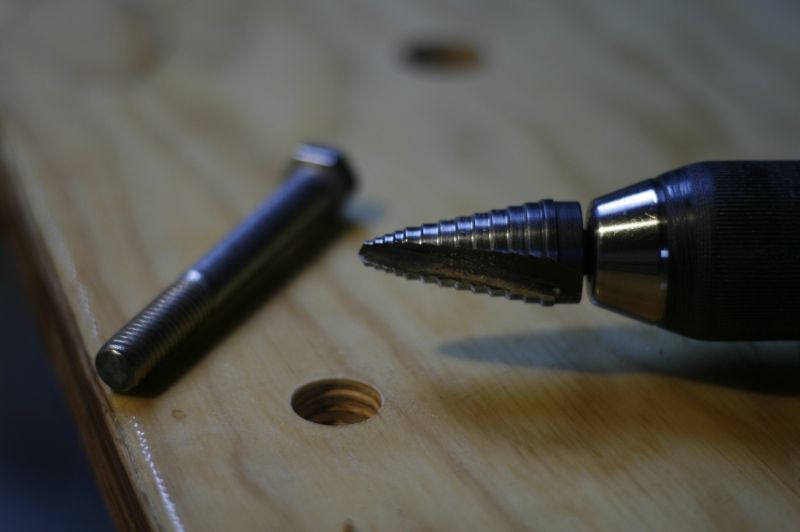
Thanks!!! CW...very clear. I did not get it before. So I will need to temporary install the finished transom....drill all holes...pull transom out, and then enlarge the holes. Then apply "peanut butter", let harden, then re-drill.

I spent about 3 hours applying and removing paint remover today. Slow. I have been re-reading Waterman's thread...up to page 18 now. He used a pressure washer. That I will try next. Also spent about two hours removing old silicone around the bow cap...that runs from the top to the keel...and at the opposite end on the transom, there was a ton on silicon there.

I will see if I can download Photobucket...or maybe break out our best old laptop to get the pictures rolling. Thanks! Baja Ron
 

laurentide

Lieutenant Commander
Joined
Jul 24, 2011
Messages
1,869
The epoxy plugs is just a suggestion for a bulletproof transom. When I redo mine I'll be using this method, but the untreated wood that starcraft installed lasted for decades.

I use imgur.com as an image file host. The free version works well and isn't quite as bloated with ads as photobucket.
 

oldhaven

Chief Petty Officer
Joined
Aug 30, 2015
Messages
575
From a recent post of mine on another topic:

I use the proprietary iBoats server for my photos and it seems to work fine. Type a couple of words in the write something box at the end of your thread. Click the left most icon on the upper right of the reply box at the bottom of the page. It has a page image with a paper clip. An upload attachments box will appear at the bottom left. Click that and you will get a screen that allows you to upload common image files by browsing your hard disk. Go through your files on your computer and select one and it will be presented in a small format at the bottom of your screen. You may have to make it smaller to post on the site by using Paint or whatever Mac's use for this if it is a super sized high res picture. If you keep it under 700 K or so it seems to work. Select large or medium from the options given you. If you don't like the size it displays at, select remove and it will go away so you can try again. Then change your selection and try again until you like the way your photo looks and its size and location. You will have to put the cursor in the message area where you want the picture to appear, but this is not so important at first, since we can all figure out what you wanted to do and later you will get better at it like I did. Then you just click post reply and it goes into the ether for us all to enjoy.

I have been pretty frustrated with off site photobucket type pictures here, because they tend to go away when the poster goes away or changes something with his or her photobucket albums and all you get is text and a cute little kitty for a picture.

Ron
 

laurentide

Lieutenant Commander
Joined
Jul 24, 2011
Messages
1,869
I have been pretty frustrated with off site photobucket type pictures here, because they tend to go away when the poster goes away or changes something with his or her photobucket albums and all you get is text and a cute little kitty for a picture.

Ron

Yeah, we've definitely lost a lot of useful pics this way. Your suggestion is likely the most reliable option.

If you do by chance use imgur (I haven't lost any images in the five years I've been using it, and most of my project pics weren't even loaded from an account, just the public site), you drag the photo to the page, click "upload," then copy the "BB code" link and paste it into your comment. Pretty simple and if you click on the photo from the iboats forum it just brings you to the image, not a jumbled bunch of junk with pop-up ads.
 

oldhaven

Chief Petty Officer
Joined
Aug 30, 2015
Messages
575
Another useful tip I picked up from an experienced forum member in the other thread I mentioned is to use this app for simple re-sizing of too big pictures. I use it and it seems stable, simple and has no apparent hidden downside that I have found. For Windows, a simple right click on the photo file gives you the resize option in the pop up list. The direct posting method above's use was OK'd by the forums' iBoat super moderators when I asked if there was some upper limit for picture posts. They say if the servers ever get too full, they will simply add more memory. While nothing is ever permanent, this seems to be a safe way to ensure future availability of pictures.

https://imageresizer.codeplex.com/

Ron
 

Watermann

Starmada Splash of the Year 2014
Joined
Jan 12, 2013
Messages
13,775
For the solid rivets I just used a cheap air hammer and adjusted the line pressure on it. You''ll just need to order a brazier 3/16" rivet set and I recommend getting a cleco set as well to help with the install of those hull stiffeners and any other parts you need held in place before riveting.
 

classiccat

"Captain" + Starmada Splash Of The Year 2020
Joined
Dec 20, 2010
Messages
3,411
The epoxy plugs is just a suggestion for a bulletproof transom. When I redo mine I'll be using this method, but the untreated wood that starcraft installed lasted for decades.

I use imgur.com as an image file host. The free version works well and isn't quite as bloated with ads as photobucket.


A little tip for those plugs is to step (or taper) the hole opening (shown here). I used a unibit since you get the best of both worlds. This ensures that the plug is pulling against the wood to help prevent it from pulling-out.
TransomPlugs20140430_MG_2290_zpsda5f2856.jpg
 

laurentide

Lieutenant Commander
Joined
Jul 24, 2011
Messages
1,869
A little tip for those plugs is to step (or taper) the hole opening (shown here). I used a unibit since you get the best of both worlds. This ensures that the plug is pulling against the wood to help prevent it from pulling-out.
TransomPlugs20140430_MG_2290_zpsda5f2856.jpg


:thumb: BahaRon, check out this guy's ^^ thread. He did all the fixes mentioned plus some more. I got the glass/epoxy plug idea from him. classiccat does top notch work and it's totally worth your time to have a long read there.
 

BajaRon

Petty Officer 3rd Class
Joined
Aug 23, 2015
Messages
85
Thanks everyone!!! I am still going through my paint removal apprenticeship. I have gone around the boat above the splash well, and have remove about 80% of the paint in that area. The scraper can only remove so much! I may flip the boat, do the bottom paint removal by hand, then finish the paint that remains with a pressure washer.

In the evenings I have been rereading Watermans thread....I am up to pg 35. I will also check out classiccat's thread.

The problem with posting pictures is with my computer...we will figure it out soon! Thanks again, Baja Ron
 

laurentide

Lieutenant Commander
Joined
Jul 24, 2011
Messages
1,869
I stripped my hull to bare aluminum. It sucked. I wish I could offer some practical advice, but it's a lot of scraping and scrubbing as you're finding out. I guess I can just say to give the stripper time to work but don't let t dry out. You've probably already got that down.
 

Watermann

Starmada Splash of the Year 2014
Joined
Jan 12, 2013
Messages
13,775
Yeap you just have to keep plugging away at it. The 3M scrub pads with the handle work good too for last little bit of paint film and primer.
 

classiccat

"Captain" + Starmada Splash Of The Year 2020
Joined
Dec 20, 2010
Messages
3,411
:thumb: BahaRon, check out this guy's ^^ thread. He did all the fixes mentioned plus some more. I got the glass/epoxy plug idea from him. classiccat does top notch work and it's totally worth your time to have a long read there.

Thank you for the kind words there Chem! Let's not forget...I'm still in dry-dock! :facepalm: :lol:

BajaRon...if you read my thread AND Waterman's thread...you may never finish your project :lol: :facepalm:
 

BajaRon

Petty Officer 3rd Class
Joined
Aug 23, 2015
Messages
85
No Title

Another photo try. Ton of reading and rereading Starcraft restoration threads...Great info! Thanks to all, Baja Ron
 

Attachments

  • photo235705.jpg
    photo235705.jpg
    62.1 KB · Views: 2
  • photo235706.jpg
    photo235706.jpg
    58.1 KB · Views: 2
  • photo235707.jpg
    photo235707.jpg
    57.8 KB · Views: 2
  • photo235708.jpg
    photo235708.jpg
    62.4 KB · Views: 2

BajaRon

Petty Officer 3rd Class
Joined
Aug 23, 2015
Messages
85
No Title

Ok, more photos...removed most all lose rivets up front. On spot had two rivets mashed together! Lots of hillbilly work...200 pounds of silicone removed. After reading several threads...no major dents, holes, damage. Will post pictures of paint removal. I would be lost without help at this site, thanks, Baja Ron
 

Attachments

  • photo235710.jpg
    photo235710.jpg
    81.3 KB · Views: 4
  • photo235711.jpg
    photo235711.jpg
    58 KB · Views: 18
  • photo235712.jpg
    photo235712.jpg
    55 KB · Views: 3

Watermann

Starmada Splash of the Year 2014
Joined
Jan 12, 2013
Messages
13,775
Hey Ron what kind of shape are the mahogany bow supports? They're a real bear to get out of there without damaging unless you take off the rub rail bracket, gunnels and bow cover.

Nice sized fuel tank you have there.

fetch
 

BajaRon

Petty Officer 3rd Class
Joined
Aug 23, 2015
Messages
85
The plastic tank you see is 45 years old! It's history...and too small. Maybe 20 gallons, not sure. Hope to put an aluminum 30 gallon in its place

Would like to cut away the bow cover up to the hatch...just enough room to throw a cast net...and maybe a pulpit/anchor roll with cleat. So the top may come off. I have read someone's thread about the difficulty of removing the first piece of mahogany.

First things first! Remove paint/silcone/carpet glue! Baja Ron
 

Grandad

Lieutenant Commander
Joined
Jun 7, 2011
Messages
1,504
Hi Ron. When you fix that cracked rib, consider just what caused the crack. The rib as constructed simply could not withstand the pressures of the job it was asked to do. Imagine the strength of that rib when new and build your repair stronger than the original. Once the rib is cracked as your is, the existing rib has virtually no strength anymore at that location. Whatever you fashion, avoid putting a hole through your patch at exactly the same location as the existing rivet hole. Once cracked, the forces placed on the rib will be concentrated on that cracked spot. The rib will not spread the force and flex as the original did. Putting a hole in your patch at the same spot creates a "stress riser" concentrating the force put on the patch on the same location. It'll last for awhile, but it'll need repair again. - Grandad
 

BajaRon

Petty Officer 3rd Class
Joined
Aug 23, 2015
Messages
85
THANKS!!! This is why I am here...for information and help like this. With my picture it is hard to see the crack. But my plan was to drill new holes and rivets about 3/4 of an inch on either side of the crack...top and bottom.

It cannot be seen, but cleaning up the outside of this area today I notices a small dent, below the rib and about 6 inches back....and another one above the rib, about 8 inches back. Maybe this caused the cracked rib. From my pictures you can see tons of loose rivets in the front area...all covered with silicone.

Could I also scab a patch on a short length on the rib? Or???

Waterman suggested 3/16 2117 alloy rivets. What lengths for this repair? 1/4, 5/16, 3/8 inch? I plan on ordering a air rivet gun soon, and plan on having this area 100% clean and ready to repair soon.

I have many more questions elsewhere on this boat, but for now, paint removal, then re-rivet. I am very excited with my progress, even thru the paint removal. Thanks to all for the advice, Baja Ron
 

Watermann

Starmada Splash of the Year 2014
Joined
Jan 12, 2013
Messages
13,775
I would think from the location of that damaged bow rib is that it was damaged from impact rather than normal use. It's been used a bunch after the damage too as you can see from the black oxidization around and running down from all the damaged rivets. I had a broken bow rib and some on the bottom of my SeaNymph and repaired them with thick AL splints bedded in marine epoxy with SS bolts and nylocs holding them together also sealed with 5200. That was 2012 and they've seen some rough water and lots of use since with no leaks or problems yet. If you use solid rivets 3/8" length is what would use for those 2 layers of AL.

stringer2.jpg


IMAG0283.jpg
 
Top