sludgeguy68
Petty Officer 2nd Class
- Joined
- Jul 16, 2010
- Messages
- 111
Hi, I've been following a few rebuilds and reading up on glass and these forums have been incredibly informative! Here's my position: I made a casting deck, removable floor, and seating for my tinny about two years ago, and I thought two coats of porch paint on the plywood would hold up for a while, but it sits out in the weather all the time and the ply just started splitting and rotting. So I'm using this old material as a template for a new fabrication, and I'd like it to last, so I'm going to go for the fiberglass approach. My goal is to not drill holes through any part of the boat, since it's all original (except for the transom). I also want the pieces to be modular / removable for cleaning or modifications, so I'm planning to glass each modular piece separately then assemble them together on the boat. My bow will have 3 pieces: a little floor, the casting deck, and a flush deck for the trolling motor.
Here's my progress so far:
The casting deck sits on the tiny half-seat in the bow and the first full-size seat. I made a hatch that will have flush handle and will be kept in place using magnets (hopefully!)
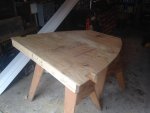
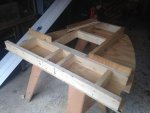
I'm using primeguard exterior screws and countersinking the heads. I have a pedestal seat that will be lag bolted (stainless) directly to the two center beams to keep it solid, since the COG is so high up here. After building this, I noticed it felt much heavier than my original build... then I realized I used 2x3s on the original to reduce the weight, doh! They help up quite well, so I re-cut all the supports using 2x3s and it's much lighter now.
I rarely used my old bow hatch because all kinds of nastiness would slosh up to the bow, or roll back down under the seat, so I cut a simple piece of ply to fit to keep stuff off the floor.
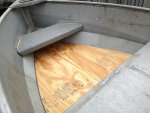
I screwed a small vertical piece of ply at the very end to keep water out that enters the bow handle. I'm planning to tie this into the casting deck with metal straps to keep it from bouncing around.
I've got a bow mount trolling motor, so it needs a platform that's close to flush with the rail. I came up with this framing so it would be safe to step on:
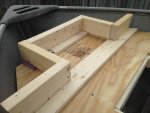
The 2x4 studs and 3/4" stock got the deck pretty close to fitting under the rub rail, but it was extremely tight, so I took a belt sander to the edges for a better fit. It's a little wonky, but seems OK.
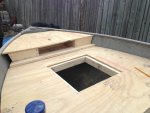
The wide lip on the front makes for an easy place to screw the piece in, so it can be removable if needed. The rub rail holds the front of it down nicely. I made a small door for the cavity in front; this space will contain a negative bus bar and the electrical connection for the trolling motor.
I know it's a small boat and probably wasn't meant to have all this crap in it, but it's so much better to fish out of. The boat is 14', I'm guessing an F-7 model which is rated at 28 max HP, and doesn't leak a drop. I'm hoping my 25 HP tiller will push all this well.
I'm still learning how to work with wood, and fiberglass is completely new to me, so I'm just looking to see if I'm going in the right direction here! Some questions:
1. The hatch and other tight fitting spots worry me; this hatch only has the jigsaw blade width as clearance. I'm thinking of using CSM on the flat surfaces prone to wear, and feathering it out before it reaches these lips, then just applying the poly to seal them in... does that sound right? Does the poly alone add thickness, or does it soak into the wood?
2. The casting deck feels pretty solid, should I just poly the undersides and only apply the CSM for the top?
Let me know what you think, thanks!
Here's my progress so far:
The casting deck sits on the tiny half-seat in the bow and the first full-size seat. I made a hatch that will have flush handle and will be kept in place using magnets (hopefully!)


I'm using primeguard exterior screws and countersinking the heads. I have a pedestal seat that will be lag bolted (stainless) directly to the two center beams to keep it solid, since the COG is so high up here. After building this, I noticed it felt much heavier than my original build... then I realized I used 2x3s on the original to reduce the weight, doh! They help up quite well, so I re-cut all the supports using 2x3s and it's much lighter now.
I rarely used my old bow hatch because all kinds of nastiness would slosh up to the bow, or roll back down under the seat, so I cut a simple piece of ply to fit to keep stuff off the floor.

I screwed a small vertical piece of ply at the very end to keep water out that enters the bow handle. I'm planning to tie this into the casting deck with metal straps to keep it from bouncing around.
I've got a bow mount trolling motor, so it needs a platform that's close to flush with the rail. I came up with this framing so it would be safe to step on:

The 2x4 studs and 3/4" stock got the deck pretty close to fitting under the rub rail, but it was extremely tight, so I took a belt sander to the edges for a better fit. It's a little wonky, but seems OK.

The wide lip on the front makes for an easy place to screw the piece in, so it can be removable if needed. The rub rail holds the front of it down nicely. I made a small door for the cavity in front; this space will contain a negative bus bar and the electrical connection for the trolling motor.
I know it's a small boat and probably wasn't meant to have all this crap in it, but it's so much better to fish out of. The boat is 14', I'm guessing an F-7 model which is rated at 28 max HP, and doesn't leak a drop. I'm hoping my 25 HP tiller will push all this well.
I'm still learning how to work with wood, and fiberglass is completely new to me, so I'm just looking to see if I'm going in the right direction here! Some questions:
1. The hatch and other tight fitting spots worry me; this hatch only has the jigsaw blade width as clearance. I'm thinking of using CSM on the flat surfaces prone to wear, and feathering it out before it reaches these lips, then just applying the poly to seal them in... does that sound right? Does the poly alone add thickness, or does it soak into the wood?
2. The casting deck feels pretty solid, should I just poly the undersides and only apply the CSM for the top?
Let me know what you think, thanks!


