1967 Evinrude 6 HP (6702) - Newbie

Michigan_

Cadet
Joined
Sep 16, 2024
Messages
8
I am brand new to the boating world, so I bought a 12' v-hull aluminum boat and then picked up a 1967 Evinrude 6 HP outboard. I don't know anything about motors, but I have to learn somewhere.
The seller of the outboard said it needed an impeller replacement and set the price at $100. I figured it'd be a good deal since the impeller looked pretty simple to change out.
After I changed the impeller, I can't get it to idle. It will just die out. I figured it's a carburetor job but that is where I have found myself stuck.
When I look online for schematics, I can't find anything close besides the 1968 6802 - which has a different carb.
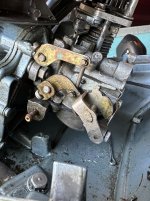
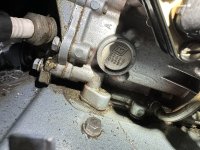
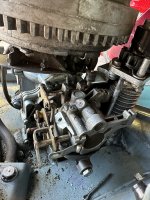
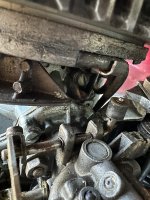
My main issue is this: I can't find a way to get to either of the bolts holding the carb onto the block. I also found a spring, which I believe is a "Evinrude Johnson Carburetor Throttle Spring 0203166" but I can't figure out where it goes or what it does.
If someone could give me some assistance/tips, that would be appreciated. Trying to get this thing on the water asap.
 

Attachments

  • image2.jpeg
    image2.jpeg
    1.4 MB · Views: 7
  • image3.jpeg
    image3.jpeg
    2.2 MB · Views: 7
  • image1.jpeg
    image1.jpeg
    1.8 MB · Views: 7
  • image0.jpeg
    image0.jpeg
    1.4 MB · Views: 7

Crosbyman

Vice Admiral
Joined
Nov 5, 2006
Messages
5,443
that spring just hooks on the small hole under the cam roller and attaches to the side of the engine block.

to remove the carb you cand remove the side linkage but take a close up photo for reassembly later on

loosen the nusts then unscrew the bolt nuts with your finngers and simultaneoulsly pull the carb body away from the block.to free up some work space !! . reasemble in reverse... bit of a pain but easy after a dozen !

easy carb to clean but check utubes how to

that carb has been used all over and a good book to read on serviciing older engines is this book ...covers ignition which you will need to do by pulling the flywheel to check for cracked coils ... while at it replace all plug wires and boots, condensers and points


replace gear oil ...... check for water ... if coffee cream color a reseal is needed .
adjust timing ..see video

geat engine !!! check compression before sending the usual $100-$150 to refurbish all ....

come back with more question if needed be ...
 

Attachments

  • cracked coils.jpg
    cracked coils.jpg
    8 MB · Views: 3

jimmbo

Supreme Mariner
Joined
May 24, 2004
Messages
13,446
Above was a Service Manual for up to 64. There quite a few Differences between the pre 1965 5 1/2 and the 1965 and later 6hp.
 

Michigan_

Cadet
Joined
Sep 16, 2024
Messages
8
that spring just hooks on the small hole under the cam roller and attaches to the side of the engine block.

to remove the carb you cand remove the side linkage but take a close up photo for reassembly later on

loosen the nusts then unscrew the bolt nuts with your finngers and simultaneoulsly pull the carb body away from the block.to free up some work space !! . reasemble in reverse... bit of a pain but easy after a dozen !

easy carb to clean but check utubes how to

that carb has been used all over and a good book to read on serviciing older engines is this book ...covers ignition which you will need to do by pulling the flywheel to check for cracked coils ... while at it replace all plug wires and boots, condensers and points


replace gear oil ...... check for water ... if coffee cream color a reseal is needed .
adjust timing ..see video

geat engine !!! check compression before sending the usual $100-$150 to refurbish all ....

come back with more question if needed be ...
I was able to get the carb off by removing that side linkage, thank you. Not entirely sure what on the carb needs to come apart, so I just took everything I could apart. I sprayed it with carb cleaner and am leaving it to soak overnight in a tub full of the cleaner. There are already a bunch of things floating around in the solution.
Are there any parts I should not leave soaking?
 

jimmbo

Supreme Mariner
Joined
May 24, 2004
Messages
13,446
Depending on what the Solvent is... Some like Lacquer Thinner, while good a dissolving Gum and Varnish, can do a Number on a lot of Plastics.
Regardless of the Cleaner, the Float, depending on its Composition, shouldn't be left too Long. BRP Carb Kits will provide all the Parts that need Replacing, though Floats are usually Separate, same might apply to the Inlet Needle and Seat
What needs to be accessed is the Chamber above the Idle ports and Transfer Slots in the Carb, but little Disc(#38 on the Parts List I posted) needs to be removed, and then a replacement installed. Soaking and Pressurized Air can't dislodge anything in that area, and in fact may even lead to the Ports and Transfer Slot getting Plugged/Blocked, the Disk has to come off/out for proper Cleaning.
 

Crosbyman

Vice Admiral
Joined
Nov 5, 2006
Messages
5,443
Above was a Service Manual for up to 64. There quite a few Differences between the pre 1965 5 1/2 and the 1965 and later 6hp.
agree yet basic concepts and servicing is much similar and the carb itself is very similar to jw carbs and other models.

servicing the ignition is identical so for 20$ the knowledge it contains iswell worth it imho.
 

Michigan_

Cadet
Joined
Sep 16, 2024
Messages
8
Depending on what the Solvent is... Some like Lacquer Thinner, while good a dissolving Gum and Varnish, can do a Number on a lot of Plastics.
Regardless of the Cleaner, the Float, depending on its Composition, shouldn't be left too Long. BRP Carb Kits will provide all the Parts that need Replacing, though Floats are usually Separate, same might apply to the Inlet Needle and Seat
What needs to be accessed is the Chamber above the Idle ports and Transfer Slots in the Carb, but little Disc(#38 on the Parts List I posted) needs to be removed, and then a replacement installed. Soaking and Pressurized Air can't dislodge anything in that area, and in fact may even lead to the Ports and Transfer Slot getting Plugged/Blocked, the Disk has to come off/out for proper Cleaning.
Funny, #38 was the only part not included in my carb kit. So now I need to get one. I was thinking to myself "hope that's not an important one" but it appears that it is!
 

Crosbyman

Vice Admiral
Joined
Nov 5, 2006
Messages
5,443
don't remove it before you find the EXACT sized one ++don't forget to adequately clean the side channel leading fuel to the top idle circuit.

blow everything out with compressed air .


unscrew the top idle needle a few turns and blow air in the side channel and it should exit the 3 small drip holes

you can always remount rhe crb and try it out if idling is OK then the top chamber is likely ok you can always reclean it if problems develop idle wise.
 

racerone

Supreme Mariner
Joined
Dec 28, 2013
Messages
37,827
I have more than a dozen of these carburetors.----I do not remove item 38 unless there is lots of gunk in the carburetor.-----There are many other thing to focus on with these wonderful 6 HP motors !!
 

jimmbo

Supreme Mariner
Joined
May 24, 2004
Messages
13,446
I have found a lot of Gunk under 38, even when the rest of the Carb(s) looked Clean.
 

racerone

Supreme Mariner
Joined
Dec 28, 2013
Messages
37,827
There have been issues with these aftermarket kits.----Good luck with it.
 

Michigan_

Cadet
Joined
Sep 16, 2024
Messages
8
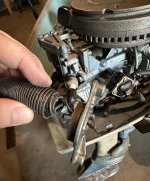
I've gotten the carb cleaned and all put back together. However, during reinstall, the pull-start got knocked loose (couldnt get me hands behind it for the carb nut). The spring looks a bit bent out of shape compared to the schematics. Is it worth to try to figure out how the previous owner had this thing rigged up, or just to buy a new spring? It might be hard to tell in the photo, but the spring is bent out of shape near the bottom - making it hard to seat it properly.
 

Attachments

  • IMG_3577.jpeg
    IMG_3577.jpeg
    1.8 MB · Views: 7

racerone

Supreme Mariner
Joined
Dec 28, 2013
Messages
37,827
Price of a new spring will shock you .----Repair yours or perhaps find a good used one.-----Not hard to find in my area.
 

Willyclay

Captain
Joined
Sep 8, 2006
Messages
3,257
Are you certain it is "bent out of shape"? Looks like the picture of P/N 0311265 at the link below. Good luck with that great old motor!
Click on image for different views.
 

Michigan_

Cadet
Joined
Sep 16, 2024
Messages
8
The spring, at the bottom, has that outer layer - which then hooks down. On my spring, that outer layer of spring wraps inwards around the inner layer and the section that is supposed to be wrap downward is just a mangled line of spring. If I knew how to bend a spring back into shape, it would probably be possible.
 

racerone

Supreme Mariner
Joined
Dec 28, 2013
Messages
37,827
???----It is sure bent WAY out of shape !----See it sticking through the lower support plate.!
 
Top