1964 Johnson JW-19M Restoration project

Plankwalker

Petty Officer 3rd Class
Joined
Sep 28, 2020
Messages
79
I just barely finished restoring a 1960 westbend (Firestone/Elgin) and I decide to take everything I learned from that project and buy another forgotten gem for a total tear down and rebuild. This engine has sat for 30 years in someone's basement. Why didn't someone stop me?

20210506_193908.jpg20210506_193929.jpg
 

Crosbyman

Rear Admiral
Joined
Nov 5, 2006
Messages
4,987
no known antidote .... I already have a cd11 waiting for next winter in my basement....$80 US with nice tank how much was your JW??
 

Attachments

  • CD-11-a (4).JPG
    CD-11-a (4).JPG
    372.2 KB · Views: 9
  • CD-11-a (1).JPG
    CD-11-a (1).JPG
    572 KB · Views: 9

Plankwalker

Petty Officer 3rd Class
Joined
Sep 28, 2020
Messages
79
no known antidote .... I already have a cd11 waiting for next winter in my basement....$80 US with nice tank how much was your JW??
I did pay $250 CND for this engine, but I really wanted it for two reasons. 1. it had only one owner and has remained untouched for 30 years since his death. 2. I have a cedar strip wherry and I need an engine with an integrated tank. there is no room for a separate tank. Plus, I really only want to be using vintage engines with this classic wooden boat. I have the 1960 2hp Firestone/Elgin, now I will have a 1964 3hp. Just waiting for all the spare parts to arrive.
 

Crosbyman

Rear Admiral
Joined
Nov 5, 2006
Messages
4,987
If you are happy with your purchase that is all that counts. TLC will have it purring.

Don't forget to clean out any crud in the 2 small cap vents..look closely to align the inside plate and holes. Check the tank filter !
 

Plankwalker

Petty Officer 3rd Class
Joined
Sep 28, 2020
Messages
79
The tear down is moving along. I just finished work on the carb. When I started, the choke would not budge. I was worried the rod was bent. All the components were intact, just really dirty. In case you are wondering, yes, the rest of the engine is just as dirty.
20210528_195816.jpg20210529_205806.jpg
 

Plankwalker

Petty Officer 3rd Class
Joined
Sep 28, 2020
Messages
79
Oh, and this was what I found under the flywheel. One of these coils actually worked!
20210526_162327.jpg
 

Crosbyman

Rear Admiral
Joined
Nov 5, 2006
Messages
4,987
lucky find....:) good omen.... cracked coils frequently mean low use motors

I am keeping a copy of your picture for non-believers :)

Points may need just a touch up but condensers likely gone also
may as well change plug wires also since you will be pulling the mag plate
 

Plankwalker

Petty Officer 3rd Class
Joined
Sep 28, 2020
Messages
79
lucky find....:) good omen.... cracked coils frequently mean low use motors

I am keeping a copy of your picture for non-believers :)

Points may need just a touch up but condensers likely gone also
may as well change plug wires also since you will be pulling the mag plate
Yes. I ordered a complete set of replacement parts. Coils, Points, Condensers, wires.
 

racerone

Supreme Mariner
Joined
Dec 28, 2013
Messages
36,258
The facts say that it is very affordable to replace the entire ignition system on these motors.-----Easier / less trouble than to do the same concept on a modern electronic ignition motor.----And in fact those wonderful magneto parts are in stock at many boat shops.----It is also amazing how many parts are listed as NLA for newer motors.
 

oldboat1

Fleet Admiral
Joined
Apr 3, 2002
Messages
9,607
Most of the motors I still have are '50s/'60s magneto motors. I routinely fully rebuild the magnetos, and used to have a fairly refined cost estimate -- less than $150US, I think, maybe including a fresh impeller as well. Well worth it, imo.
 

Plankwalker

Petty Officer 3rd Class
Joined
Sep 28, 2020
Messages
79
Most of the motors I still have are '50s/'60s magneto motors. I routinely fully rebuild the magnetos, and used to have a fairly refined cost estimate -- less than $150US, I think, maybe including a fresh impeller as well. Well worth it, imo.
I agree. In this case, I have ordered all new gaskets and seals. I know that there is a heavy amount of carbon build up that needs to be removed and I want to be 100% certain the cooling chambers are free and clear. The cylinders appear perfect, no scoring. No indication of any overheating. I am looking forward to using this little gem for some fishing.
 

Plankwalker

Petty Officer 3rd Class
Joined
Sep 28, 2020
Messages
79
I am finally back to working on my Johnson (so to speak).
The lower unit and powerhead are still waiting to be taken apart and cleaned. I am missing the spring for the tilt bracket. I just ordered one off ebay. Half the small fitting for the grease nipple is broken off. I have two options. One is to try and tap the remaining material for a threaded grease nipple, but I just do not think there is enough material to hold it. The second is to simply block the hole with epoxy paste. If I need to add grease, I can remove the casing and add it. Blocking the hole will prevent water from getting inside the mid section case.20211015_140542.jpg
 

tphoyt

Ensign
Joined
Jun 10, 2010
Messages
918
That kind of grime is an excellent preservativešŸ˜‚.
It seems to prevent corrosion and paint oxidation. It sounds like this is going to clean up nice. Please come back with some pics when your done.
Best.
 

Plankwalker

Petty Officer 3rd Class
Joined
Sep 28, 2020
Messages
79
LOOSE CONNECTING ROD
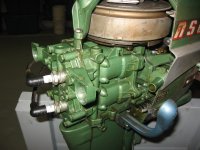
Cracked open the power head and discovered a couple of things.
First, two of the bolts showed signs of failed attempts to remove. The other six bolts were untouched. So I figure someone felt the need to open the power head and found it too difficult to remove the bolts.
Second, once I opened the block, I realized that the bolts on the lower connecting rod were LOOSE!!!! The locking plates were in place and prevented the bolts from coming completely free. The only thing I can think of is that there were never torqued properly in the first place.
So I figure the reason why someone was attempting to open the block might have been due to hearing a knocking from the loose connecting rod.
I have new bolts and locking plates coming in the mail.
Want to follow along with the rebuild?
Check it out: 1964 3hp rebuild

20211020_114655.jpg
 

Plankwalker

Petty Officer 3rd Class
Joined
Sep 28, 2020
Messages
79
I am doing the prep work to repaint the cowling of the 1964 JW-19M. Of course, I much prefer the colors and decals of the earlier models. Early 50's models were green with a really nice sea horse logo. The 1956 was a deep burgundy. The physical look of the cowling of the 1964 appears identical to the 56. I am tempted to replicate the look of the 56 on the 64 model. I am not planning to sell it as a 56 model.
The 56:1956b.jpg

The 64:Vintage_Johnson_3hp_Outboard_Motor_03_soph.jpg

Is it blasphemy to repaint it as an older model just because you prefer the colors and decals?
Let me know.
 

tphoyt

Ensign
Joined
Jun 10, 2010
Messages
918
In my eyes if your going to keep it do what ever you want. But if you plan to sell it I would keep it the original color. It can mean a lot to someone looking for a period correct motor.
 

Plankwalker

Petty Officer 3rd Class
Joined
Sep 28, 2020
Messages
79
In my eyes if your going to keep it do what ever you want. But if you plan to sell it I would keep it the original color. It can mean a lot to someone looking for a period correct motor.
I hear you. I guess I will keep it period correct and keep my eyes open for yet another outboard to restore.
 

Plankwalker

Petty Officer 3rd Class
Joined
Sep 28, 2020
Messages
79
After I am done the JW-19, I will be turning my attention to this beauty. A 1956 JW-12. I will likely sell the jw-19 just to free up the space I need to store the ones I use. The style is very similar to later models, but the colors and decals are so much nicer. This unit will also require a full tear down and rebuild. I anticipate needing new coils and condensers. Seals and gaskets are on order as well as paint and decals.
20211114_161223.jpg
 

Plankwalker

Petty Officer 3rd Class
Joined
Sep 28, 2020
Messages
79
Tried putting in new points in the 1964 Johnson 3hp. 'out of the box', the gap was way too small. The contacts were too big to form any gap as the cam rotated.
I tried manually filing down the contact on the stationary point (put the point in a vice and filed the contact down), but that resulted in poor surface contact; I would get one high side some where.
I re-installed the old points and cleaned them up a bit and reset the gap/timing.

Is there a good method to grind down contact material to make the new points fit the vintage engines?
 
Top