18' 1969 Offshore V restoration

ctswf

Chief Petty Officer
Joined
Aug 7, 2012
Messages
424
Re: 18' 1969 Offshore V restoration

:grumpy:

the boat was out in the direct sun all day monday, and in the rain since then.
Today as it dried out I noticed the deck now has a lot of cracks in it, like splintering wood.

Deck had one layer of epoxy on the bottom and sides, dried, riveted in place then two layers of epoxy on top going over all rivets. Then 2 coats of deck paint.
I did not epoxy or caulk the rivets holes when installed.

Anyone see this happen before on your epoxied deck? The deck is made of 4 pieces of 3/4 tongue and grove.

At this point I guess I have to wait it out, see how bad it gets then maybe hit it with a coat of deck paint again
 

classiccat

"Captain" + Starmada Splash Of The Year 2020
Joined
Dec 20, 2010
Messages
3,412
Re: 18' 1969 Offshore V restoration

:grumpy:

the boat was out in the direct sun all day monday, and in the rain since then.
Today as it dried out I noticed the deck now has a lot of cracks in it, like splintering wood.

Deck had one layer of epoxy on the bottom and sides, dried, riveted in place then two layers of epoxy on top going over all rivets. Then 2 coats of deck paint.
I did not epoxy or caulk the rivets holes when installed.

Anyone see this happen before on your epoxied deck? The deck is made of 4 pieces of 3/4 tongue and grove.

At this point I guess I have to wait it out, see how bad it gets then maybe hit it with a coat of deck paint again

That stinks CT. it could be checking. Certain PLY types are more prone to it than others. The work-around is glass cloth.

do you have any pics of it?
 

ctswf

Chief Petty Officer
Joined
Aug 7, 2012
Messages
424
Re: 18' 1969 Offshore V restoration

one of the 4 pieces is much worse than the others... here's the pics:

2013-05-29_15-54-25_376_zps581af693.jpg


2013-05-29_15-54-11_571_zpsaf3dfd4d.jpg
 

classiccat

"Captain" + Starmada Splash Of The Year 2020
Joined
Dec 20, 2010
Messages
3,412
Re: 18' 1969 Offshore V restoration

I'm sorry to say it CT but it looks like checking; your wood grains run from port to SB. Its bad news because it exposes untreated wood to the elements. Can you peel-up an inconspicuous area to see if it is indeed the wood grain lifting?

search around the woodboat forums but I have a feeling that the only solution you'll find is to sand-off the paint (stopping in the epoxy) and putting down 6oz fiberglass cloth with epoxy resin. I recently picked-up 25 yards of 6oz cloth off of JTD for about $135.

Hopefully someone else has an easier (and as equally effective) solution than what I'm proposing above. :(
 

InMotion

Commander
Joined
Nov 3, 2011
Messages
2,080
Re: 18' 1969 Offshore V restoration

Really does look like checking to me as well. Another option would be to sand as Bluefin suggested and then use Helmsmans spar varnish and put 3-4 coats. Then you can paint over it when done. Best guess is that you would need a max of 2 quarts --- roughly $45-$50. This would seal it up as the spar will seep into the checked wood.

Stinks either way though man.... sorry that you have to experience this!

J.
 

ctswf

Chief Petty Officer
Joined
Aug 7, 2012
Messages
424
Re: 18' 1969 Offshore V restoration

Really sucks but its not the worst thing in the world i guess, glad I didn't buy crazy expensive floor paint.

It's actually not to bad yet, the pictures I took were of one piece, the rest of the pieces have zero to 2 cracks total...right now anyway.

Funny part is the problem piece was originally the "good piece", while all the others had some level of warping to them that I had to muscle out...I assume it will soon be happening to all of them though.
 

classiccat

"Captain" + Starmada Splash Of The Year 2020
Joined
Dec 20, 2010
Messages
3,412
Re: 18' 1969 Offshore V restoration

Really sucks but its not the worst thing in the world i guess, glad I didn't buy crazy expensive floor paint.

It's actually not to bad yet, the pictures I took were of one piece, the rest of the pieces have zero to 2 cracks total...right now anyway.

Funny part is the problem piece was originally the "good piece", while all the others had some level of warping to them that I had to muscle out...I assume it will soon be happening to all of them though.

Consider yourself lucky to catch it and that it wasn't hidden under carpet or vinyl.

I would've suspected that the warped pieces would've been the 1st to check since you had to stress the wood grain to get it to conform to the stringers/ribs.
 

GA_Boater

Honorary Moderator Emeritus
Joined
May 24, 2011
Messages
49,038
Re: 18' 1969 Offshore V restoration

CT, did you happen to mix up a piece of interior ply? That looks like what happens with inside ply outside. My side panels just have two coats of Rusto on the them and after a year there are no checks, still look like I put them in yesterday barring the scuffs and scrapes.

I looked at your motor thread in the J/E forum. Looks like you got the answers you need after the chaff from the idjits is blown away. I don't know why the wise azzes have to jump on you for not changing the impeller and offer no help, just stupid comments. I guess they have always been perfect. :facepalm: Sorry, but stuff like that bugs me.
 
Last edited:

ctswf

Chief Petty Officer
Joined
Aug 7, 2012
Messages
424
Re: 18' 1969 Offshore V restoration

Interior ply - It's not impossible, The floor ply was picked up for me as a favor. I said to get any 3/4 exterior but never checked it myself or got a receipt. When I get home I'll see if I can find a piece of scrap.

The 1/2 inch on the side panels I got myself and is definitely exterior, that and the marine ply have no issues so far. But none of those pieces have the size, stress, ventilation issues and amount of sun and heat exposure the floor has

The floor corners have trim to prevent dropping fishing weights down there, (basically no ventilation) the floor was REALLY HOT the other day in the sun... skin burning hot.

Worst case scenario if it does turn out to be the interior ply that will de-laminate with or without fiberglass mat, I'll probably just let it rot out over the next few years and replace it when I need to. I'll at least get the summer out of it...again, worst case scenario that is
 

ctswf

Chief Petty Officer
Joined
Aug 7, 2012
Messages
424
Re: 18' 1969 Offshore V restoration

I looked at your motor thread in the J/E forum. Looks like you got the answers you need after the chaff from the idjits is blown away. I don't know why the wise azzes have to jump on you for not changing the impeller and offer no help, just stupid comments. I guess they have always been perfect. :facepalm: Sorry, but stuff like that bugs me.

I took no offense to the evinrude forum, the manual does say to change it yearly, people being shocked by my 8 year spree is a good thing, it drives home it's importance.

I'm a handy person but don't have good working knowledge of motors. To some extent I do feel like I show up pointing my finger at motor parts saying "whats this thingy"... by the way I actually have a photo of a leak I was going to post pretty much saying that.
 

GA_Boater

Honorary Moderator Emeritus
Joined
May 24, 2011
Messages
49,038
Re: 18' 1969 Offshore V restoration

You're a better man than I, Dunga Din.

You went in there saying you knew it needed to be changed, so there was no need for any dumb *** comments or the equivalent. 'Nough said.
 

jbcurt00

Moderator
Staff member
Joined
Oct 25, 2011
Messages
25,030
Re: 18' 1969 Offshore V restoration

If the plywood was tongue & groove when you got it, I don't think it's interior ply. But I could be wrong.

I'm be really surprised that newly applied epoxy checked that badly, unless it could possibly have not been completely cured. Did the epoxy & deck paint get sufficient cure time between coats? And prior to being outside in the hot sun, then the rain?

If the epoxy wasn't 100%, the sun may have warmed the wood, which would expand, and that might crack the paint, depending on what deck paint you used. Have you looked to see how extensive each crack is? Maybe 'just' the paint? Or have the cracks exposed bare wood?

If you can get the boat under cover (garage preferred), have some air (heat too) circulation above (& if possible below deck) and give it a few days, see if you can encourage the deck to dry out as much as it's likely to.

Scuff it & re-coat the deck w/ more paint, give it plenty of time to cure and cover w/ deck finish of your choice. If you are going w/ a paint finish deck, might consider vigorous sanding back to epoxy & possibly another 2 coats of epoxy.

During the current resto, it might be better to do more now, rather then letting it go. Lotta work to replace the deck. In a tinny, not has critical as a glasser deck, but still a lot of work to replace.

That ^^^ & a nickle will get you 1/5 of a Jaw Breaker ;)
 

ctswf

Chief Petty Officer
Joined
Aug 7, 2012
Messages
424
Re: 18' 1969 Offshore V restoration

Wood is indeed exterior rated glue, cure times were well above recommended wait times

Heres another possible cause,

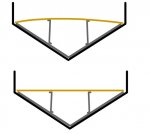
This boat has been torn down in the past, when I opened it up the stringers were riveted to the ribs at a height which causes the floor to be bowed up in the middle, enough that I had to really fight this wood in to place.

This is my first boat restore, it seemed normal to me as if designed to shed water off the sides.

Is the floor supposed to be perfectly flat on these boats??? No doubt my wood had to be stressed in to place to get that existing curve. All epoxy on the top of the deck was applied after the wood was riveted down.

Really wishing I went with the fiberglass cloth...
 

ctswf

Chief Petty Officer
Joined
Aug 7, 2012
Messages
424
Re: 18' 1969 Offshore V restoration

I got a chance to test out the trim pin

originally I posted 24mph. 5200rpm , 4th pin from the transom. prop would kick out of the water sometimes.

Moved to the second pin from the transom and WOT was 29mph 4800rpm. No problems with motor height or prop kicking out of the water at all.

Little bit of a plow though, next time i'll try the 3rd pin I think might be the magic spot for this boat.

so far both trips were a wet and bumpy ride, I think due such a blunt bow although it was a bit windy out. When anchored these old starcrafts can really floats up over some huge rollers like its nothing huh? What a difference from my old low profile 16' glasser.
 

GA_Boater

Honorary Moderator Emeritus
Joined
May 24, 2011
Messages
49,038
Re: 18' 1969 Offshore V restoration

I'd say you're getting the trim pin dialed in. Different SC/motor but I ended up at the third hole out too.

The floor should lay flat. If it was bowed (slightly too wide) when you got it in, that could have put some stress cracks in the epoxy leading to what you have now. How to fix, pull the floor up and trim the sides a little, re-coat and put back in. Or re-coat in place. I don't know for sure, ct.
 

ctswf

Chief Petty Officer
Joined
Aug 7, 2012
Messages
424
Re: 18' 1969 Offshore V restoration

not that the floor would have been too wide, but the location of the two stringers may have been altered before I got it, causing the middle of the floor to be a little higher. It looks fine installed now with a slight bow, you would not know it.

but just so I know, looking at this highly detailed replica, what is normal on these boats? the color grey being the ribs and stringers.

Yeah I think the 3rd hole and 3rd trys a charm on the motor! resisting 3rd hole joke

sh.jpg
 

classiccat

"Captain" + Starmada Splash Of The Year 2020
Joined
Dec 20, 2010
Messages
3,412
Re: 18' 1969 Offshore V restoration

not that the floor would have been too wide, but the location of the two stringers may have been altered before I got it, causing the middle of the floor to be a little higher. It looks fine installed now with a slight bow, you would not know it.

but just so I know, looking at this highly detailed replica, what is normal on these boats? the color grey being the ribs and stringers.

Yeah I think the 3rd hole and 3rd trys a charm on the motor! resisting 3rd hole joke

View attachment 196687

:lol:

I would think it would be designed flat or bowed towards center (concave-up) so that it sheds water towards the bilge above-deck rather than relying on limber holes. Alot of those little runabouts have an exaggerated concave-up deck...I've always assumed for drainage. Maybe i'm wrong? :noidea:
 

ctswf

Chief Petty Officer
Joined
Aug 7, 2012
Messages
424
Re: 18' 1969 Offshore V restoration

I'm sorry to say it CT but it looks like checking; your wood grains run from port to SB. Its bad news because it exposes untreated wood to the elements. Can you peel-up an inconspicuous area to see if it is indeed the wood grain lifting?

search around the woodboat forums but I have a feeling that the only solution you'll find is to sand-off the paint (stopping in the epoxy) and putting down 6oz fiberglass cloth with epoxy resin. I recently picked-up 25 yards of 6oz cloth off of JTD for about $135.

Hopefully someone else has an easier (and as equally effective) solution than what I'm proposing above. :(

good advice, I did this.
Sanded the paint off with an edger (floor sander)

Did one layer of cloth+UScomposites 3:1 epoxy. Re coated a second layer of epoxy last night.
Looks good, I plan on a total of 3 or 4 coats of epoxy.

I plan to paint again, but I kind of want to keep the floor clear for now so I can see what the wood grain is doing over time. I wonder how quick epoxy is compromised by sun exposure.

...I bought new seats

Thanks for the heads up on the impeller GA_boater, I got it done
 

classiccat

"Captain" + Starmada Splash Of The Year 2020
Joined
Dec 20, 2010
Messages
3,412
Re: 18' 1969 Offshore V restoration

tank-hull, bullet-proof motor and now a bomb-proof deck!

Cloth is like rebar in epoxy...if done right, it will not check...but I can understand your apprehension after what you were just through.

Maybe cover it up with rug or pads if you're taking it out into daylight? you definitely want to minimize UV exposure.
 

ctswf

Chief Petty Officer
Joined
Aug 7, 2012
Messages
424
Re: 18' 1969 Offshore V restoration

eh, I'll probably just paint and forget about it, it looks great so far

It's been long enough, I need to get some fish on the boat!!!
 
Top