16' Nescher ski boat complete restore- SPLASHED!!

Status
Not open for further replies.

archbuilder

Vice Admiral
Joined
Sep 12, 2009
Messages
5,697
Re: 16' Nescher ski boat complete restore

Re: 16' Nescher ski boat complete restore

I'm on track for paint Tuesday....got the dash sanded down and the drain tubes installed, thanks bankfisher!

IMG_0048.jpg


I also got the paint booth cleaned out....hosed it out good!

IMG_0049.jpg


And of course Miss Morgan enjoyed being outside.....damn, cant wait to get the paint on the top and Max hung on the transom! :D

IMG_0047.jpg


Head to the upholster in the AM, then paint prep tomorrow night!
 

archbuilder

Vice Admiral
Joined
Sep 12, 2009
Messages
5,697
Re: 16' Nescher ski boat complete restore

Re: 16' Nescher ski boat complete restore

Ok I just finished the prep work....tried! I need a good night sleep and get after it tomorrow. Here is a shot of her taped to the floor!

IMG_0053.jpg
 

archbuilder

Vice Admiral
Joined
Sep 12, 2009
Messages
5,697
Re: 16' Nescher ski boat complete restore

Re: 16' Nescher ski boat complete restore

Here is the first shot of the boat....not a good one, but the paint booth is a little cramped for photography! I'll get some more shots later one it tacks up and I unwrap it....and a video. Hope everyone is having a good day, I sticky, smell like paint and tired....but happy!

IMG_0056.jpg
 

archbuilder

Vice Admiral
Joined
Sep 12, 2009
Messages
5,697
Re: 16' Nescher ski boat complete restore

Re: 16' Nescher ski boat complete restore

Thanks here are some pics...youtube is of course taking forever to upload! I almost feel bad saying this..but it is to shinny to photograph...all you get are reflections! I'm sure the Oklahoma sun will take care of that problem, but it is a nice one for the moment!

IMG_0071.jpg


IMG_0074.jpg


I couldn't resist sticking some of the toys on to see how they look with the new paint!

IMG_0065.jpg


Dash has some orange peel....but the buffer will fix that!

IMG_0076.jpg


IMG_0077.jpg


Hope you guys are having a great night....
 

archbuilder

Vice Admiral
Joined
Sep 12, 2009
Messages
5,697
Re: 16' Nescher ski boat complete restore

Re: 16' Nescher ski boat complete restore

thanks bob! I've been going down memory lane.....wow I forgot what she looked like!

CopyofIMG_1469.jpg


IMG_0074.jpg


IMG_1479.jpg


IMG_0056.jpg


Wow....what a change.....If any of you guys ever have a doubt, just keep sanding!
 

archbuilder

Vice Admiral
Joined
Sep 12, 2009
Messages
5,697
Re: 16' Nescher ski boat complete restore

Re: 16' Nescher ski boat complete restore

Thanks for all the comments guys! Tonight I moved her to my garage, and took Max out to the paint booth...all nice and tucked in waiting for fresh paint! Here is a shot of Miss Morgan in the sun tonight!

IMG_0083.jpg


The plan is to get Max prepped on Saturday, and painted on Monday. Then break down the paint booth and get started putting her together! This will be the fun part!
 

archbuilder

Vice Admiral
Joined
Sep 12, 2009
Messages
5,697
Re: 16' Nescher ski boat complete restore

Re: 16' Nescher ski boat complete restore

Thanks for all the comments guys! It feels good to be on the down hill side! There is still a lot of work, but she is getting close! Tonight I stripped down Max's stickers, and got the glue off.

IMG_0124r.jpg


Tomorrow I'm going to work on finishing the prep work on him. I'm also sending my decal guy a shot of this sticker to see if he can reproduce it.

IMG_0130r.jpg


I also picked up the pin stripe tape today at the paint store. I think it will look really cool! I forked over the bucks to get the 3M strip tape, but I think it will outlast the cheap stuff by years.

IMG_0135.jpg


I hope everyone is having a great weekend! Hopefully Max is painted tomorrow or Sunday morning!
 

archbuilder

Vice Admiral
Joined
Sep 12, 2009
Messages
5,697
Re: 16' Nescher ski boat complete restore

Re: 16' Nescher ski boat complete restore

Well here are a couple of shots of Max's outfit being pressed so to speak!
IMG_0149.jpg


And one of him without his belt and suspenders!

IMG_0150.jpg
 

archbuilder

Vice Admiral
Joined
Sep 12, 2009
Messages
5,697
Re: 16' Nescher ski boat complete restore

Re: 16' Nescher ski boat complete restore

I started out today by moving Miss Morgan back to the shop. It looks so much better without a paint booth to walk around / in and out of! :D

IMG_0155.jpg


I color sanded and buffed her out above the rub rail this afternoon. My arms still feel like rubber bands from the hand buffing!
 

archbuilder

Vice Admiral
Joined
Sep 12, 2009
Messages
5,697
Re: 16' Nescher ski boat complete restore

Re: 16' Nescher ski boat complete restore

After buffing I started putting the dash together and thinking about wiring. Naturally the studs on the smaller gauges are too short, so I made extensions.

IMG_0157.jpg


And because of the angled adapters, the backing plates in the back are offset from the holes to one side. They seem to work like they are, but I may make some kind of support for the side that is over the hole. I'll ponder that tonight.

IMG_0166.jpg


I also put in the switches to the right of the steering. I figured I would put the ones that are either not used much or turned on at the beginning of the day and off at the end on that side. I put two on off switches and the bilge pump 3 way on that side. I'm guessing one will be the master radio (hot leg, not the memory leg). It seems like that one should be next to the bilge switch....since both will be fiddled with at the beginning and end of each outing. The other will either be a spare (put one in, figured I have forgotten something!) or lights

IMG_0163.jpg


My switches are as follows so far:
  1. Bilge
  2. Interior lights
  3. Running lights
  4. Radio master
  5. Horn
  6. Spare

I need to order two more "end" trims for the switches. I ordered 2 end and 4 middle pieces, not realizing I would split the switches into two banks.

The gauges are starting too look good. The empty hole is for the depth finder. I need to get that ordered too.

IMG_0162.jpg


I also put in the fuse block tonight. I mounted it to the drivers side of the framing member that goes from the bow to the dash. I should be able to lay on the floor between the seats and access it as needed.

IMG_0165.jpg


Its a 14 fuse bank, so I should have more than enough circuits.
 

archbuilder

Vice Admiral
Joined
Sep 12, 2009
Messages
5,697
Re: 16' Nescher ski boat complete restore

Re: 16' Nescher ski boat complete restore

I did find a stainless one last night Skibum. I need to order it along with some other stuff today.

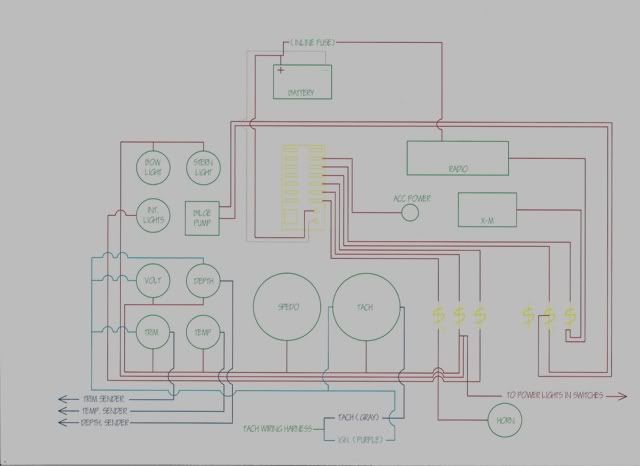
I also put together a wiring diagram this morning. I had to print, it....then scan it. For some reason acrobat is refusing to talk with AutoCAD this morning! Its a little hard to read, but hopefully you can see it.

WIREDIA.jpg


And my black ink cartage is almost out so the ground from the battery to the fuse block is barely visible. Here are a couple of questions for you guys.
  1. I have a ground on the fuse block that I was planning on connecting everything too. I also have a ground on the tach wiring harness. I'm thinking about ignoring the tach ground, and just grounding everything back to the fuse block. That seems like a more direct route to the battery.
  2. I can't decide if I want the depth finder on the ignition switch. I have almost thought of switching it separate. That way I can still run the depth finder with the engine off. Of course there goes my spare switch. I really can't tell you why I would need it on when the ignition is off either.
  3. I put the X-M and radio on a master switch. That way I can listen to tunes when the ignition is off.
  4. There are some inline fuses in Max, I'm assuming one of them is for the ignition circuit. I need to check that on the wiring diagram. Does anyone know? Otherwise I might want to fuse it before it goes to the instruments.

My switches also have lights, but I didn't show them wired...I just indicated that with the "to power lights in switches". I thought that would get pretty confusing. Switching notes: "M" is for momentary and "3" is for 3-way.
 

archbuilder

Vice Admiral
Joined
Sep 12, 2009
Messages
5,697
Re: 16' Nescher ski boat complete restore

Re: 16' Nescher ski boat complete restore

So I'm sitting here looking at this diagram....I think I'm going to add buss bars to the "Running light" circuit and the "radio circuit". Both of those circuits have items that aren't necessary close to each other. I figure I could put the busses next to the fuse block. Run power from the switch, to the buss, then distribute it in different directions. On the radio switch, that would allow me to add an amp pretty easy later (depending on the draw). I need to crunch some numbers and figure out the total loading to size the wire to the fuse block. Ohm's law is a little fuzzy right now.....think its volts / watts = amps.
 

archbuilder

Vice Admiral
Joined
Sep 12, 2009
Messages
5,697
Re: 16' Nescher ski boat complete restore

Re: 16' Nescher ski boat complete restore

Ok I did a little calculating on the wire sizes tonight. I found this handy wire size calculator. There is also a lot of other useful information. http://www.gtsparkplugs.com/WireSizeCalc.html

Here is what I came up with. I used a maxim of a 5% voltage drop. I also ran the calcs using a higher load that the actual load. The Master circuit (from the battery to the fuse block) wire seems a little large. I didn't take any diversity into account, just based it on the total load. I would have to turn on everything for that to take place plus add about another 15 amps.

wiresizechart.jpg


It looks like, as High Voltage predicted, most of its 14 ga. For simplicity I will probably wire all of it with 14 ga. I talked with the guy at the parts store today and they can order 100' rolls in whatever colors I want. I'm not going to use the tinned wire...that seems like overkill on a weekend boat on fresh water. I'm going to figure out how much I need so I can get it ordered. I ordered some of the misc. parts I need for wiring today. I should be able to make a big dent in it next weekend....then back to waiting on the rub rail....once I have that I can hang Max! Seats should be done right after that!
 

archbuilder

Vice Admiral
Joined
Sep 12, 2009
Messages
5,697
Re: 16' Nescher ski boat complete restore

Re: 16' Nescher ski boat complete restore

I have been thinking a little about color coding the hot wires. I know there are boating standards...but I'm making up my own! :D Here is what I have so far:

  • Black: All ground wires
  • Blue: Sending unit wires
  • Yellow: Running lights
  • Pink: Instrument lights
  • White: Ignition circuit
  • Green: Interior lights
  • Red: Misc power, radio, bilge pump, etc

I added up the lengths, and they aren't as long as I thought. Looks like I will only need around 300'. I can get 40' rolls also, so I think everything other than black I can do off the 40' rolls. Looks like I will need about a zillion wire connectors for hooking up wire to the instruments, fuse block, and switches.
 

archbuilder

Vice Admiral
Joined
Sep 12, 2009
Messages
5,697
Re: 16' Nescher ski boat complete restore

Re: 16' Nescher ski boat complete restore

Thanks for the labels Skinny Chicken! Redred, I'm ready to see her done too! Your boat is coming along nicely by the way. Skibum I am using the heat shrink type, picked them up today.

Tonight I made a little progress. First for Micks favorite subject....the fenders! I taped them off and under coated the bottom side. Hopefully tomorrow or Sunday I will get the pin stripe on them and put them on the trailer. I also coated the board that attaches too them with the epoxy. They should be ready for carpet tomorrow.

IMG_0169.jpg


I also got my box of goodies from the UPS guy. Max's new "shoes" were in the box. Here is the new 19 pitch next to the old 13 pitch. I'm thinking the 13 was used on a tug boat or something!

IMG_0167.jpg


IMG_0168.jpg


I also picked up a double row buss at Academy. I should be able to distribute the running light and radio circuits off of it.

IMG_0174.jpg


While I was at Academy I also picked up the other 3 cleats, you would think those things are made of gold! I also got the horn in my UPS package.

IMG_0176.jpg


After the horn and buss, I put in the remaining switches. I started to put in some conduit clamps down the gunnel....it had been a while since I looked at it.....I was thinking I could put an 1.5" conduit clamp on it. Its a little tighter than what I remembered....wide, just not tall. I came up with the idea of making brackets so that I could lay wire bundles across the bracket. Its amazing how much stuff there is. The shifter control wire bundle, master power and ground, 3 sensor wires, 3 wires for the bilge, 2 wires for the stern marker lamp, spedo tube, steering cable, speaker wire, shifter cable and throttle cable. I'm contemplating putting all of the wiring (except the shifter control wire bundle) down the passenger side. That would free up some room for all the cables and steering. The fuse block and the battery are both located centered on the beam, so the wire lenght is the same either way.

IMG_0171.jpg


Anyone have any ideas? Guess I will sleep on it.
 

archbuilder

Vice Admiral
Joined
Sep 12, 2009
Messages
5,697
Re: 16' Nescher ski boat complete restore

Re: 16' Nescher ski boat complete restore

Ok I made the decision to run all the wiring down the passenger side (port). The only thing that will have a few feet longer is the stern light and the engine sender wires. Those are all over sized anyhow. That will free up the drivers side for the control / ignition cabling, shifter cable, throttle cable and steering cable. I plan on making brackets like I posted last night to support them. I ran 3/4" PCV conduit clamps down the passenger gunnel this morning and across the splash well. That took 16, fixing to run out and get some more at lunch. Its funny that the stainless screws cost more than the clamps! I also came to the revelation that if I need a buss to collect the running light / radio hot wires.....I need one for the grounds also, duh! :D So I will need to pick up another buss.
 

archbuilder

Vice Admiral
Joined
Sep 12, 2009
Messages
5,697
Re: 16' Nescher ski boat complete restore

Re: 16' Nescher ski boat complete restore

Well its been a long day of wiring....3 trips to the store today...and I have a list for tomorrow....wiring is almost as bad as plumbing! I did make a lot of progress, but have a ways to go. Hopefully I will have everything wired up tomorrow that I have. By the way, in case anyone gets any ideas about kidnapping Miss Morgan, you should know she has a security guard! Buck is very excited about lake weekends!

IMG_0183.jpg


Here is what I got done up under the dash. I plan on zip tying up everything and adding some more clamps once everything is terminated and finished up.

IMG_0177.jpg


I was a little bum-fuzzeled this morning. I needed a couple of clamps, but didn't have any wood to screw them too. I ended up epoxying them on, worked great. I used a 6 minute gel epoxy, just dabbed it on, then stuck them in place. I didn't even have to clamp or tape them up.

IMG_0182.jpg


Here are the clamps running down the passenger side gunnel. This worked out pretty good. I still need to pull things tight and zip tie it, but I think it will be pretty clean.

IMG_0180.jpg


I did a short video, but youtube is still doing its thing. I'll post it later.
 
Status
Not open for further replies.
Top