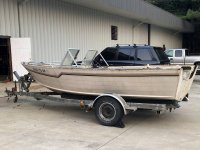
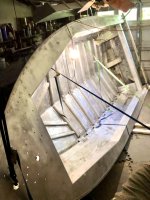
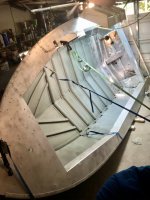
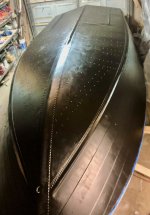
16 foot 1985 Grumman Aluminum Boat

Degn8er

Cadet
Joined
Jun 7, 2022
Messages
12
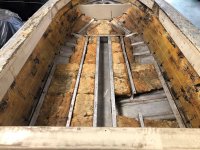
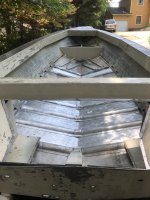
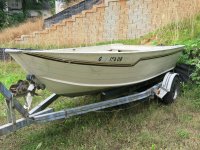
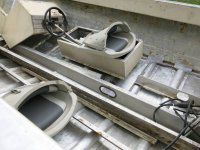
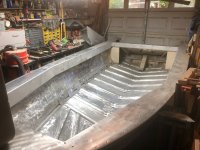
Hello, I am new here but I have a question. I recently bought this boat and the seller sent me this picture with the foam in it. The other picture is its present form without any foam. I did get all the metal parts that make up the floor supports in a pile with the sale. I am completely renovating the boat. I already removed a lot of the inside paint and I will be removing the outside paint as well. I am a skilled carpenter and accomplished handyman but this will be my first boat.
My question is. What is the purpose of the center trough and the cut out on the right. I wished I had some diagrams or plans to work from but I have not been able to find any online. I would appreciate any help or advice on the project. Thanks.
 

Attachments

  • 00505_bUUR4VXTzYuz_0CH0t2_1200x900.jpg
    00505_bUUR4VXTzYuz_0CH0t2_1200x900.jpg
    274.8 KB · Views: 19
  • IMG_1312.jpg
    IMG_1312.jpg
    1.6 MB · Views: 19

jbcurt00

Moderator
Staff member
Joined
Oct 25, 2011
Messages
25,019
Plans/Diagrams don't exist.

If wide enough center section might have been ski locker but looks too small.

Drainage perhaps, but probably ineffective.

No idea about the squarish section, battery, livewell that extended below the deck(floor)

Just treat this topic as your rebuild topic, moved to Resto Forum
 

Degn8er

Cadet
Joined
Jun 7, 2022
Messages
12
Plans/Diagrams don't exist.

If wide enough center section might have been ski locker but looks too small.

Drainage perhaps, but probably ineffective.

No idea about the squarish section, battery, livewell that extended below the deck(floor)

Just treat this topic as your rebuild topic, moved to Resto Forum
Thanks for the reply. I think the squarish cut out section would be a live well. I think I have the box in my pile of stuff. I will have to check if the size fits. If the center trough is ineffective do you think I should remove it on the restore?
 

Attachments

  • 00T0T_cGMhdqI8xTQz_0CI0t2_1200x900.jpg
    00T0T_cGMhdqI8xTQz_0CI0t2_1200x900.jpg
    128.1 KB · Views: 5

Wildey

Petty Officer 1st Class
Joined
Nov 24, 2021
Messages
202
Hi Degn8er, welcome aboard !
That center compartment looks like a 3 sided tray of sorts, well above the ribs and any drainage areas. I'd say you might have a Fish n' Fun model, or similar.
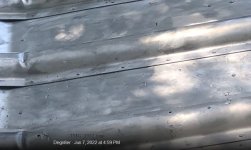
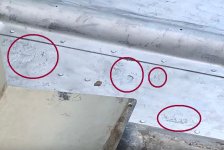
Also, you should look very closely at the evident corrosion that can be seen in the pic. If it is as bad, and extensive, you might want to try a different project.
You could possibly push a small awl through many of those pitted areas.
(could be why the seller quit on it ...... (seen that before)
Cheers.
 

Attachments

  • corrosion.jpg
    corrosion.jpg
    281.9 KB · Views: 12
  • more corrosion.jpg
    more corrosion.jpg
    55.1 KB · Views: 12

Degn8er

Cadet
Joined
Jun 7, 2022
Messages
12
Hi Degn8er, welcome aboard !
That center compartment looks like a 3 sided tray of sorts, well above the ribs and any drainage areas. I'd say you might have a Fish n' Fun model, or similar.
Also, you should look very closely at the evident corrosion that can be seen in the pic. If it is as bad, and extensive, you might want to try a different project.
You could possibly push a small awl through many of those pitted areas.
(could be why the seller quit on it ...... (seen that before)
Cheers.
Thanks for the welcome. Yes, you are correct with the Fish n' Fun model. I am committed to fixing up. The boat is 37 years old. I will do my best to patch any problems with the boat. If you have any suggestion I would like to hear it. The aluminum seems a lot thicker than the average boat. I am hopeful that I can repair it enough to take her out one day. I am not in any hurry and I have a lot of time on my hands.
 

Attachments

  • 00O0O_1spoNSvbFdTz_0pO0jm_1200x900.jpg
    00O0O_1spoNSvbFdTz_0pO0jm_1200x900.jpg
    226.5 KB · Views: 9
  • 00B0B_1okFhcxSX85z_0pO0jm_1200x900.jpg
    00B0B_1okFhcxSX85z_0pO0jm_1200x900.jpg
    123.7 KB · Views: 9

Wildey

Petty Officer 1st Class
Joined
Nov 24, 2021
Messages
202
I like that style ! Will likely make you a very nice boat when done.
Keep in mind, sometimes the worst of the corrosion is out of sight .... hidden under the ribs and laminations / attach points.
Just be aware, and check it closely.
Enjoy the journey !
Cheers !
 

Degn8er

Cadet
Joined
Jun 7, 2022
Messages
12
I like that style ! Will likely make you a very nice boat when done.
Keep in mind, sometimes the worst of the corrosion is out of sight .... hidden under the ribs and laminations / attach points.
Just be aware, and check it closely.
Enjoy the journey !
Cheers !
I appreciate it. I will know every little cranny of this boat when I am done with it. I am power wire brushing and sanding the inside. Every inch, I will check the corrosion that you mention. Then I will be starting the outside. I really hope this turns out well. So far I don't see any fatal flaws, but what would a rookie know. ;)
 

Degn8er

Cadet
Joined
Jun 7, 2022
Messages
12
I like that style ! Will likely make you a very nice boat when done.
Keep in mind, sometimes the worst of the corrosion is out of sight .... hidden under the ribs and laminations / attach points.
Just be aware, and check it closely.
Enjoy the journey !
Cheers !
What is the best way to repair the corrosion? I have been researching low temperature braising with map gas. Is this a decent way to fix it? Please let me know.
 

BWR1953

Admiral
Joined
Jan 23, 2009
Messages
6,156
What is the best way to repair the corrosion? I have been researching low temperature braising with map gas. Is this a decent way to fix it? Please let me know.
I'm in the process of dealing with corrosion repair on my Chieftain project. Mostly at the stern. The brazing option doesn't work if you're close to seams which contain sealant, which could heat up and be destroyed or leak out. In other, more open areas, it might work fine.

I'm using JB MarineWeld for much of my repair. Going to go back out to the garage after lunch and hit it again. Thoroughly clean the area, wipe with alcohol as a final cleaning, then smear the JBMW into place. Once hardened (about 24 hours) I'll sand it smooth and prep it for paint.

For major repairs, like thru-hull perforations, I'm installing a patch. Worked on that this morning and will continue tomorrow after the JBMW cures.

In my case, the stern patch will go on the outside of the hull only. It will be completely back-buttered with 3M 5200 sealant and final riveted with solids.
 

Degn8er

Cadet
Joined
Jun 7, 2022
Messages
12
I'm in the process of dealing with corrosion repair on my Chieftain project. Mostly at the stern. The brazing option doesn't work if you're close to seams which contain sealant, which could heat up and be destroyed or leak out. In other, more open areas, it might work fine.

I'm using JB MarineWeld for much of my repair. Going to go back out to the garage after lunch and hit it again. Thoroughly clean the area, wipe with alcohol as a final cleaning, then smear the JBMW into place. Once hardened (about 24 hours) I'll sand it smooth and prep it for paint.

For major repairs, like thru-hull perforations, I'm installing a patch. Worked on that this morning and will continue tomorrow after the JBMW cures.

In my case, the stern patch will go on the outside of the hull only. It will be completely back-buttered with 3M 5200 sealant and final riveted with solids.
I appreciate the reply. I have power wired brushed about 3/4 of the inside of the boat. So I will know better what I will be dealing with when it is done. I am planning on power brushing the paint off on the outside of the boat as well. I will look into JBMW to see if I think this will work. I plan on repainting with primer and a good marine paint after all the repairs are done.
 

Degn8er

Cadet
Joined
Jun 7, 2022
Messages
12
I appreciate the reply. I have power wired brushed about 3/4 of the inside of the boat. So I will know better what I will be dealing with when it is done. I am planning on power brushing the paint off on the outside of the boat as well. I will look into JBMW to see if I think this will work. I plan on repainting with primer and a good marine paint after all the repairs are done.
Most of the inside of the boat is sanded. There is just a few details left. There is some pitting in the aluminum but I have not found any extensive damage.

I am planning on one more quick sand with 80 grit sandpaper to even out the surface because I used many different tools to remove the paint. I think I will fill the pits with Marine JB weld and then spray a self etching Rustoleum primer.

I am wondering if the self etching paint is a wasted step if the surfaces are already sanded. I then plan on spraying the over the self etching primer with a regular aluminum primer before proceeding with the final coats of paint. Am I on the right track?
 

Attachments

  • image0.jpeg
    image0.jpeg
    2.1 MB · Views: 6

Degn8er

Cadet
Joined
Jun 7, 2022
Messages
12
I stripped most of the paint. I am checking for leaks and learning how to aluminum brazing to fix them. The next step is primer.
 

Attachments

  • IMG_1369.jpg
    IMG_1369.jpg
    1.7 MB · Views: 2

Degn8er

Cadet
Joined
Jun 7, 2022
Messages
12
I started self etching primer on the inside of the hull.
 

Attachments

  • IMG_1377.jpg
    IMG_1377.jpg
    1.4 MB · Views: 2

Degn8er

Cadet
Joined
Jun 7, 2022
Messages
12
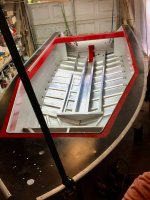
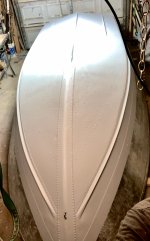
Inside painted and now I am priming the outside of the hull.
 

Attachments

  • IMG_1400.jpg
    IMG_1400.jpg
    1.1 MB · Views: 4
  • IMG_1407.jpg
    IMG_1407.jpg
    818.3 KB · Views: 4

Wildey

Petty Officer 1st Class
Joined
Nov 24, 2021
Messages
202
Lookin' sharp !
You are on a roll ... keep up the good work !
 

Degn8er

Cadet
Joined
Jun 7, 2022
Messages
12
Lookin' sharp !
You are on a roll ... keep up the good work !
Thanks, is is so hot in Georgia. Who needs to go to the sauna at the gym when I just need to walk outside. ;). If the heat does not kill me before I finish this boat, I will be happy.
 

Degn8er

Cadet
Joined
Jun 7, 2022
Messages
12
Painted two coats of AlumaHawk black today. Tomorrow the red strip goes on.
 

Attachments

  • IMG_1417.jpg
    IMG_1417.jpg
    1.1 MB · Views: 1
Top