140hp steering arm bolt head broke off

archcycle

Chief Petty Officer
Joined
Sep 21, 2009
Messages
647
1990 140hp E140TLESE

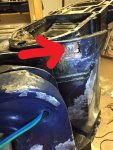
I'm trying to get this exhaust housing apart, but removing the two bolts that go horizontally into the steering arm one of the heads snapped right off like it knew I was coming.

Everything but this one headless bolt is out and I can wiggle the exhaust housing around on the midsection.

The angle doesn't look too bad in the picture but but it is bad. No way I'm getting a drill in there.

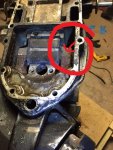
I could cut down between the steering arm and the block it bolts to on the exhaust housing adapter, but that looks expensive, though maybe it would be ok because it would only be the thickness of a Dremel multimax blade. The steering arms and exhaust housing adapters on ebay are all listed for the same cost as whole midsection assemblies that often include the steering arm.. I can pry the bottom of the exhaust housing out a bit but can't get half enough room to get a socket under the bottom of it to remove the lock nut holding the whole assembly together from the bottom.

Am I boned?
 

Attachments

  • photo269933.JPG
    photo269933.JPG
    136.7 KB · Views: 0
  • photo269934.JPG
    photo269934.JPG
    153.1 KB · Views: 0

interalian

Commander
Joined
Jul 23, 2009
Messages
2,105
I think that bolts to the upper motor mount which was NLA when I looked. If you have a spare you could cut the mount off the tilller arm rather than sacrifice the tiller arm.
 

F_R

Supreme Mariner
Joined
Jul 7, 2006
Messages
28,195
Agreed, sacrifice the mount. If you can get a replacement.
 

archcycle

Chief Petty Officer
Joined
Sep 21, 2009
Messages
647
Ok, I see what needs to be done now. Thanks interalian and F_R. I hadn't noticed that with the plate above it removed all that was holding that mount in place was the broken bolt through the arm.

The mount is readily Ebay-able. Time to get cutting.
 

archcycle

Chief Petty Officer
Joined
Sep 21, 2009
Messages
647
No Title

Success! Now off to buy an absurdly large socket for that for that lock nut at the bottom of the steering arm.
 

Attachments

  • photo270006.JPG
    photo270006.JPG
    134.1 KB · Views: 0

interalian

Commander
Joined
Jul 23, 2009
Messages
2,105
What's your project? I took the tiller arm off a motor I was scrapping. Getting it out of the housing once the nut was off was an exercise in heavy pounding.
 

archcycle

Chief Petty Officer
Joined
Sep 21, 2009
Messages
647
Looking back over it, I don't think I need to remove that nut and mess with the steering arm now that the exhaust housing is off and I can really examine it. The steering arm it is pretty solid in there. It looks safe.

What's your project? I took the tiller arm off a motor I was scrapping. Getting it out of the housing once the nut was off was an exercise in heavy pounding.

Project is rehabilitation. I spent countless hours on this motor many years ago. First boat, lots of mechanical tragedies and disasters. It was a terrible Frankenmotor pieced together from rotting remains of various OMC carcasses by a marine salvage yard masquerading as parts shop sold the motor to me as a 90hp. Some trouble was apparently gone to in order to disguise the thing.

Over the years I replaced just about everything that can be bolted or wired or crimped and all of the electrical system including wiring, rebuilt the gearcase, etc., but after years of very heavy use and then worse the years of disuse, stuff has just rotted. I bought a bigger boat with an Ocean Pro and discovered not having to fix things is awesome :)

120+ compression all around, it's a good motor, but it needs to be fully ripped apart. I just put an 88 SPL on that boat a few months ago so I can sell it, so this thing has just been sitting around waiting to be refurbed and once I get it rebuilt and painted, I get to buy another boat!
 

interalian

Commander
Joined
Jul 23, 2009
Messages
2,105
Good project. Best of luck and check back often with updates. We like pictures of rehabs.
 

archcycle

Chief Petty Officer
Joined
Sep 21, 2009
Messages
647
No Title

These lower mounts *really* don't want to come out. They are one of the important reasons I wanted to do the midsection. In hindsight they are quite permanently where ought to be, but there's no going back now.

OMC of course shows a picture of a large screwdriver gently inserted below factory clean rubber mounts and suggests spritzing some soapy water to help remove stubborn lower mounts. :rolleyes:

I've banged, pried, tried to cut a bit of the outer rubber on the other side well in away from the sidewalls hoping to relieve a bit of pressure, but they don't want to budge. On the other side I scraped in a bit and the walls around they appear to be sound considering how bad the nearby metal looks.

Suggestions appreciated. Drilling and tapping to thread an eye bolt in there, strapping down, and applying a chain hoist is starting to sound good.
 

Attachments

  • photo270356.JPG
    photo270356.JPG
    136.8 KB · Views: 0

interalian

Commander
Joined
Jul 23, 2009
Messages
2,105
Looks nasty. You could try drilling into the rubber all around to excavate it.
 

Chinewalker

Fleet Admiral
Joined
Aug 19, 2001
Messages
8,902
I've cut them out with an angle grinder. Corrosion in the housing can really clamp them in there... Do it outside, as the burning rubber from the grinder will really stink up a garage in a hurry. Don't ask me how I know this. :(
 

archcycle

Chief Petty Officer
Joined
Sep 21, 2009
Messages
647
I've been sidetracked a lot the last few months, but back at it, and have made some good progress.

Drilled then excavated the lower mounts with angle grinder. Dremel multimax long flat blade to the rescue Again to clean out the rubber without cutting the mating surface. I must have run $100 of multimax blades through this job so far but worth every penny.

Lots of chemicals and scraping and sanding and green priming and cans of OMC touchup paint later the parts look pretty good. Air conditioned shed and garage make rattle can jobs turn out better than I usually expect them to for NW Florida summers (when I did most of the painting). Cowling wasn't as good as I wanted so it has more work left.

Started assembling the midsection last night. Ready to start tapping new holes for the bolts I had to drill out.

I would have gotten to assemble more but the manual said OMC Gel Seal II between the exhaust adapter and outer exhaust housing and i really don't like disobeying the book, so ordered some. Going to be out of town this whole week anyway.


IMG_2040.JPG
IMG_2051[831].JPG
IMG_2052[833].JPG
IMG_2043.JPG

lower mount 1.JPG
lower mount 2.JPG
IMG_2055[835].JPG
IMG_2062[837].JPG
IMG_2066[839].JPG

2017-10-15 Progress.JPG
 

Attachments

  • IMG_2043.JPG
    IMG_2043.JPG
    181 KB · Views: 0
  • IMG_2051[831].JPG
    IMG_2051[831].JPG
    151 KB · Views: 0
Top