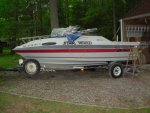
I have a 1989 Admiral cuddy cabin, 20' ft of cheap (and I mean cheap) boat. I bought this new in 1990, it had been on a dealer's lot for a year and was about all I could afford at the time. It's not much of a boat, but my kids have grown up on it, and now one son is a Coast Guard reservist, the other is finishing up a college degree in fisheries and wants to be a charter captain.
It's certainly not the boat of my dreams. It was made by the Raven boat company, who was apparently only in business a few years - and I'm guessing that's at least in part because they didn't build a very good boat.
The boat has been trailered most of its life, I bought a slip 2 years ago since my age and health suggested that putting the boat in and out several times a weekend was no longer fun (and that my sons aren't around as much). It was under a canvas cover whenever not in use, cranked high on the tongue to drain any rainwater that did get in, and double tarped each winter. for the last 9 years I've had it in a pole barn whenever its not on the water.
I should have known there was a serious problem a few years ago, when while heading back from our favorite fishing spot, the captain's chair broke loose and I was on my back, facing the clouds. But I thought it was just too thin a plywood floor, and I added a 3/4 plywood riser under the seat, screwed it down and went back to fishing.
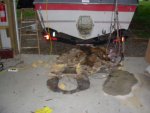
Toward the end of last season, my son convinced me that we should pull up and replace the floor, it seemed a bit soft in a couple of spots. I'm sure all you veterans can see it coming now.
We intended on starting in March, in hopes of having a full season (we're in Michigan, and salmon and trout fishing on the Great Lakes is a May-Sept. sport for our family). I got started a bit late, and finally tore into the floor toward the end of May.
I read a few things (including a few posts on this forum) and got a few tips from friends. My son convinced me that it was worth the $100/sheet for the 3 sheets of marine ply, and to use West Systems epoxy. So I bought the wood, and the epoxy.
Then I started tearing into the boat. I've taken a bunch of photos along the way, and will post them in subsequent posts once I get them to the standard forum size and have some time to add notes for each one. The plan slipped to hoping to finish by the 4th of July, now I'm rushing to get done by a fishing tournament I usually enter in mid-August, but frankly I'm not totally convinced I can even get it done by Labor Day. The boat is 200 miles away from my weekday habitat, so my work is confined to weekends (including a few longer weekends).
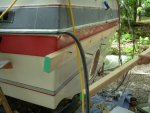
To make a long story short, I'm now at least in the building phase. For weeks I'd hoped I would begin the positive side of the process, only to tear out more bad stuff instead. I've spent over $2,000 already, and perhaps not done spending. This boat isn't worth a lot - in fact, in this economy there is a boat for sale for about $3,000 that has a bigger motor, is better built and even has better fishing equipment as part of the deal. (If I would have known how bad the boat was, I would have parted it out and gotten some please with a chain saw....)
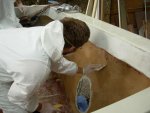
So here it is - I've decided I would use this boat as a learning experience. I figure if I ever ran across a boat that is just perfect, and a great deal because it needs work, I'll be ready. As such, most of you will giggle or groan on my approach (perhaps both). I've read with gusto many posts throughout this forum. I will be using and making comments on all sorts of material. The transom is done and back in, using pristine (expensive) marine ply and West Systems epoxy (for which the first gallon I paid way too much money at the local West Marine store). Once I passed the $1,000 mark I decided I'd slow down the spending, so I am using polyester resin and treated plywood for replacing the rotten stringers. The engine box will also be built from treated ply, but will be set and glassed in with epoxy. In fact, I'll have used at least 3 brands of epoxy, so you'll get comments about which was god, which was not so good (hint: not all epoxy is good for boat building).
With any luck I'll get the first pics up tonight. In the mean time, as you might have gathered, I'm nowhere near done. So this is your opportunity to give some advice, and plenty of encouragement.
Here's the opening question - the boat had marine carpeting, but that got slimey when we would land a big fish (or a few at once). I intended to install marine vinyl, but I see that some like to use a variety of paint products instead. Any comments on the virtues of vinyl .vs. paint, and what brands or types have worked for you would be appreciated.
Now, to start pulling the pictures together and tell you the rest of my story!
It's certainly not the boat of my dreams. It was made by the Raven boat company, who was apparently only in business a few years - and I'm guessing that's at least in part because they didn't build a very good boat.
The boat has been trailered most of its life, I bought a slip 2 years ago since my age and health suggested that putting the boat in and out several times a weekend was no longer fun (and that my sons aren't around as much). It was under a canvas cover whenever not in use, cranked high on the tongue to drain any rainwater that did get in, and double tarped each winter. for the last 9 years I've had it in a pole barn whenever its not on the water.
I should have known there was a serious problem a few years ago, when while heading back from our favorite fishing spot, the captain's chair broke loose and I was on my back, facing the clouds. But I thought it was just too thin a plywood floor, and I added a 3/4 plywood riser under the seat, screwed it down and went back to fishing.
Toward the end of last season, my son convinced me that we should pull up and replace the floor, it seemed a bit soft in a couple of spots. I'm sure all you veterans can see it coming now.
We intended on starting in March, in hopes of having a full season (we're in Michigan, and salmon and trout fishing on the Great Lakes is a May-Sept. sport for our family). I got started a bit late, and finally tore into the floor toward the end of May.
I read a few things (including a few posts on this forum) and got a few tips from friends. My son convinced me that it was worth the $100/sheet for the 3 sheets of marine ply, and to use West Systems epoxy. So I bought the wood, and the epoxy.
Then I started tearing into the boat. I've taken a bunch of photos along the way, and will post them in subsequent posts once I get them to the standard forum size and have some time to add notes for each one. The plan slipped to hoping to finish by the 4th of July, now I'm rushing to get done by a fishing tournament I usually enter in mid-August, but frankly I'm not totally convinced I can even get it done by Labor Day. The boat is 200 miles away from my weekday habitat, so my work is confined to weekends (including a few longer weekends).
To make a long story short, I'm now at least in the building phase. For weeks I'd hoped I would begin the positive side of the process, only to tear out more bad stuff instead. I've spent over $2,000 already, and perhaps not done spending. This boat isn't worth a lot - in fact, in this economy there is a boat for sale for about $3,000 that has a bigger motor, is better built and even has better fishing equipment as part of the deal. (If I would have known how bad the boat was, I would have parted it out and gotten some please with a chain saw....)
So here it is - I've decided I would use this boat as a learning experience. I figure if I ever ran across a boat that is just perfect, and a great deal because it needs work, I'll be ready. As such, most of you will giggle or groan on my approach (perhaps both). I've read with gusto many posts throughout this forum. I will be using and making comments on all sorts of material. The transom is done and back in, using pristine (expensive) marine ply and West Systems epoxy (for which the first gallon I paid way too much money at the local West Marine store). Once I passed the $1,000 mark I decided I'd slow down the spending, so I am using polyester resin and treated plywood for replacing the rotten stringers. The engine box will also be built from treated ply, but will be set and glassed in with epoxy. In fact, I'll have used at least 3 brands of epoxy, so you'll get comments about which was god, which was not so good (hint: not all epoxy is good for boat building).
With any luck I'll get the first pics up tonight. In the mean time, as you might have gathered, I'm nowhere near done. So this is your opportunity to give some advice, and plenty of encouragement.
Here's the opening question - the boat had marine carpeting, but that got slimey when we would land a big fish (or a few at once). I intended to install marine vinyl, but I see that some like to use a variety of paint products instead. Any comments on the virtues of vinyl .vs. paint, and what brands or types have worked for you would be appreciated.
Now, to start pulling the pictures together and tell you the rest of my story!
")