1983 Starcraft fm16 upgrades

Joined
Mar 28, 2010
Messages
24
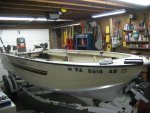
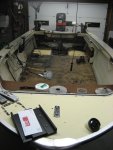
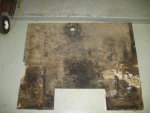
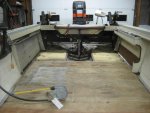
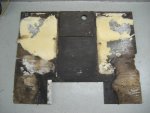
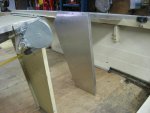
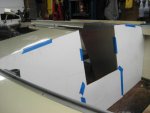
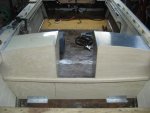
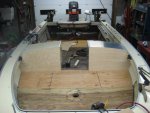
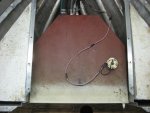
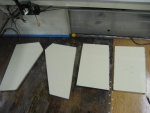
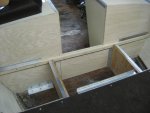
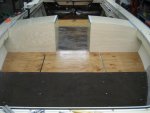
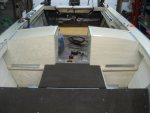
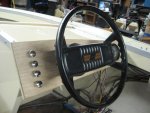
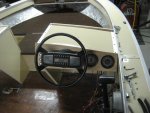
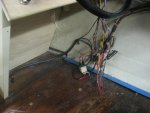
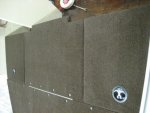
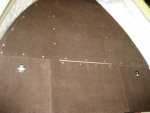
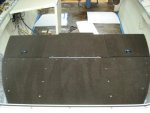
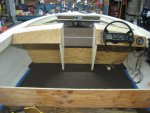
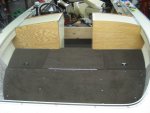
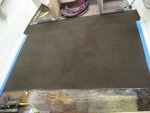
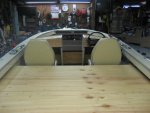
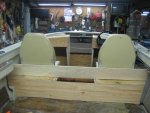
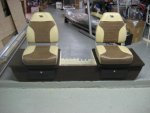
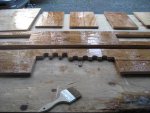
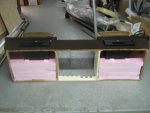
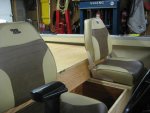
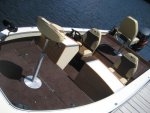
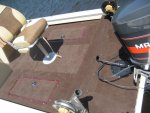
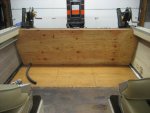
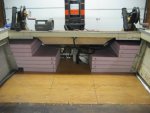
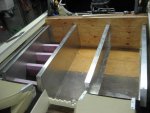
I've been follwing several projects in this forum, especially Huron Angler's project, (excellent documentation), and I decided to post my project hoping to help someone as much as this forum has helped me. It all started when I decided to replace the carpet this Spring. After removing the old carpet I discovered the aft section of deck was rotted to point where I could stick a putty knife through it. After reviewing all the posts, I pulled up the old section of deck and checked the flotation foam for saturation. The foam was dry and the boat doesn't take on any water, so I proceeded to replace the deck with 1/2 marine plywood that I coated with fiberglass resin. That's when I decided to extend the casting platform, add a right side console, and a rear casting platform. Pictures and updates to follow
 
Joined
Mar 28, 2010
Messages
24
Re: 1983 fm16 upgrades

Re: 1983 fm16 upgrades

Here's a few shots after I pulled the carpert. Unfortunately I didn't take any pictures with the seats and console in place. The carpet had been replaced some 12 to 15 years ago when I patched the floor under the live well. It seems anywhere that the carpet was covered by something it rotted. I'm sure the carpet acted like sponge and just couldn't dry out. The rear portion of the deck rotted where the battery boxes were fastened. The rear deck has been removed, the new one cut to size from 1/2 marine plywood, and covered with glass resin. I added 10' of 2" pink foam between the stringers while I had the floor out and fixed aa few briken rivets. I started to pop rivet the deck back in place with buuton head rivets, then found out countersunk rivets were available. I'll wait for the rivets then install the deck with proper ones. I fabbed a right side console from 16 gauge aluminium and nice bulkhead from oak veneir. I know it' not marine wood or made for exterior apps. I just took a birch veneir bulkhead out of the right side console that lasted 10 plus years, granted it had soom rot on the edge that contacted the floor it really held up considering the circumstances. I had stained it and urethaned it with three coats. It looked like a fine kitchen cabinet when it was done. I'll use a light tinted stain on the oak and then at least three coats of Min Wax exterior urethane. Tonight I'll lay out and cut the casting deck extension, (about 15"). Then split it into three sections, the center one for both batteries, and the side ones are just wide enough to 3700 series tackle boxes. Pictures in next post.
 

Attachments

  • Side shot.jpg
    Side shot.jpg
    144.1 KB · Views: 0
  • Aft floor removed.jpg
    Aft floor removed.jpg
    141.1 KB · Views: 0
  • Rotten deck.JPG
    Rotten deck.JPG
    55.8 KB · Views: 0
  • Bow shot of deck.JPG
    Bow shot of deck.JPG
    56.6 KB · Views: 0
  • Foam stuck to deck.JPG
    Foam stuck to deck.JPG
    49.4 KB · Views: 0
Joined
Mar 28, 2010
Messages
24
Re: 1983 Starcraft fm16 upgrades

I routered the edges of the new bulk head and added a ledge board to support the deck extension. I tried & tried, but there was just no way the bulk head was going in one peice, so I cut it just inside the right console, hopping that should I have to remove my custom gas tank it would make it easier. Next I trimmed the original deck back to the flange and added a peice of 1" angle to support it. I measured and cut my extension, then cut it into three hacth sections. Then I added partions made from 3/4 exterior plywood and covered everything with a coat fiberglass resin. So far, so good. I'm still looking for a wide aluminum piano hinge to attach the deck hatches. Hope to get consoles to paint shop on Monday.
 

Attachments

  • New console side shot.JPG
    New console side shot.JPG
    48.7 KB · Views: 1
  • Bulk head patern.JPG
    Bulk head patern.JPG
    41.4 KB · Views: 1
  • New bulk head.JPG
    New bulk head.JPG
    52.2 KB · Views: 1
  • 3Down.JPG
    3Down.JPG
    58 KB · Views: 1
  • Gas tank.JPG
    Gas tank.JPG
    50.5 KB · Views: 1
Joined
Mar 28, 2010
Messages
24
Re: 1983 Starcraft fm16 upgrades

I dropped my consoles off at the body shop yesterday and they asked me for a color code, so I called my local Starcraft dealer and he wasn't much help. I really didn't think it was going to be a big deal to match the color. It's a light beige that I believe they used on just about everthing. Anyone have any suggestions?
 
Joined
Mar 28, 2010
Messages
24
Re: 1983 Starcraft fm16 upgrades

I just picked up the console panels from the paint shop. The paint is a perfect macth. While I had the deck up to recover I added a steel elbow to my custom gas tank filler neck. That should help spit back when fueling. He's a few shots with the front deck covered and installed. I found 3" winde aluminum hinges at Graingers, (I hope there wide enough after I bend the offset in them). The hinges are installed and the center deck lid covered. The dash boards are installed and ready to have the gauges cut in. The next step is to get a good fit at the deck lid hinges.
 

Attachments

  • Filler neck.JPG
    Filler neck.JPG
    60.4 KB · Views: 1
  • Consoles back from paint shop.JPG
    Consoles back from paint shop.JPG
    41.8 KB · Views: 1
  • Hinges installed.JPG
    Hinges installed.JPG
    47.8 KB · Views: 1
  • Hatches covered with resin.JPG
    Hatches covered with resin.JPG
    49.4 KB · Views: 1
  • Center lid covered.JPG
    Center lid covered.JPG
    50 KB · Views: 1
Joined
Mar 28, 2010
Messages
24
Re: 1983 Starcraft fm16 upgrades

I cut in the gauges & steering wheel mount into the right dash board over the weekend. The wire harness still needs to be postioned under the new console. The center front hatch is mounted and fits well. It was a real pain to align the hinge. I'll wait for the T latches I ordered below mounting the remaining front hatches.
 

Attachments

  • Center lid covered.JPG
    Center lid covered.JPG
    50 KB · Views: 1
  • Dash switches.JPG
    Dash switches.JPG
    56.4 KB · Views: 1
  • Gauges & wheel mounted.JPG
    Gauges & wheel mounted.JPG
    56.8 KB · Views: 1
  • Dash wiring.JPG
    Dash wiring.JPG
    50.3 KB · Views: 1

wvmedic

Chief Petty Officer
Joined
Jun 3, 2008
Messages
465
Re: 1983 Starcraft fm16 upgrades

Looking good, what size trolling motor are you using up front?

Jeff
 
Joined
Mar 28, 2010
Messages
24
Re: 1983 Starcraft fm16 upgrades

It's a Minn Kota 55lb 12 volt Power Drive-V2 and I love it. I put it on the dove tail mount last fall and could kick myself for not buying it sooner. I had an old cable drive Minn Kota with the same amount of thrust, but the new one is noticably stronger and is much easier on the batteries. Maybe I can swing the Co-Pilot head this summer. I've heard good things about it. Some people complained about deploying & retrieving the motor. I can see where that might be a problem on a bass boat with the motor mounted on the casting deck. It's not a problem on my set up. I just give the head a bump with my knee and it's in the water. It's not hard to retrieve at all.
 
Joined
Mar 28, 2010
Messages
24
Re: 1983 Starcraft fm16 upgrades

I got the hatch latches I ordered from Bass Pro last week. I cut the hatches out with a hole saw, covered them with carpet, and added the latches. I still need to tweek the hinges to get a perfect fit, but it's pretty close. I 've already started breaking down the consoles and bulk head to stain & urethane. I should have some new pictures in a couple of days. I'm on my second coat of urethane and they are looking good.
 

Attachments

  • IMG_1967.JPG
    IMG_1967.JPG
    60 KB · Views: 0
  • IMG_1969.JPG
    IMG_1969.JPG
    52.4 KB · Views: 0
  • IMG_1972.JPG
    IMG_1972.JPG
    49.9 KB · Views: 0

ezmobee

Supreme Mariner
Joined
Mar 26, 2007
Messages
23,767
Re: 1983 Starcraft fm16 upgrades

Looking good. I like those latches. Man it sure would have made my life easier if I just decided to not worry about seeing fasteners when I installed my bow deck.
 
Joined
Mar 28, 2010
Messages
24
Re: 1983 Starcraft fm16 upgrades

Originally the deck was secured with counter sunk stainless screws that disappeared in the carpet. I didn't like the look when put them back in the recovered deck, so I added the counter sunk trim washers I think it looks better.
 
Joined
Mar 28, 2010
Messages
24
Re: 1983 Starcraft fm16 upgrades

After a week on staining, urethaning, sanding, more urethaning and more sanding, I'm ready to reassemble the consoles, but before laying the center section of carpet. I cut a template and made the front panel for my seat platform from 3/4 exterior plywood. Now I can focus on the rest of the platform, the rear casting deck, and the place of the rod locker, live well, and storage compartments.
 

Attachments

  • Consoles finished rr.JPG
    Consoles finished rr.JPG
    62.5 KB · Views: 1
  • Consoles finished frt.JPG
    Consoles finished frt.JPG
    53 KB · Views: 1
  • Right console.JPG
    Right console.JPG
    53.9 KB · Views: 1
  • Consoles finished lft.JPG
    Consoles finished lft.JPG
    60.8 KB · Views: 1
  • Center carpet.JPG
    Center carpet.JPG
    54.1 KB · Views: 1

ezmobee

Supreme Mariner
Joined
Mar 26, 2007
Messages
23,767
Re: 1983 Starcraft fm16 upgrades

Wow! Looks awesome! Can't wait to see it all buttoned up.
 
Joined
Mar 28, 2010
Messages
24
Re: 1983 Starcraft fm16 upgrades

It's been almost a week since I started working on what I call the seat module. This ties the seats in with the rear deck. The two out board seats will be fixed to the module with a glove box under each. The center seat will be removable and the lid under it will access the rod locker that runs under the deck all the way to the transom, it should hold 7' rods. Now that everything is roughed in, I'll disassemble the seat module and cover with resin before carpeting. I still need to make templates for the aluminum stringers that will support the rear deck. It's really starting to take shape now. I need to place the live well and figure out hatch placements. Once the stringers are in place and the live well positioned, the rest should fall into place.
 

Attachments

  • Rear deck roughed in.JPG
    Rear deck roughed in.JPG
    48.5 KB · Views: 1
  • Rear deck.JPG
    Rear deck.JPG
    51.8 KB · Views: 1
  • Rear of seat module.JPG
    Rear of seat module.JPG
    59.8 KB · Views: 1
Joined
Mar 28, 2010
Messages
24
Re: 1983 Starcraft fm16 upgrades

It's been a few weeks since I've posted any progress. The seat module is now assembled, carpeted, with glove boxes installed under each seat and all unused space filled with foam. I've made two of the four aluminum stringers I need to support the rear deck and hope to have the other two done this weekend. I've secured all loose wiring and hoses at the transom and fashioned a bulkhead to seal off the entire compartment, which will be fille with foam. All my decking is 3/4 exterior plywood coated with fiberglass. Soon I'll be able to screw it down and cut in my hatches and carpet. I'll post more pictures soon.
 

Attachments

  • Seat module 1.JPG
    Seat module 1.JPG
    49.2 KB · Views: 1
  • Seat module parts.JPG
    Seat module parts.JPG
    65.6 KB · Views: 0
  • Seat module 3.JPG
    Seat module 3.JPG
    50.3 KB · Views: 1
  • Seat layout.JPG
    Seat layout.JPG
    52.7 KB · Views: 1
Joined
Mar 28, 2010
Messages
24
Re: 1983 Starcraft fm16 upgrades

It's done! Well almost done, a little trim here and there, a few minor adjustments, but pretty much done. I've got a bunch of pictures to post, I'll do a few on every post until I've got the remainder of the project covered. Frankly, if I had to do it over again, I don't know if I would. It was a lot more work than I anticipated.
 

Attachments

  • Finished on the water 2.JPG
    Finished on the water 2.JPG
    58.1 KB · Views: 1
  • Stern shot on the water.JPG
    Stern shot on the water.JPG
    62.3 KB · Views: 1
  • Aft bulkhead.JPG
    Aft bulkhead.JPG
    49.7 KB · Views: 1
  • Aft foam.JPG
    Aft foam.JPG
    51.8 KB · Views: 1
  • Rear stringers.JPG
    Rear stringers.JPG
    55.2 KB · Views: 1

ezmobee

Supreme Mariner
Joined
Mar 26, 2007
Messages
23,767
Re: 1983 Starcraft fm16 upgrades

You did an awesome job on that. Super nice work. Looks like a brand new fishing rig. Not so sure what I think about carpet in the splashwell though.

I kinda feel the same way about my project. I ended up spending way more money than I thought would and it was a ton of work. Certainly could have just bought a nicer boat. However I paid for all the parts/materials slowly in cash as the project went on and I doubt anyone would have let me buy their boat on a payment plan so it's probably for the best.
 
Top