71satellite
Cadet
- Joined
- Apr 28, 2009
- Messages
- 28
Hi everyone,
This spring I bought a 1986 Bayliner Capri 2150 (21 foot) Cuddy Cabin. While I'm not new to working on projects (I own a 1971 Plymouth Satellite and a 1987 Yamaha FZ750), it was my first boat.
The boat had sat at a marina for 12 years when I stumbled across it, and while I knew the floor "wasn't good", and it needed some motor work (there are a couple of other posts in the repair and maintenance section that cover what I did to get the boat running), but I figured for the price I couldn't lose.
Fortunately, I was right. The boat runs like a champ, and looks great (in my opinion) with the new deck.
So, I thought I would share with you the apparently non-conventional method I used to fix (replace) the floor.
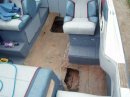
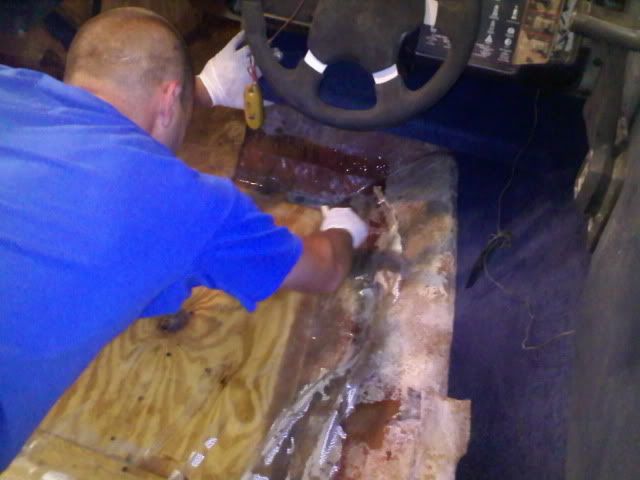
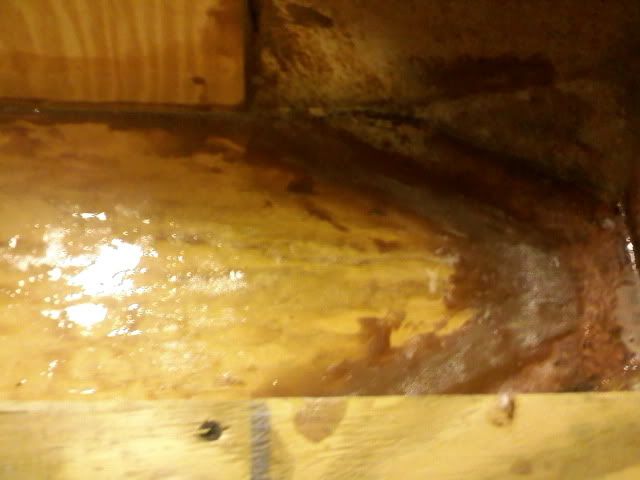
As shown in the attached photos, once I pulled up the carpet and cut through the fibreglass skim coat (Note: using the reciprocating saw really cut down on the dust and mess. I initially tried using a grider with a cut-off wheel, but it just created a huge cloud of fiberglass dust), the entire plywood core of the floor turned out to be a soggy mess. I literally pulled it up with my hands like wet cardboard. Most of the floor was being supported by the gas tank!
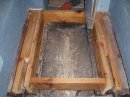
The tops of some of the stringers were rotten, but were found to be solid a few inches down, so I used them as "anchors" for the subframe I built.
I debated the following floor options:
-Install marine plywood and paint with polyurethane or some other "deck stain" sprinkled with sandy grit for traction
-Cut marine (or regular exterior) plywood and have it encased in a coating of fiberglass (coincidentally I work next to a fiberglass shop and I spoke with them at length about the process)
I didn't want to reinstall carpet, as it seems to me that's half the problem (as it hold water).
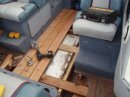
In the end, I came up with the option you see in the photos. I used 5/4" cedar deck planks for the decking (flooring), and 2x6' cedar beams for the subfloor and joists.
I'll preface the following description by saying (in case it isn't obvious) that I'm NOT a carpenter by any means! I used a circular saw and a reciprocating saw for all of my cuts, and just did the best I could to get everything to fit nicely.
In the end it was a combination of cost, ease of installation, and ease of maintenance that lead me to my choice. All in all I spent $215 on the supplies to build the floor (including screws!). Since I knew I had to build a subfloor anyways to replace the rotten stringers, I calculated that the total project cost was about half of what it would have cost to use marine plywood, or have exterior plywood encased in fiberglass.
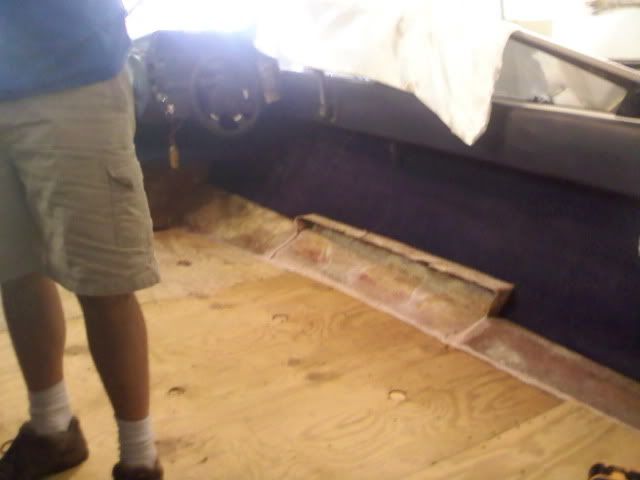
As you can see, the 2x6 subframe is screwed to stringers where possible, and I cut a second 2x6 to fit flush against the hull for further support. Across the gas tank I laid a 5/4" plank to provide something to screw into, and to disperse the weight of people standing on the deck across the tank surface.
It took a bit of finessing around the engine cowl, and in some cases angle-cutting the underside of the deck boards, to get everything to lay down nicely. I also ended up shifting the cuddy door upwards to accommodate the new deck thickness. The problem was that if I set the deck boards low enough to accommodate the original cuddy door height, they would be at too much of an angle to run across the gas tank and meet the base of the engine cowl.
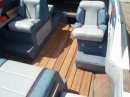
You'll note that at the port and starboard aft corners, the floor isn't finished yet. Thankfully I realized that the original deck surface tapered out and exposes the hull in these corners, so I didn't screw into that. I plan to use construction adhesive to glue boards into those sections. For now it doesn't seem to be a problem.
When I came up with the idea of "building a cedar deck" I researched on the internet and was surprised to find that no one else seems to have tried this solution. The ease of cutting and installing everything "in place" along with the forgiving nature of having individual boards to work with made building the deck very simple. Also, I can pull up and replace a board very easily if something happens. And cedar just won't rot (at least not in the remaining lifetime of the boat).
We used the boat during the Canada Day/Independence Day long weekend (had 5 people on it), and no one complained of splinters. No boards came loose, no boards split, everything seemed to hold up nicely. The deck got soaked numerous times by people getting out of the water, and from the rain that caught us in the middle of the lake, but the deck boards never became slippery.
In hindsight, I should have spaced the boards a bit closer together. I was worried about warpage and swelling, but I think just 1/8" spacing would have been sufficient.
I have debated staining the boards, but as my father pointed out - once you stain a deck, you are forever re-staining. So I think I'll just let the floor weather naturally and see what happens.
Any comments or questions are welcome. I hope this information assists you if you have a similar project.
Chris
This spring I bought a 1986 Bayliner Capri 2150 (21 foot) Cuddy Cabin. While I'm not new to working on projects (I own a 1971 Plymouth Satellite and a 1987 Yamaha FZ750), it was my first boat.
The boat had sat at a marina for 12 years when I stumbled across it, and while I knew the floor "wasn't good", and it needed some motor work (there are a couple of other posts in the repair and maintenance section that cover what I did to get the boat running), but I figured for the price I couldn't lose.
Fortunately, I was right. The boat runs like a champ, and looks great (in my opinion) with the new deck.
So, I thought I would share with you the apparently non-conventional method I used to fix (replace) the floor.
As shown in the attached photos, once I pulled up the carpet and cut through the fibreglass skim coat (Note: using the reciprocating saw really cut down on the dust and mess. I initially tried using a grider with a cut-off wheel, but it just created a huge cloud of fiberglass dust), the entire plywood core of the floor turned out to be a soggy mess. I literally pulled it up with my hands like wet cardboard. Most of the floor was being supported by the gas tank!
The tops of some of the stringers were rotten, but were found to be solid a few inches down, so I used them as "anchors" for the subframe I built.
I debated the following floor options:
-Install marine plywood and paint with polyurethane or some other "deck stain" sprinkled with sandy grit for traction
-Cut marine (or regular exterior) plywood and have it encased in a coating of fiberglass (coincidentally I work next to a fiberglass shop and I spoke with them at length about the process)
I didn't want to reinstall carpet, as it seems to me that's half the problem (as it hold water).
In the end, I came up with the option you see in the photos. I used 5/4" cedar deck planks for the decking (flooring), and 2x6' cedar beams for the subfloor and joists.
I'll preface the following description by saying (in case it isn't obvious) that I'm NOT a carpenter by any means! I used a circular saw and a reciprocating saw for all of my cuts, and just did the best I could to get everything to fit nicely.
In the end it was a combination of cost, ease of installation, and ease of maintenance that lead me to my choice. All in all I spent $215 on the supplies to build the floor (including screws!). Since I knew I had to build a subfloor anyways to replace the rotten stringers, I calculated that the total project cost was about half of what it would have cost to use marine plywood, or have exterior plywood encased in fiberglass.
As you can see, the 2x6 subframe is screwed to stringers where possible, and I cut a second 2x6 to fit flush against the hull for further support. Across the gas tank I laid a 5/4" plank to provide something to screw into, and to disperse the weight of people standing on the deck across the tank surface.
It took a bit of finessing around the engine cowl, and in some cases angle-cutting the underside of the deck boards, to get everything to lay down nicely. I also ended up shifting the cuddy door upwards to accommodate the new deck thickness. The problem was that if I set the deck boards low enough to accommodate the original cuddy door height, they would be at too much of an angle to run across the gas tank and meet the base of the engine cowl.
You'll note that at the port and starboard aft corners, the floor isn't finished yet. Thankfully I realized that the original deck surface tapered out and exposes the hull in these corners, so I didn't screw into that. I plan to use construction adhesive to glue boards into those sections. For now it doesn't seem to be a problem.
When I came up with the idea of "building a cedar deck" I researched on the internet and was surprised to find that no one else seems to have tried this solution. The ease of cutting and installing everything "in place" along with the forgiving nature of having individual boards to work with made building the deck very simple. Also, I can pull up and replace a board very easily if something happens. And cedar just won't rot (at least not in the remaining lifetime of the boat).
We used the boat during the Canada Day/Independence Day long weekend (had 5 people on it), and no one complained of splinters. No boards came loose, no boards split, everything seemed to hold up nicely. The deck got soaked numerous times by people getting out of the water, and from the rain that caught us in the middle of the lake, but the deck boards never became slippery.
In hindsight, I should have spaced the boards a bit closer together. I was worried about warpage and swelling, but I think just 1/8" spacing would have been sufficient.
I have debated staining the boards, but as my father pointed out - once you stain a deck, you are forever re-staining. So I think I'll just let the floor weather naturally and see what happens.
Any comments or questions are welcome. I hope this information assists you if you have a similar project.
Chris