Rough and ready '74 Starcraft Chieftan 18' rebuild

GA_Boater

Honorary Moderator Emeritus
Joined
May 24, 2011
Messages
49,038
Re: Rough and ready '74 Starcraft Chieftan 18' rebuild

Yes it is. Not a bad package price.
 

laurentide

Lieutenant Commander
Joined
Jul 24, 2011
Messages
1,869
Re: Rough and ready '74 Starcraft Chieftan 18' rebuild

^^^GaB, yes. Just for the record, I bought my 36" all-around led light from iboats.
 

GA_Boater

Honorary Moderator Emeritus
Joined
May 24, 2011
Messages
49,038
Re: Rough and ready '74 Starcraft Chieftan 18' rebuild

They're picky about competition. Especially the O place. Can't blame them, though. It's all about the Bengies.
 

jbcurt00

Moderator
Staff member
Joined
Oct 25, 2011
Messages
25,045
Re: Rough and ready '74 Starcraft Chieftan 18' rebuild

They've been slipping links to products into posts too. Like boat cover << see if it works.......

Yep, I didn't link them, the server did it.

I'm OK w/ it though, heck of a good deal we've got going w/ the forum....
 

laurentide

Lieutenant Commander
Joined
Jul 24, 2011
Messages
1,869
Re: Rough and ready '74 Starcraft Chieftan 18' rebuild

They've been slipping links to products into posts too. Like boat cover << see if it works.......

Yep, I didn't link them, the server did it.

I'm OK w/ it though, heck of a good deal we've got going w/ the forum....

Yeah, agreed.
 

Watermann

Starmada Splash of the Year 2014
Joined
Jan 12, 2013
Messages
13,794
Re: Rough and ready '74 Starcraft Chieftan 18' rebuild

Don't know what I would have done or do without the iboats forum. I think we happen to be the best looking bunch of boat heads too. :joyous:

One suggestion though if they are listening, make those links target a new tab rather than parent page which takes one away from the thread page.
 

jbcurt00

Moderator
Staff member
Joined
Oct 25, 2011
Messages
25,045
Re: Rough and ready '74 Starcraft Chieftan 18' rebuild

Ahem, I think the preferred politically correct term is: Boat Nerds.......
sm_tease.gif
 

laurentide

Lieutenant Commander
Joined
Jul 24, 2011
Messages
1,869
Re: Rough and ready '74 Starcraft Chieftan 18' rebuild

Don't know what I would have done or do without the iboats forum. I think we happen to be the best looking bunch of boat heads too. :joyous:

I'd still be running a soggy, rotten, trashed-out glasser if I hadn't found the resto forum. Now I've got a boat that I'll be proud to run without spending 5K or getting hazmat shipments. I'm a tinnie evangelist now :happy:
 

jbcurt00

Moderator
Staff member
Joined
Oct 25, 2011
Messages
25,045
Re: Rough and ready '74 Starcraft Chieftan 18' rebuild

Ha, yeah, that could've been me :facepalm: I have to thank you guys for putting me on the right track!
Found this in the brochure thread, and this seems like a good place to drop it:
3964016908_015ac96151_o.jpg


Seems like Jas was working w/ the SC marketing machine way back in 1980.......

Even then the Starmadians were separatists.......:first:
 

laurentide

Lieutenant Commander
Joined
Jul 24, 2011
Messages
1,869
Re: Rough and ready '74 Starcraft Chieftan 18' rebuild

Ha, that's great JB^^^. And, for the average working middle class guy looking to get into a safe boat for as little $ as possible, absolutely true. I know the appeal of glass boats, especially on salt/bigger water, but these old tinnies are perfect for lakes and rivers.

Just a couple of updated interior pics. I really struggled to get the side panel base trim right, and mangled one piece of angle trying to get it flush to both surfaces. That won't happen without a big brake. Sooo, there's a gap between the top of the trim and the panel, which I'll fill with exterior caulk and paint. Not pro at all, but it should be fine.

WzZxDM2.jpg


I'm happy with the finished sliders (just need handles):

2EFZl90.jpg


Have a really great 4th everybody! I know I will, working on the Chief. Cheers.
 

classiccat

"Captain" + Starmada Splash Of The Year 2020
Joined
Dec 20, 2010
Messages
3,412
Re: Rough and ready '74 Starcraft Chieftan 18' rebuild

Side panels look good from here CW! Sliders turned-out great! Happy 4th to you as well!
 

laurentide

Lieutenant Commander
Joined
Jul 24, 2011
Messages
1,869
Re: Rough and ready '74 Starcraft Chieftan 18' rebuild

Side panels look good from here CW! Sliders turned-out great! Happy 4th to you as well!

Thanks, BF! I've been following your progress in the SC forum, as well. I'm glad you're done scrapin' that epoxy junk. EDIT: oh, well at least one side....

I should probably take this to the electrical sub-forum, but, since I'm here: my bow light has two sets of pos/ground wires, which would have been part of a complete circuit with the stern/anchor light on a 3-way switch. I'm going to just have separate anchor light and bow light switches, so can I just snip one of the sets on the bow light? Does it matter which?

^^I don't necessarily expect an answer on that, but figured I'd ask. Thanks!
 

GA_Boater

Honorary Moderator Emeritus
Joined
May 24, 2011
Messages
49,038
Re: Rough and ready '74 Starcraft Chieftan 18' rebuild

It's all looking good, Chem. All those little things, like the trim gap, are why a boat is never finished. Your gonna be fishing one day and look down and think "Why don't I do.............". :watermelon:

I have no idea what's up with the double wiring for the bow light. I know you are going with separate Nav/Anc switches, but I have a simple 3-way switch wiring diagram (buried somewhere on this computer) I'll post if you want. Less is more in my opinion.
 

laurentide

Lieutenant Commander
Joined
Jul 24, 2011
Messages
1,869
Re: Rough and ready '74 Starcraft Chieftan 18' rebuild

GA, the only reason I'm not doing the common, simple, 3-way switch is because I bought a 6 fuse panel that doesn't have the space for it...and since I don't need all 6 for other stuff I'll just separate my nav lighting.

I'm just going to wire the bow light on one set of wires and see if it works...they should all go to the same contacts, I think?

Thanks for checkin' in.
 

Watermann

Starmada Splash of the Year 2014
Joined
Jan 12, 2013
Messages
13,794
Re: Rough and ready '74 Starcraft Chieftan 18' rebuild

Hey Chem the ole Chief is coming together great. On the sliders, have you thought about going simple and using a 1 inch hole saw drill bit to make a finger hole? You could even trim the hole with an insert. Then the panels could also bypass each other without hanging up or banging the hardware.
 

jbcurt00

Moderator
Staff member
Joined
Oct 25, 2011
Messages
25,045
Re: Rough and ready '74 Starcraft Chieftan 18' rebuild

I wouldn't cut the wires, just cap them, then tape the caps & zip tie them up out of the way.

The wires are probably a power feed for something else, wired in parallel instead of series. And switched somewhere else (like a cabin overhead light or something)...
 

GA_Boater

Honorary Moderator Emeritus
Joined
May 24, 2011
Messages
49,038
Re: Rough and ready '74 Starcraft Chieftan 18' rebuild

GA, the only reason I'm not doing the common, simple, 3-way switch is because I bought a 6 fuse panel that doesn't have the space for it...and since I don't need all 6 for other stuff I'll just separate my nav lighting.

I'm just going to wire the bow light on one set of wires and see if it works...they should all go to the same contacts, I think?

Thanks for checkin' in.

That makes sense. No open holes in the panel. You should be able to look inside the bow light to see if each connection has two wires.
 

ctswf

Chief Petty Officer
Joined
Aug 7, 2012
Messages
424
Re: Rough and ready '74 Starcraft Chieftan 18' rebuild

oh man, the chiefs looking great! Too bad us statecrafties are all over the place, a starcraft meetup on the water would be so much fun.
 

classiccat

"Captain" + Starmada Splash Of The Year 2020
Joined
Dec 20, 2010
Messages
3,412
Re: Rough and ready '74 Starcraft Chieftan 18' rebuild

Thanks, BF! I've been following your progress in the SC forum, as well. I'm glad you're done scrapin' that epoxy junk. EDIT: oh, well at least one side....

I should probably take this to the electrical sub-forum, but, since I'm here: my bow light has two sets of pos/ground wires, which would have been part of a complete circuit with the stern/anchor light on a 3-way switch. I'm going to just have separate anchor light and bow light switches, so can I just snip one of the sets on the bow light? Does it matter which?

^^I don't necessarily expect an answer on that, but figured I'd ask. Thanks!

Ha, just finished scraping the other side.

Its not clear to me why there would be 2 sets of wires feeding the bow light. You can accomplish the stern+bow (moving) vs stern-only (anchored) with a single switch (DPDT: Double Pole, Double Throw) where the center position is Lights-off.


(I'm a little loopy from the Zip Strip fumes so if something is dorked in my powerpoint diagram above...that's probably why :lol: )

EDIT: I want to call your attention to the Purple stern light... :cool:
 

laurentide

Lieutenant Commander
Joined
Jul 24, 2011
Messages
1,869
Re: Rough and ready '74 Starcraft Chieftan 18' rebuild

oh man, the chiefs looking great! Too bad us statecrafties are all over the place, a starcraft meetup on the water would be so much fun.

Thanks ct! Yeah, you're assuming that I'm actually going to have this thing in the water at some point :D. I kid...I'm pretty close actually. I hear you, though...it would be cool to have a bunch of these restored/rebuilt SC's in one spot for a weekend. I bet you don't see too many running in salt water down by you. Up here there are a few more, but they're mostly big money new boats.

BTW, how's that triple working for you on your rig?

Ha, just finished scraping the other side.

Its not clear to me why there would be 2 sets of wires feeding the bow light. You can accomplish the stern+bow (moving) vs stern-only (anchored) with a single switch (DPDT: Double Pole, Double Throw) where the center position is Lights-off.
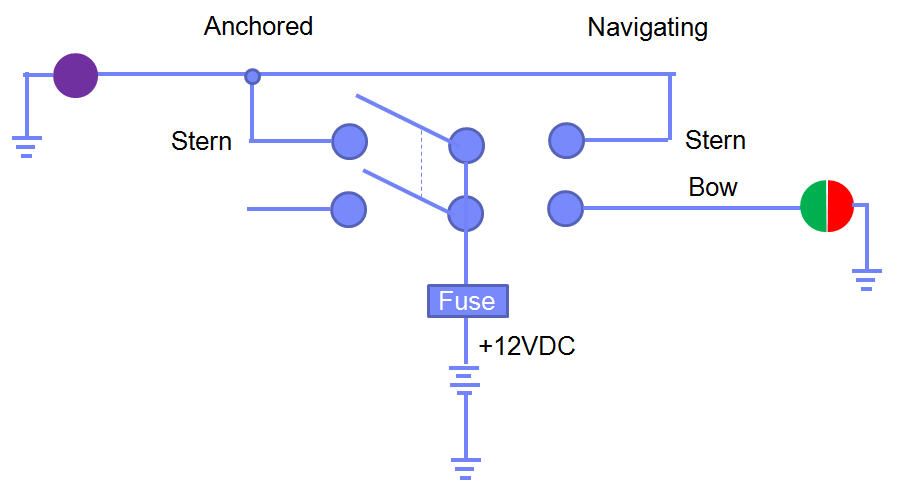


(I'm a little loopy from the Zip Strip fumes so if something is dorked in my powerpoint diagram above...that's probably why :lol: )

EDIT: I want to call your attention to the Purple stern light... :cool:

BF, thanks for the awesome diagram. I took the bow light apart, and both sets of wires are just on ring connectors to the two terminals. I think one set connected to the old masthead light, which had a forward white running light, and also an all-around anchor light. I just ran it straight to the switch, and, voila...even the 15+ year old bulb still works! I have rocker switches to spare, as I'm running most of my accessories right to the battery switch breaker, so I'm simply going to have a separate anchor light switch...I just have to remember to turn it on when the running lights are on.

I have to admit that I was kind of intimidated by the prospect of a complete wiring job, but by just using logic and taking one's time it's really not too bad. Plus, it's very gratifying when everything works on the first try.

For the curious or just very bored, here's my layout for the wiring, in verbal format (sorry, no fancy diagrams here):

Bilge pump: auto switch direct to battery, in-line 6 amp fuse. Manual override to rocker switch on panel.

Running (bow) lights: to panel switch, with jumper to gauge lights. I may add a compass light jumper from the tach as well. [off topic here, but I was psyched that the remote harness works with the teleflex tach, and that my rectifier is still good.]

Anchor/stern, mounted on windshield (36" for bimini clearance): to panel switch.

LED cockpit lighting (not installed yet): to panel switch.

VHF, 12v adapter, depth finder, horn: all straight to main switch breaker (40 amp auto reset), with the appropriate respective in-line fuses.

I'll post pics when I have everything zip-tied/secured/neatened up.


Thanks for stopping by, guys.

Let me know if anything sounds off in that wiring scheme...thanks.
 
Top