1975 Starcraft SS 16' Freshen Up

Michigan Lakes

Petty Officer 3rd Class
Joined
Dec 20, 2018
Messages
86
Hi there guys. I've been kicking around the iBoats forums for a few months and have learned a great deal already. I had been spending quite a bit of time on The Hull Truth when I came across a post mentioning iBoats, Watermann and his rivet expertise. Needless to say, I found iBoats far more in tune with my strata of boat ownership.

I'll be a bit long-winded with this first post in order to get the back story out of the way.

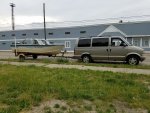
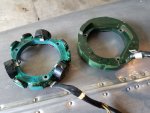
After a somewhat lengthy and very particular search (aluminum, 16', open bow, back-to-back seats, "running", OMC power, less than $2k) I found this boat on CL, and picked it up in Muskegon, MI in June 2018. The original asking price was $1800. When I met the owner at the boat launch, he could not keep the 70hp 3cyl Evinrude running under any sort of load. We ended up settling on $1100 based on his assumption that all three carburetors needed to be rebuilt. After some research and photo comparisons, it became quite apparent that the stator insulation had almost entirely melted off (see attached photo). A $50 used stator from ebay managed to solve the stalling under load issue. I'm not going to say the outboard runs like a Swiss watch now, but it's good enough to begin addressing structural and cosmetic issues.

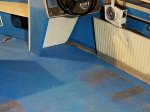
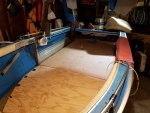
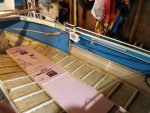
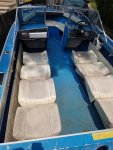
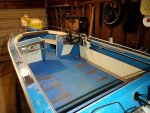
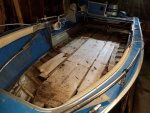
To the best of my knowledge, I am the third owner. According to the second owner, the original owner had a habit of dropping his 20lb anchor directly on the bow floor after each use. Not surprisingly, that entire area was cratered and splintered. Additionally, there were multiple soft soft spots along the edges of the flooring.

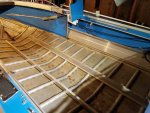
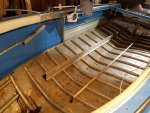
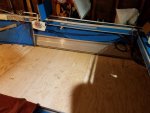
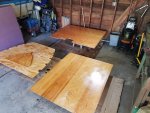
Last December, I spent a few evenings stripping the interior down to the hull. Needless to say, the floor was worse than I thought and the lower portions of the foam were entirely water logged. I am thankful that floor came out intact enough for template use. I had fairly good intentions of making some headway during the Winter months but the arctic temps we've experienced in SE Michigan would have made for wholly enjoyable hours in the unheated, detached garage.

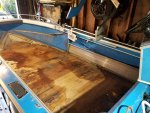
I sprayed out the inside of the hull at the local coin wash last week and got the project back on track. Although I cannot find any damaged rivets and the hull did not appear to leak during the handful of lake trips it made last year. I have decided to apply a quart of Gluvit based on iBoats forum recommendations.

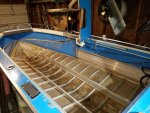
The plan is to maintain the open bow "speedboat" layout as comfortable seating for six is the primary reason I went with an open bow vessel. It seems like Starcraft intended for the design to serve a number of purposes. Fish-able, ski/tube-able, trailer-able, semi-comfortable, and standard 20' garage-able it is.

If and when I do fish, it's a pretty casual sort of thing that's more about beer and conversation as opposed to stocking my deep freezer. Swimming, tubing, shore cruising, and WOT runs are what I really enjoy.

I plan on using carpet instead of the original (vinyl?) floor covering. Additionally, I'd like to replace the hard, fixed bow area seating surfaces with padded, removable cushions that will allow greater access to the storage area. I'm not sure there's such a thing as too much storage on any small boat.
 

Attachments

  • photo309296.jpg
    photo309296.jpg
    324.1 KB · Views: 50
  • photo309297.jpg
    photo309297.jpg
    209.4 KB · Views: 50
  • photo309298.jpg
    photo309298.jpg
    192.3 KB · Views: 52
  • photo309299.jpg
    photo309299.jpg
    315.2 KB · Views: 48
  • photo309300.jpg
    photo309300.jpg
    327.5 KB · Views: 51
  • photo309301.jpg
    photo309301.jpg
    305.5 KB · Views: 50
  • photo309302.jpg
    photo309302.jpg
    323.5 KB · Views: 51
Last edited:

bchaney

Petty Officer 1st Class
Joined
Jul 3, 2018
Messages
246
Congrats on the boat! You got a good deal on it, it looks to be in pretty good shape. Are you going to do a full restoration on it or just replace floor and foam? Good progress so far. I believe some guys here will fill the inside of the hull with water and check for leaky rivets under the boat while its on the trailer. Now is the time to fix those before you put in the new floor and block access to the rivets. I'm jealous that you can fit your boat in your garage. The SS really is a great design for all the reasons you mentioned. I was attracted to it for the same reasons but ended up with a Holiday
 

Watermann

Starmada Splash of the Year 2014
Joined
Jan 12, 2013
Messages
13,753
:welcome: to the Starmada Michigan Lakes!

Congrats on owning the prolific 16' SS and arguably the most popular aluminum boat ever made. She will serve you well and I hope you enjoy the rebuild in the warmer months to come.
 

astor

2018's Starmada Splash Of The Year.
Joined
Jul 31, 2011
Messages
425
Welcome to the forum, congratulations on the new boat! Carpet certainly is cooler than vinyl on the feet, but I prefer the newer vinyls and the ability to clean them. Enjoy the rebuild!
 

Michigan Lakes

Petty Officer 3rd Class
Joined
Dec 20, 2018
Messages
86
Congrats on the boat! You got a good deal on it, it looks to be in pretty good shape. Are you going to do a full restoration on it or just replace floor and foam? Good progress so far. I believe some guys here will fill the inside of the hull with water and check for leaky rivets under the boat while its on the trailer. Now is the time to fix those before you put in the new floor and block access to the rivets. I'm jealous that you can fit your boat in your garage. The SS really is a great design for all the reasons you mentioned. I was attracted to it for the same reasons but ended up with a Holiday

This year, I'll just be doing the foam, floor, carpet, seats and a complete rewire. The transom is solid in feel and appearance but I have no illusions about it being as strong as it was 44 years ago. I wouldn't call it's replacement necessary but it should be done if I plan to keep the boat for years to come. That being said, adding transom replacement and hull refinishing/painting to the list would easily put the boat out of commission for the entirety of this Summer. I am not willing sacrifice those months regardless of the total time saved with doing a full resto in one shot.

I am tempted to fill the boat and check for rivet leaks as now is the only time they can be properly fixed. That being said, I did not have any bilge water after non-swimming trips last Summer (hard to tell with swimming as each us probably sheds a quart or so of lake water each time we jump in the boat).
 

ab59

Ensign
Joined
May 10, 2017
Messages
979
Welcome to the forum . I bought my SS about a year and a half ago but mine is a 1988 20' but pretty much the same animal. Just like you the floor was rotting in places and the carpet was shot . I ripped out the floor and replaced the engine as well as new panels etc. I got everything back together and when I put what i thought would be the final test to the boat , ie. testing the engine and checking for leaks the transom leaked ! What looked like a solid transom had some rot that i did not see and so I had to pull the side panels , and engine ( did I mention that it's a gm 5.7 ? ) and outdrive to yank the transom out and replace it.
Not sayin that yours is bad too but I am saying to really look it over good before you take it fishing or whatever for the day .
Mine was a sterndrive and a PITA to replace but if I were a younger man I could have got the job done in a week.
Don't know how long it takes for transom replacement for and outboard but you might be surprised how quickly you could replace it and not look back.
Waterman could tell you pretty dang close as to how long it should take . He's restored more than a couple of Starcraft boats .
Just a thought.
 

ShoestringMariner

Lieutenant Commander
Joined
Apr 18, 2015
Messages
1,563
Welcome, I have the exact same boat. same year, same colour. I cant tell from the photo, but I wonder if your floor has been done before. I "think" I have an original floor where the floor covering looks more like a woven plastic tarp than carpet. Same in your boat?

What are your plans? Your interior looks pretty original and solid. My seats look the same. I bought new wite ones, but I think I might see if I can get the originals white again. I like the originals better. Actually, I want to keep mine as original as possible, down the the pleated vinyl side panels and cushions, but with hidden and drop in pro fishing features. Classic cruising with the better half, and clickety click...pro fishing with my brother, son and pals. the sleeper seats will be quick connect with swivel bases beneath. thats one idea. Like you, I want to change the under cushion bow storage access.

You got a good deal. I paid too much for mine because of "I had to have it syndrome". nicely done
 
Last edited:

Michigan Lakes

Petty Officer 3rd Class
Joined
Dec 20, 2018
Messages
86
Welcome, I have the exact same boat. same year, same colour. I cant tell from the photo, but I wonder if your floor has been done before. I "think" I have an original floor where the floor covering looks more like a woven plastic tarp than carpet. Same in your boat?

What are your plans? Your interior looks pretty original and solid. My seats look the same. I bought new wite ones, but I think I might see if I can get the originals white again. I like the originals better. Actually, I want to keep mine as original as possible, down the the pleated vinyl side panels and cushions, but with hidden and drop in pro fishing features. Classic cruising with the better half, and clickety click...pro fishing with my brother, son and pals. the sleeper seats will be quick connect with swivel bases beneath. thats one idea. Like you, I want to change the under cushion bow storage access.

The vinyl covering on the floor was the same as the material that is still on the inside vertical surfaces of the hull. I'm leaving that alone as it's in fairly good shape. I originally planned on building new seat bases and getting the original seats reupholstered but it looks like new seats are a bit more budget friendly. I'm sure their quality is less than top notch but my boat interior has a pretty easy life, spending approximately 345 days a year on the windowless side of my garage.
 

Attachments

  • photo309377.jpg
    photo309377.jpg
    284.5 KB · Views: 22

ShoestringMariner

Lieutenant Commander
Joined
Apr 18, 2015
Messages
1,563
Ah, thanks for posting that. Mine must have been recovered once as it is not the same as yours, but I have the mottled blue covering on the hull like yours. I'm planning on keeping my hull covering as is too and only replacing the floor. I hope to find a nice marine vinyl to compliment it and the white pleated panels.

looking forward to see your progress
 

Michigan Lakes

Petty Officer 3rd Class
Joined
Dec 20, 2018
Messages
86
Temps in SE Michigan finally made it North of 60 F, allowing me put down a quart of Gluvit on all the rivets below the chine. I was surprised how long it stayed tacky (about 48 hours). Either way, I'm now ready for foam and plywood.

The iboats foam debates seemed pretty well settled for my application and budget range. I'll be going with the Owens Corning Extruded Polystyrene Rigid Foam Board (Pink Panther) from either HD or Menards. I don't think I'll go as far as to glue the pieces together or wrap the board in fuel proof bags. A good, tight fit up to deck while still allowing for drainage should suffice. I plan to use a hand saw to cut the foam and I assume based on XPS' prevalence among iboats users, that this material/method will not result in little pieces clogging up the drain holes along the keel.

As for plywood, an hour of iboats and additional research has been largely a rat-hole of differing opinions, methods etc. Based on my own needs and reasoning, I plan on using CCA treated 1/2" plywood with no sealer. This method is advocated by some but generally viewed as legitimate by most (including woodonglass). If the plywood must be 100% sealed in the absence of some breathing/self-drying ability, I cannot reasonably anticipate zero compromises to the sealing surface during interior reassembly, let alone years of use. Additionally, the consoles were/will be secured to the floor with wood screws, which would seem to instantly compromise any epoxy or other sealer. That being said, I may consider a layer of sealer (old timer's recipe or another) on the topside of the deck before the carpet is laid down.

I managed to find two sources of CCA Plywood near-to-somewhat-near me. Northville Lumbar (10 miles from my house) sells 4' x 8' x 1/2" sheets of C-D grade CCA treated ply for $33.79 a sheet. The price and location are good but I'd likely need to fill a few topside craters with wood filler or epoxy resin. Homestead Hardwoods of Vickery, OH is about 2 hours away but sells 4' x 8' x 1/2" B-C grade CCA sheets for $56. One of two options should do.

For what it's worth, I found this thread to be the most helpful: https://forums.iboats.com/forum/boa...-and-hull-repair/10353063-pontoon-re-deck-job
 

Attachments

  • photo310464.jpg
    photo310464.jpg
    279.8 KB · Views: 22
  • photo310465.jpg
    photo310465.jpg
    331.9 KB · Views: 22

Watermann

Starmada Splash of the Year 2014
Joined
Jan 12, 2013
Messages
13,753
The last type of plywood I would use in a boat is that CCA soggy copper and arsenic laced stuff . Sorry but that's how I feel about that green garbage. I did use it for my lawn shed deck though and got it screwed down before it turned into a pringles chip..

Lots of advice all over, even that dark hole called Face Book... do not to use copper treated ply in tin boats.

Just use a nice exterior grade fir ACX and seal it up. I've even found it in 5 layer Roseberg.
 

MTboatguy

Fleet Admiral
Joined
Jul 8, 2010
Messages
8,988
Copper treated plywood and boats do not go together, you are looking for trouble down the road, it can help degrade the structural integrity of the aluminum. There are much better choice to use.
 

Michigan Lakes

Petty Officer 3rd Class
Joined
Dec 20, 2018
Messages
86
The CCA Plywood I was considering is, I thought, a different chemical makeup than the green stuff sold at Home Depot. Several iboats users in the thread linked below indicate that the "new" Marine grade CCA (see fishrdan and Woodonglass posts near the bottom of pg 1) is safe for aluminum and an acceptable choice. I've also provided a link to the actual plywood in question.

I am absolutely willing to go a different route and ready to hear the opinions of those with far more experience and expertise than I. At the very least, please have sympathy for my confusion at this time.

https://forums.iboats.com/forum/boa...-and-hull-repair/10353063-pontoon-re-deck-job

http://www.marine-plywood.us/douglas fir.htm#BC_Pressure
 

Watermann

Starmada Splash of the Year 2014
Joined
Jan 12, 2013
Messages
13,753
No it's still the same corrosive cocktail since the 1930's Chromated copper arsenate (CCA) but the stuff your talking about is kiln dried and not soggy with the chemicals.

The only reason I can see to use treated ply is if you plan on neglecting your boat and just leave it out for the elements to ravage over the years with the end result of selling to someone when done ruining it.

Yeah use a good ACX fir or marine grade fir, seal it well and cover your boat. It will last for decades and look new.
 

DLNorth

Chief Petty Officer
Joined
May 26, 2016
Messages
432
The treated ply that is very corrosive is the newer ACQ stuff, the older CCA is much less corrosive, but I believe is still corrosive to some extent. .
The difference is in the amount of copper in each, because the CCA has arsenic it needs much less copper.
The ACQ is the opposite, it has no arsenic and so needs much more copper, which makes it much more reactive.

"Pontoon decking Bruce mentioned is CCA treated plywood and the stuff you want to get, it is much different than ACQ (green) treated plywood that will find at your local big box hardware store."

As for which to use, that's up to you.

Dan
 

Michigan Lakes

Petty Officer 3rd Class
Joined
Dec 20, 2018
Messages
86
As it turned out, the lumberyard near my house did not have kiln-dried CCA lumber. The nearest source for that type was 117 miles away. With late April coming on and little time for a trip to Ohio, I decided to take Watermann's advice and go with the 1/2" Roseburg Marine 5 Ply from the Menard's near my house. I also bought four sheets of 4' x 8' x 2" xps foam board.
A good neighbor friend of mine is a bit more handy with lumber than I and has far better woodworking tools. We were in a race against time to get the plywood cut as his wife was due to give birth next week. He ended up bringing his saws to my place for a bit of a marathon session on Saturday evening, during which all sections were measured and cut. His wife ended up going into labor several hours later. Mom and baby are doing great. :joyous:
As for the plywood, I'll need to take it back out of the boat and get the foam installed before the drilling and sealing stage. I'll probably end up making a few trips to Menards in order to get the correct dimensions and quantities of xps board to achieve a tight fit. I'm not sure how much noise loose foam can make in the hull, but I'd rather not find out.
Right now, the sections of plywood fit quite well with very little wiggle room. We were able to use some of the less rotten sections of the old floor as templates when cutting, but the new sections are not exact matches of the old sections since most many of the edges were seriously distorted and chipped from rot. I would not trust the rivet holes in the old sections to drill the new floor.
What is the best method for cleanly drilling to the original rivet holes in the ribs, vertical supports and joiner plates? Is it generally just measure and drill? If I had to guess, it looked like the plywood and aluminum sections were drilled together at the factory. I'd like to use the original holes if at all possible, although I can't seem to find any other builds that mention doing so. :confused:
 

Attachments

  • photo311080.jpg
    photo311080.jpg
    201.3 KB · Views: 25
  • photo311081.jpg
    photo311081.jpg
    254.9 KB · Views: 25
  • photo311082.jpg
    photo311082.jpg
    233.3 KB · Views: 25

Watermann

Starmada Splash of the Year 2014
Joined
Jan 12, 2013
Messages
13,753
The ply fit looks great and so does the quality of the wood. :thumb:

Joining the wood I can say the best thing to do is add a piece of 2" x 1/8" angle AL between the deck supports. Cut a 2" piece of angle for each side, rivet it to the insides of the supports (2 works) and then rivet the cut to size angle to form the bridge. If you don't the seam will be an issue in the future. 1/2" ply does have some spring to it when walked on but you get used to it, after all you're not building a flat top aircraft carrier. :lol:

The bane of all of us that came before you is the rib end holes from the old deck. No way I know of to accurately find the old holes. Having 2 holes near the ends of the ribs is not an issue as far as strength goes, they won't crack from having 2. I moved my rivets back a short distance to completely miss the old holes and used longer LF rivets where needed.
 

Michigan Lakes

Petty Officer 3rd Class
Joined
Dec 20, 2018
Messages
86
Managed to make a fair amount of progress this weekend. About half the foam is installed and the new deck boards were soaked in a gallon of Old Timer's Formula.
I considered cutting the foam in smaller pieces and placing it vertically in the hull, as many previous builds have done, but I want to minimize the number of cut, shaved, frayed, etc foam edges. The factory foam pieces were leaving so much confetti in the hull last season that the bilge pump was nearly clogged. I could see the early stages of this occurring as I test fitted the new foam pieces. I'm also concerned about the small drain channels along the keel. I found most of these to be blocked with all manner of debris when I stripped the interior. On a side note, I did find a Youtube vid (linked below) in a which an electric "hot knife" was used to cut the foam. Nice (maybe), but not this time around.
I basically saturated the new deck pieces in Old Timer's Formula. Helmsman Spar Urethane was substituted for the Marine Varnish. I was pleasantly surprised how much the grain jumped out once the sealer was applied. Too bad virtually none of the wood will be visible after the carpet is down.

https://www.youtube.com/watch?v=dTTEkaG0VjA
 

Attachments

  • photo311539.jpg
    photo311539.jpg
    299.7 KB · Views: 29
  • photo311540.jpg
    photo311540.jpg
    307.5 KB · Views: 29

ShoestringMariner

Lieutenant Commander
Joined
Apr 18, 2015
Messages
1,563
Managed to make a fair amount of progress this weekend. About half the foam is installed and the new deck boards were soaked in a gallon of Old Timer's Formula.
I considered cutting the foam in smaller pieces and placing it vertically in the hull, as many previous builds have done, but I want to minimize the number of cut, shaved, frayed, etc foam edges. The factory foam pieces were leaving so much confetti in the hull last season that the bilge pump was nearly clogged. I could see the early stages of this occurring as I test fitted the new foam pieces. I'm also concerned about the small drain channels along the keel. I found most of these to be blocked with all manner of debris when I stripped the interior. On a side note, I did find a Youtube vid (linked below) in a which an electric "hot knife" was used to cut the foam. Nice (maybe), but not this time around.
I basically saturated the new deck pieces in Old Timer's Formula. Helmsman Spar Urethane was substituted for the Marine Varnish. I was pleasantly surprised how much the grain jumped out once the sealer was applied. Too bad virtually none of the wood will be visible after the carpet is down.

https://www.youtube.com/watch?v=dTTEkaG0VjA

Looks good,. If you have a bandsaw, it makes short work of that Styrofoam SM
 
Top