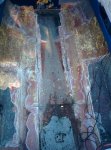
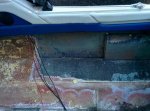
1998 Bayliner Capri 1952 Deck / Transom Project

SynPDX

Seaman Apprentice
Joined
Jun 29, 2013
Messages
36
I know there's quite a stigma around Bayliner boats, but I'm going to put the time and effort into this anyway. It'll be a quite the learning project, I'm barely into this project and I've already learned quite a bit.

I'm hoping by posting here, it'll keep me motivated to work on this... ANY hints at all to a first time boat owner would be GREAT, as I'm quite possibly biting off more than I can chew...

I'll be posting videos below as I progress through this project:

Introduction

Water found


Link to the post that contains update # 2
 
Last edited:

coolbri70

Lieutenant Commander
Joined
Oct 6, 2011
Messages
1,554
looks like you are on track, just make it back the way it was. maybe improve on the workmanship and it can be better than new. bayliners are not bad boats, if properly taken care of. keep it dry
 

jbcurt00

Moderator
Staff member
Joined
Oct 25, 2011
Messages
24,889
Id suggest posting pix and video, some cant view videos at work. Not that we'd ever use company resources for boat geek stuff online....

Good luck w your project.
 

Woodonglass

Supreme Mariner
Joined
Dec 29, 2009
Messages
25,924
Bayliner created som really nice designed boats. They just didn't spend a lot of time on craftsmanship. IF you like the style of the boat and she meets your needs You can put the craftsmanship into her and make her a sound boat that will last for decades. Several hundred hours of work, Lots of itchin', and lots of dollars and you'll "Git er Dun!!!" Keep askin questions and postin pics, and we'll be there fer ya!!! Get DEMO Begin!!! P.S. Don't be surprised if the Rot goes all the way up under the Cuddy Cabin!!!!:eek: FYI I hope you've budgeted around $3K for this restoration. What powerplant does she have and what shape is it in?
 
Last edited:

SynPDX

Seaman Apprentice
Joined
Jun 29, 2013
Messages
36
Thanks guys, I'll definitely post pics.

The engine is a Merc 2.0, its only a for cylinder but I quite like it. Its does well on gas and I'm using this boat as a family fun / fishing boat.

3k is about my budget for the project. I may go slightly above as I am plan on getting www.linex.com sprayed in instead of carpet.
 

Corjen1

Lieutenant Junior Grade
Joined
Aug 24, 2013
Messages
1,237
Welcome to dry Dock!! Good luck in your build!!! These guys on here have certainly helped me keep going!!! Like others said, ask lots of questions, take pit of pix and post lots of pix......it didnt happen if no pix!!! :eek:
 

havoc_squad

Senior Chief Petty Officer
Joined
Mar 5, 2011
Messages
711
it didnt happen if no pix!!! :eek:

That's sometimes a nice two way street for screw up deniability. Re-work, I don't see no pics of re-work. Guess it didn't happen.

Don't forget to preserve the lounge chair fiberglass box so you don't have to re-think how its supposed to be re-assembled IF you plan to keep it when you re-do the transom, stringers, and floor.
 

SynPDX

Seaman Apprentice
Joined
Jun 29, 2013
Messages
36
So here is my first official update to this worklog and I'm hoping some of you can answer some questions.

First, here's some pics!

Here are some overhead shots of what I have so far:


Picture A
IMG_20150604_180003.jpg


Picture B
IMG_20150604_180026.jpg

This is a humbling amount of work, but I'm trying to keep at it... I have soooo many questions already from the top two pictures.

1. Everything you see in blue is the area that carpet was laid over a thin layer of gelcoat. My question is there seems to be this extra layer of thick fiberglass that I've removed during the demolition process. For example, the seat boxes REALLY kicked my butt, the fiberglass was so thick, there were times I was afraid of damaging the hull. I got the seat boxes out, and you can see a nice pink fiberglass as a result. My question is this: All that is blue, should I remove that layer of fiberglass, or shall I sand it down smooth and call it a day?

2. Here's some close up images of the blue "extra layer of fiberglass:
Picture C
IMG_20150604_180241.jpg


Picture D
IMG_20150604_180256.jpg


Picture E
IMG_20150604_180312.jpg

I know in this picture (Picture E), I'm going to get rid of that lump of fiberglass, but I need to know if I should remove the entire layer of glass (Picture D is a good example).

More examples:

Picture F
IMG_20150604_180048.jpg

Picture G
IMG_20150604_180059.jpg

Picture F/G scares the crap out of me.... It just seems so "deep" into the glass, what are your thoughts on this?

Ok, here's some pictures of the transom so far:

Picture H
IMG_20150604_180122.jpg

As you can see the transom was quite wet.... Water was seeping up from the drain plug, as well as bolt holes.... Hell, water was even seeping in from the trailer strap mountpoints.... *sigh*

This update is getting kind of long, I'm going to end this post now and post more pics in a bit (as well as a YouTube update).

Thanks for all your help so far...

-Pete
 

SynPDX

Seaman Apprentice
Joined
Jun 29, 2013
Messages
36
Some videos:

Latest update video....


Short video of work on the transom...

 
Top