Capri 1750 Complete Restore :) & 9 Months to do it too!

Status
Not open for further replies.

dezmond

Senior Chief Petty Officer
Joined
Jul 21, 2010
Messages
760
As in more like a dome than a beveled box ? I 'could' do that, but realize with only 22" of width you may not have much space for instrumentation if you go with too many curves. Possibly, I could round off the sides a bit . . . I'll see what I can do. My 'curved surface' skills on the software that I use are not a strong point :rolleyes:

Ya. Domed on the top and a nice arc to the back from the front.
 

tpenfield

Moderator
Staff member
Joined
Jul 18, 2011
Messages
17,711
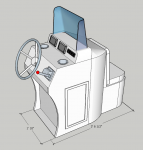
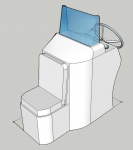
This is about the best I can do . . . rounded the edges and re-tapered the portion in front of the windshield.
.
CC2C.png
.
CC1C.png
.
This was good practice for me in working with curves shapes. :)

I think you could start out with a basic design 'on paper' and then add curved shapes as you fabricate it.
 

tpenfield

Moderator
Staff member
Joined
Jul 18, 2011
Messages
17,711
I like Mad Props design, :thumb: particularly if you are going to have an aluminum tube supported windshield. Definitely would have to do a plug and mold with those curves.
 

Redtruck12

Petty Officer 1st Class
Joined
Jan 25, 2018
Messages
344
Can’t help much with the design partDez but if you willing to go for a bit of a drive there’s a couple boat salvage places in the Barrie area
Sandy Cove in Innisville would likely be the biggest
Inland in Georgina would be worth a look as well
a bit farther there is Kawartha Marine in Bobcaygoen
 

dezmond

Senior Chief Petty Officer
Joined
Jul 21, 2010
Messages
760
K. Here’s the plan. I’m going to use all 3 designs in someway or another. tpenfield could you send me some dimensions on your final model you did? Different heights length width and over length? That would help me a ton to get the ball rolling. I owe you guys a ton! Thank you so much for helping me out. Now let’s make these ideas into a real console :)
 

tpenfield

Moderator
Staff member
Joined
Jul 18, 2011
Messages
17,711
K. Here’s the plan. I’m going to use all 3 designs in someway or another. tpenfield could you send me some dimensions on your final model you did? Different heights length width and over length? That would help me a ton to get the ball rolling. I owe you guys a ton! Thank you so much for helping me out. Now let’s make these ideas into a real console :)

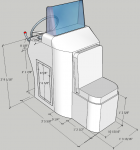
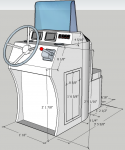
The dimensions (foot print 22" x 42" ) were in the images, but I can add more dimensions, if that is what you are looking for. I would adjust them to your liking though . . .
 

tpenfield

Moderator
Staff member
Joined
Jul 18, 2011
Messages
17,711
Here are a couple of pictures with a bunch of dimensions. Feel free to round-off as needed.

CC2D.png
.
CC1D.png
.
 

Scott Danforth

Grumpy Vintage Moderator still playing with boats
Staff member
Joined
Jul 23, 2011
Messages
47,551
I would make the kick plate removable for access and leave the sides smooth.
 

dezmond

Senior Chief Petty Officer
Joined
Jul 21, 2010
Messages
760
Hey Everyone :)

Looooooooong overdue for an update and pics. Sorry been busy with RV Trade Shows and at the shop the last couple of weeks. BUT I did get lot's done on the boat and console over the last week and this weekend.

I took the design that tpenfield drew up and started to make the framework. Cut my base template first out of paper so I can get an idea and also something symmetrical to cut from.


Then cut it out of 1/2 Fir and cut my notches for my sticks. Sliced up some 1/2 sticks and sat down and started to put things together.


Also cut out my main console area and added those as well. Looking pretty good so far ;)

Then on to the cockpit area. Was a little more work back here to get the right angles and such but I figured it out. Front seat back is in as well.


Then the fun part. The dash ;) I took everything I could think I was putting on there and made cutouts to figure out how big I needed to go. Then I cut out the contour of the dash and laid out the templates to figure out where to put things...


All looks good so I grabbed the hole saws and cut away.. Did a temp fit on the gauges and voila!! That's where I am at today... I like what I see.


So next will be fastening the dash to the console somehow and then wrapping stretchy cloth on the top to get the shapes I am looking for. The main body of the console can be skinned with 1/8 ply I figure and then I will glass over that.

Sooooooooo.. Any input? Advice? Suggestions? Feedback?

Oh ya... I just gotta figure out where to put my switches, radio and Marine Radio... I'm sure I will find somewhere ;)

Thanks again guys for all the help ;)
 

Mechanicalmike08

Petty Officer 1st Class
Joined
Aug 29, 2018
Messages
308
That's looks pretty sweet. I would add some supports to the seat area to carry the load of a person. Just doesn't look like much from the pics.

you could add two bump outs on the lower section like under the tach and speedo for the switches. That way there a little closer to you and add some pizazz to the top.
 

tpenfield

Moderator
Staff member
Joined
Jul 18, 2011
Messages
17,711
Your woodworking skills are very impressive. I like how you did the instrumentation layout. :thumb:
 

Scott Danforth

Grumpy Vintage Moderator still playing with boats
Staff member
Joined
Jul 23, 2011
Messages
47,551
plenty of room for switches under the gauges as well as room for cup holders
 
Status
Not open for further replies.
Top